User Guide
Introduction
The Profile Management Tool (PMT) is a web application to edit application schema profiles.
Application schemas define conceptual models relevant for one or more applications. Typically, UML is chosen as the conceptual schema language, so the conceptual model contains packages, classes, relationships between classes (via associations and inheritance relationships) as well as attributes. Profiles of an application schema can be created to tailor the schema to the needs of a particular application.
ShapeChange loads application schemas defined according to ISO 19109, and derives a number of implementation schemas, for example XML Schemas, DDL schemas, ArcGIS workspaces and documentation. While processing an application schema, ShapeChange can also create a profile of this schema.
However, defining a consistent profile can be a complex task. That is where the Profile Management Tool comes into play. The PMT can load application schemas that have been exported by ShapeChange (via the Model Export target). The user can then use the PMT to edit profiles. The PMT provides a number of features to support the user in this task. For example, when setting the profile of a class, the PMT automatically sets profiles of related model elements (more information can be found in the user guide). The PMT also continuously checks the consistency of the profile that is being edited. When a profile has been defined, it can be exported by the PMT and loaded by ShapeChange.
Account management
The user management of the PMT is very basic at the moment. A user signs up and logs in by simply providing his user id. This basic kind of user account management supports assigning any imported model file to a specific user.
| To protect a user account, the user id should be kept secret. |
Signing up
When the PMT is opened in the browser, a combined Login and Sign up form is displayed.
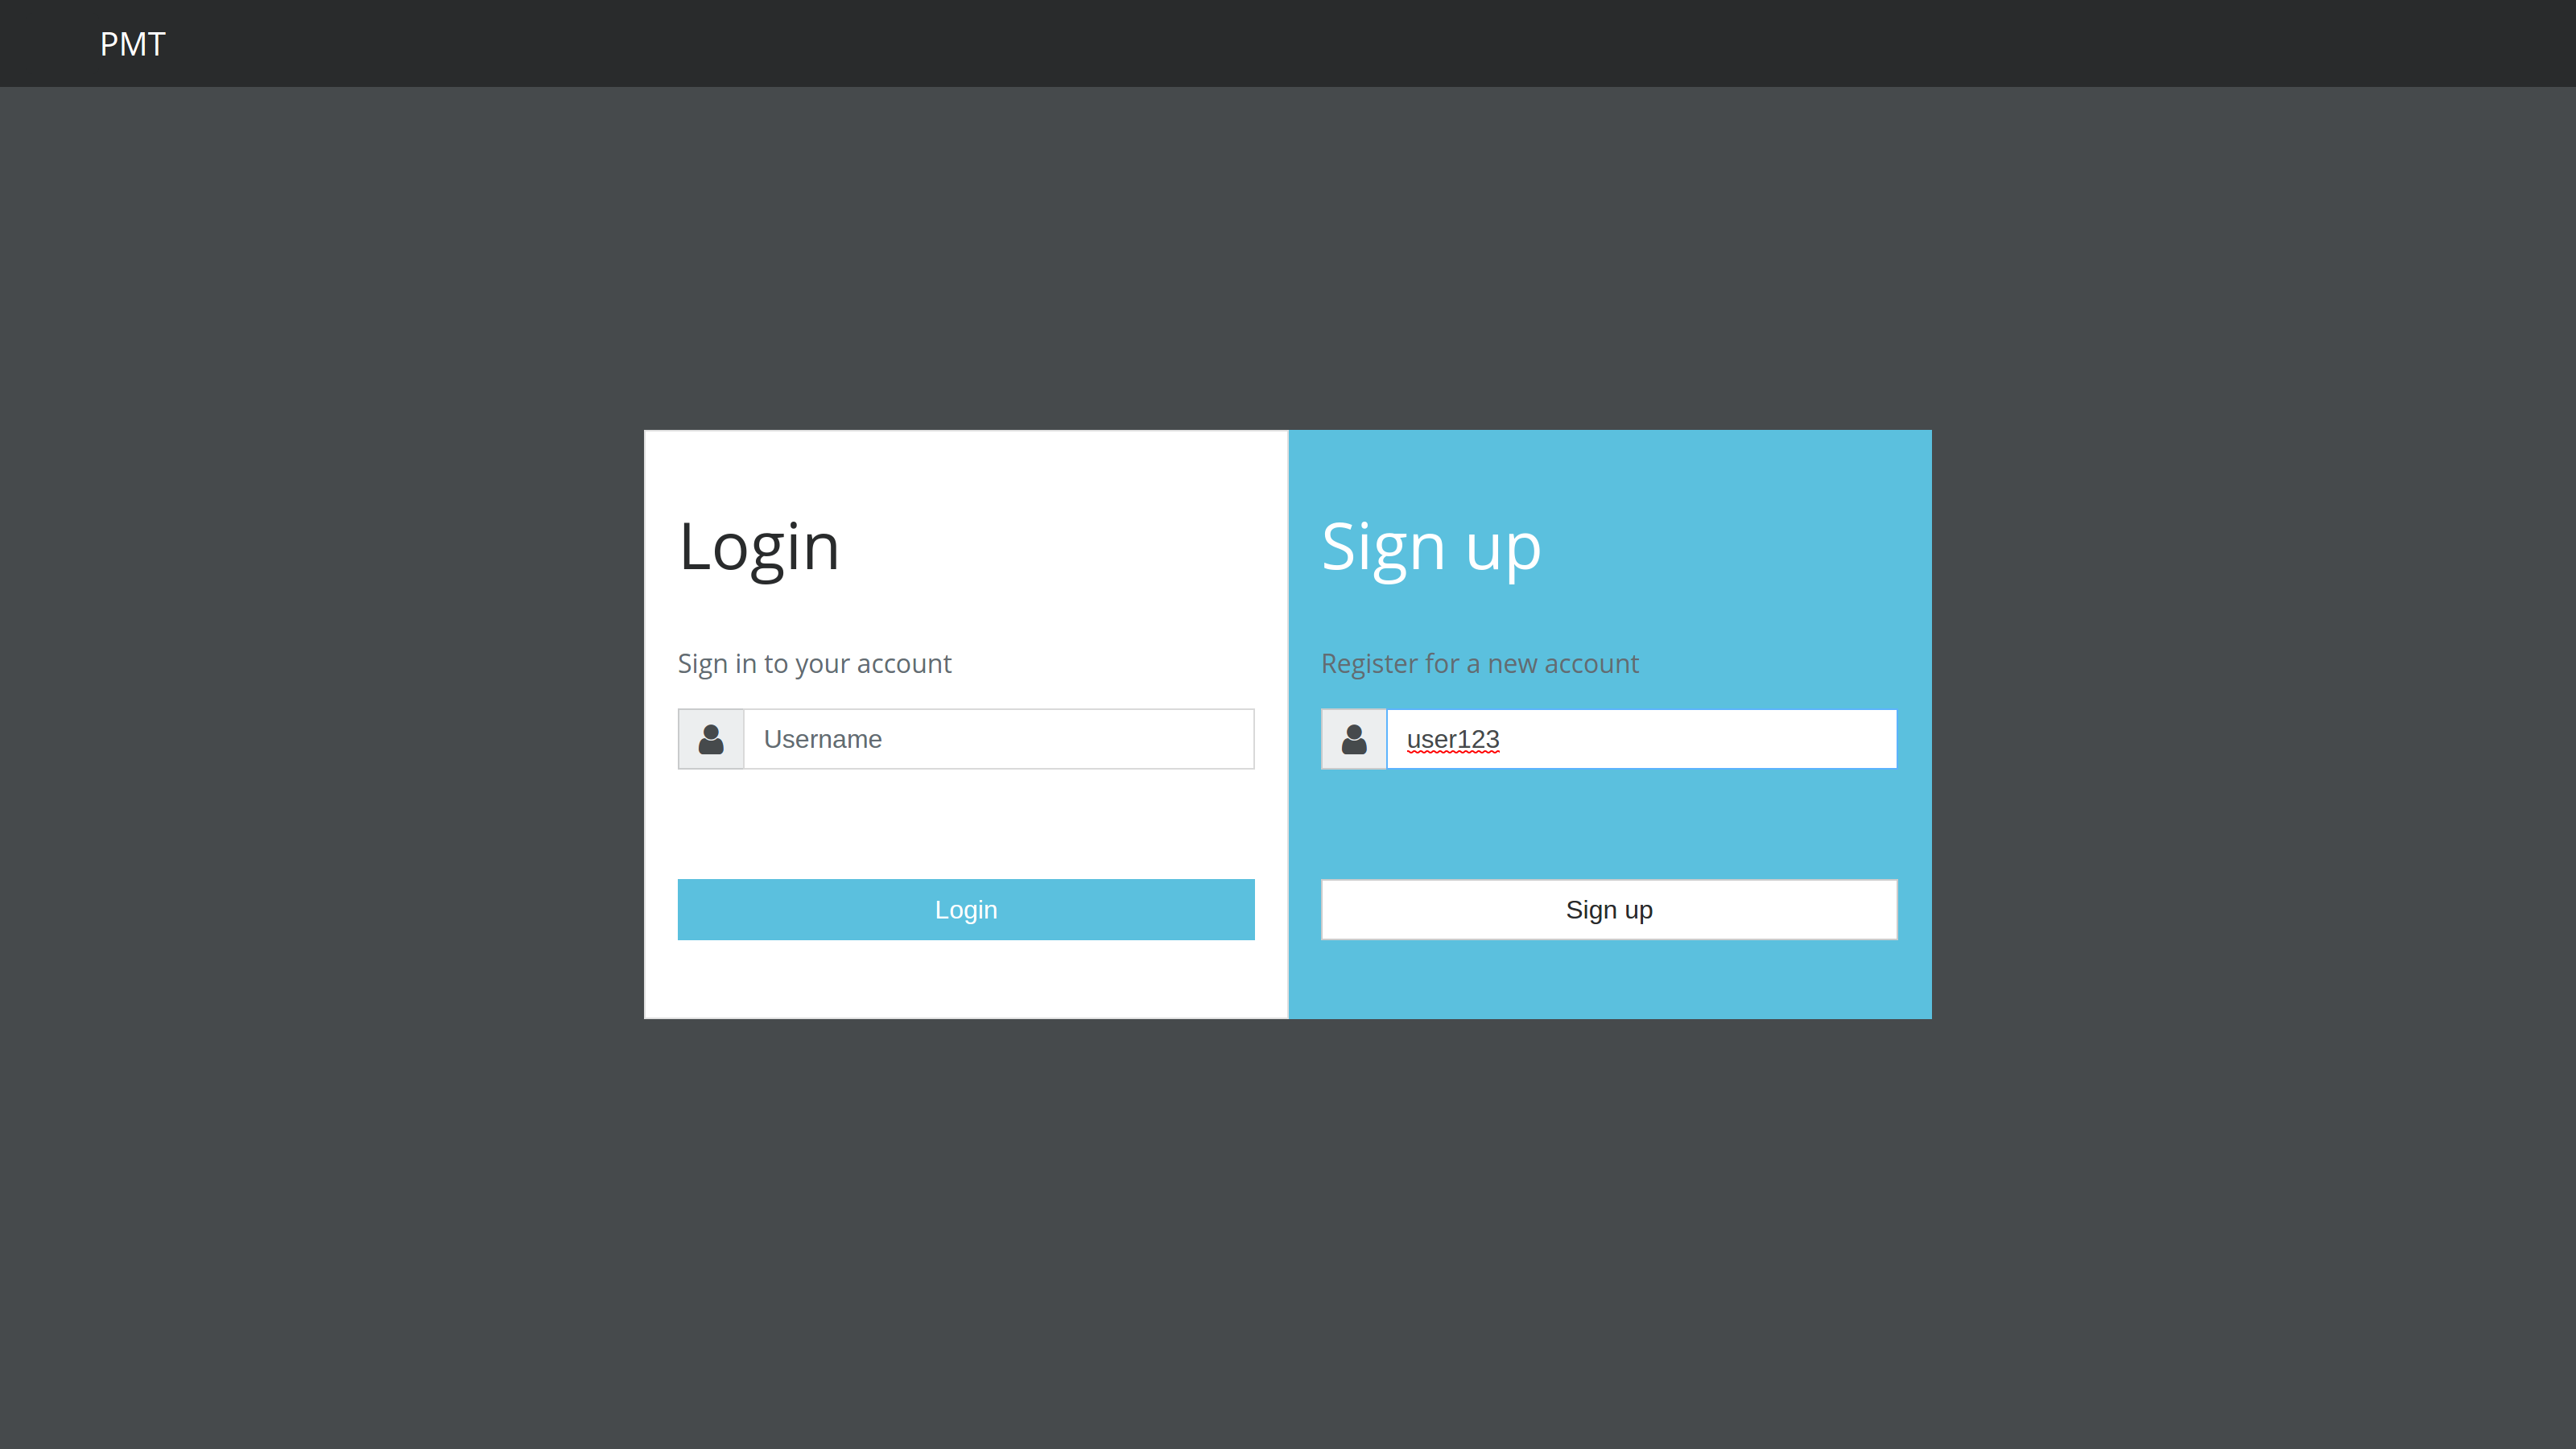
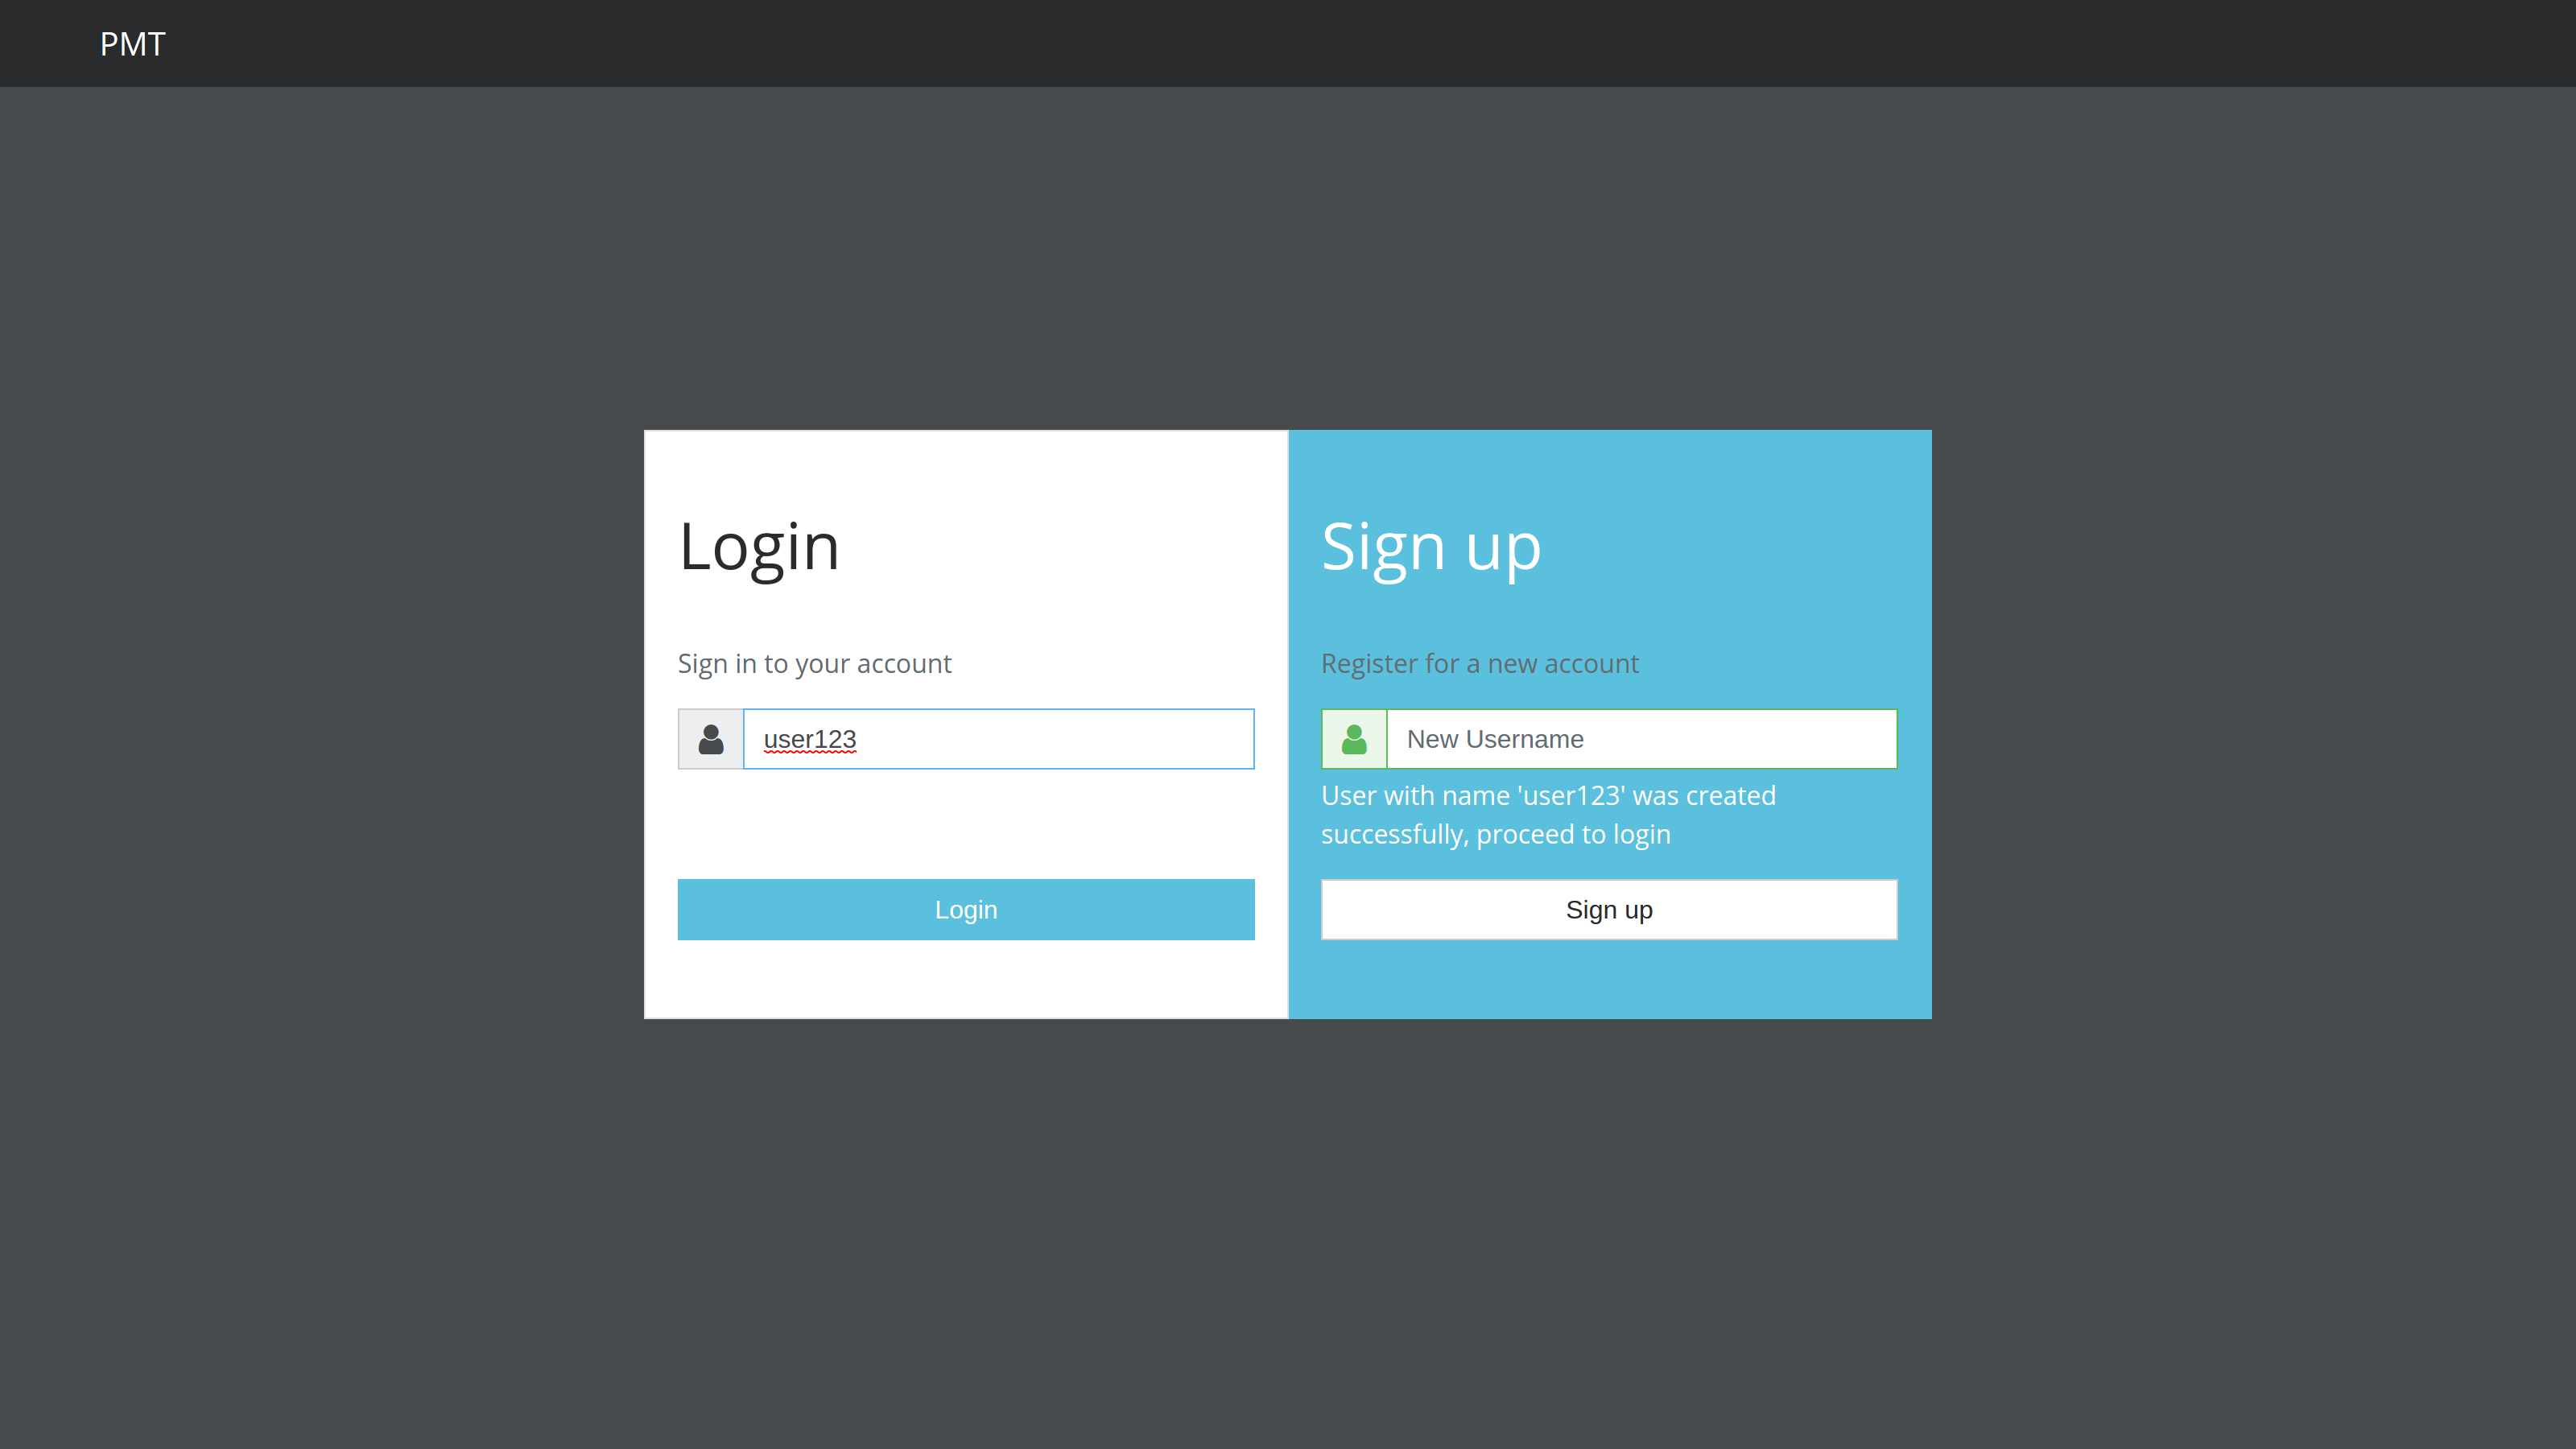
To sign up, simply provide your desired user id on the right, then press Enter or click on Register. If the id is already taken, an according message will be displayed. When the registration succeeded, you can proceed to log in.
Logging in
To log in, provide your user id on the left of the combined Login and Sign up form. Then press Enter or click on Login. If the login succeeds, you will be redirected to the Menu if this was your first login, otherwise the Model Browser.
Logging out
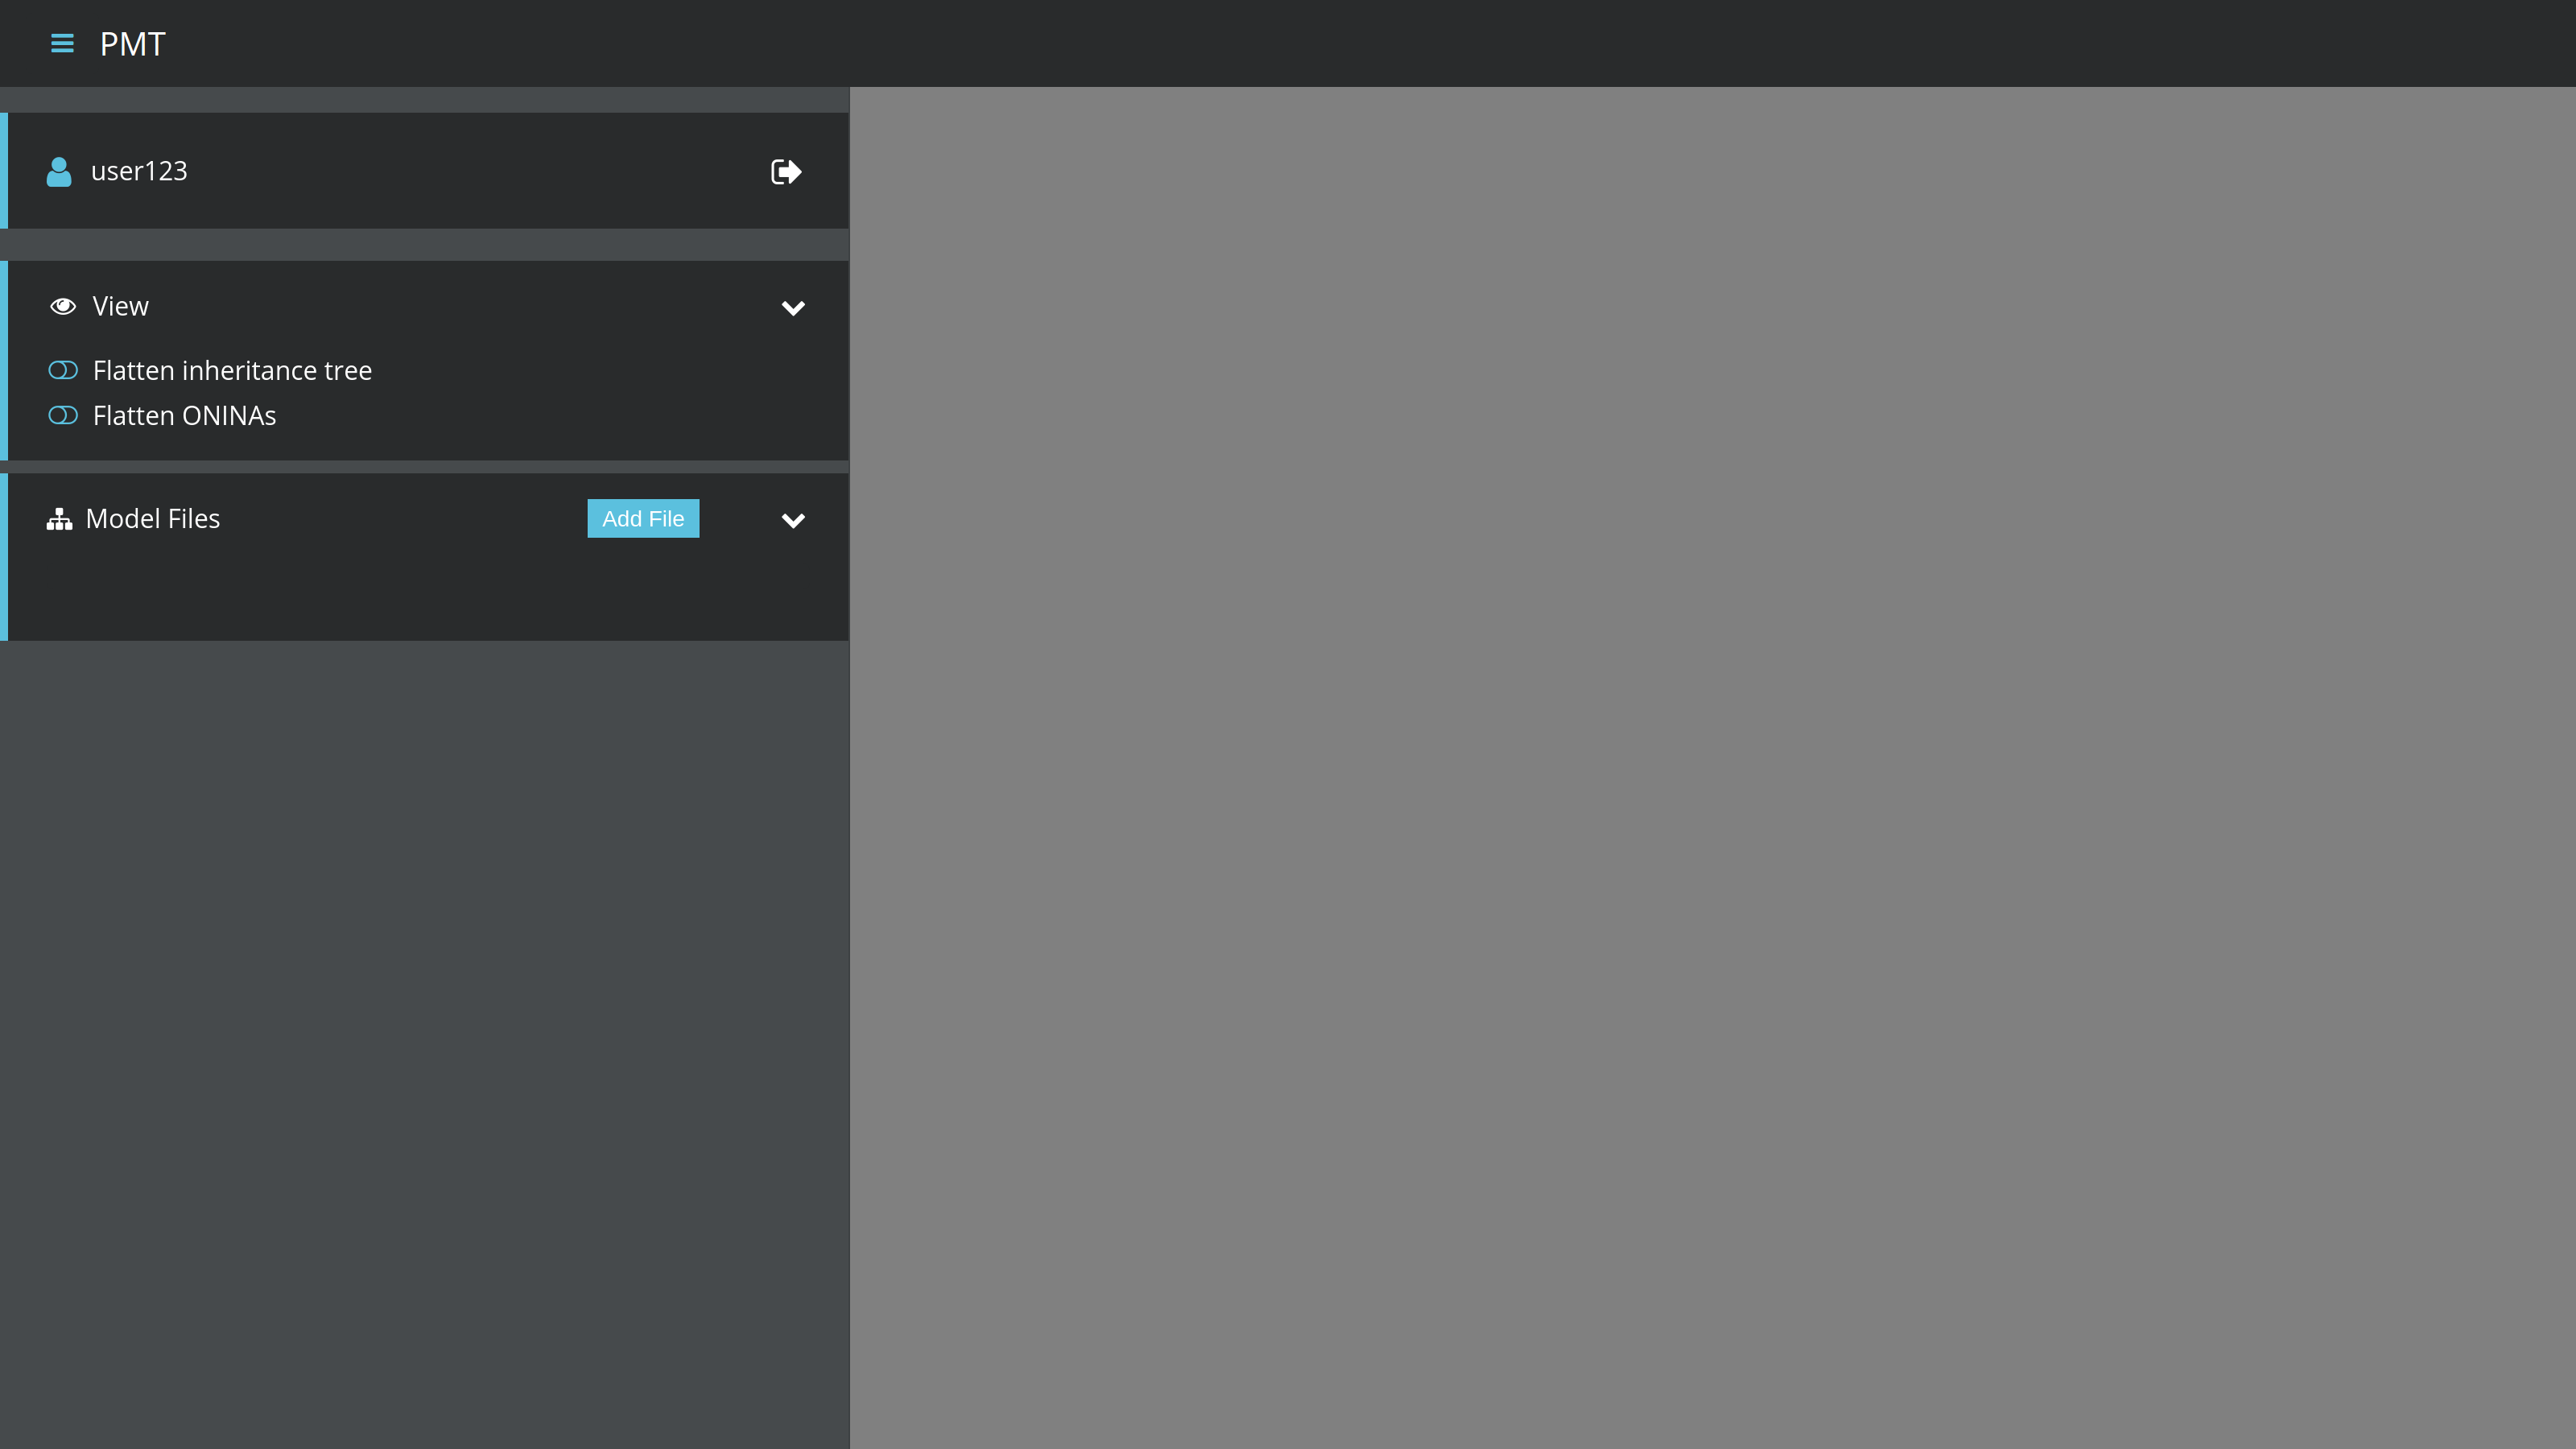
The menu displays your user id and a logout link. The logout link will take you back to the Login.
| Logging out is not required. You can simply close your browser. The PMT will return to where you left when you re-open it in the same browser. |
Multi-Login
The PMT can be accessed via multiple browser windows at the same time, with the same user account. If you open multiple tabs in the same browser, you will only need to log in once.
Accessing the menu
The menu of the PMT can be opened by clicking on the icon in the top left corner. To close the menu, simply click on the icon again or click somewhere in the space to the right of the menu.
Model Views
The PMT supports special model views. They are listed in the menu, with buttons to enable or disable them.
| Multiple model views can be enabled at the same time. |
Flatten inheritance
This view flattens some aspects of class inheritance. Abstract classes and information about superclasses and subclasses are hidden. The Properties pane of a class will show inherited properties, in addition to the properties that are owned by the class itself. Batch editing actions of a class will include inherited properties as well.
| If a profile editing action behaves different when this view is enabled, a yellow warning icon will be displayed to indicate it. |
Flatten ONINAs
This view will hide the special Meta and Reason classes. Whenever the type of a property P is a Meta or Reason class, the type of the value (or values) property of the Reason class will be used as the value type of property P.
Display default values
This view will show items in the info tab for classes and properties that are not set in the model, but have a default value in the SCXML schema.
Model files and profiles
The Model Files pane within the menu lists all model files that have been imported by the user.
| The model files are sorted by time of addition. The model file that was imported last will therefore appear on top. |
The pane provides controls to manage model files and profiles. Clicking on the name of a model file will open the list of its profiles.
Importing a model
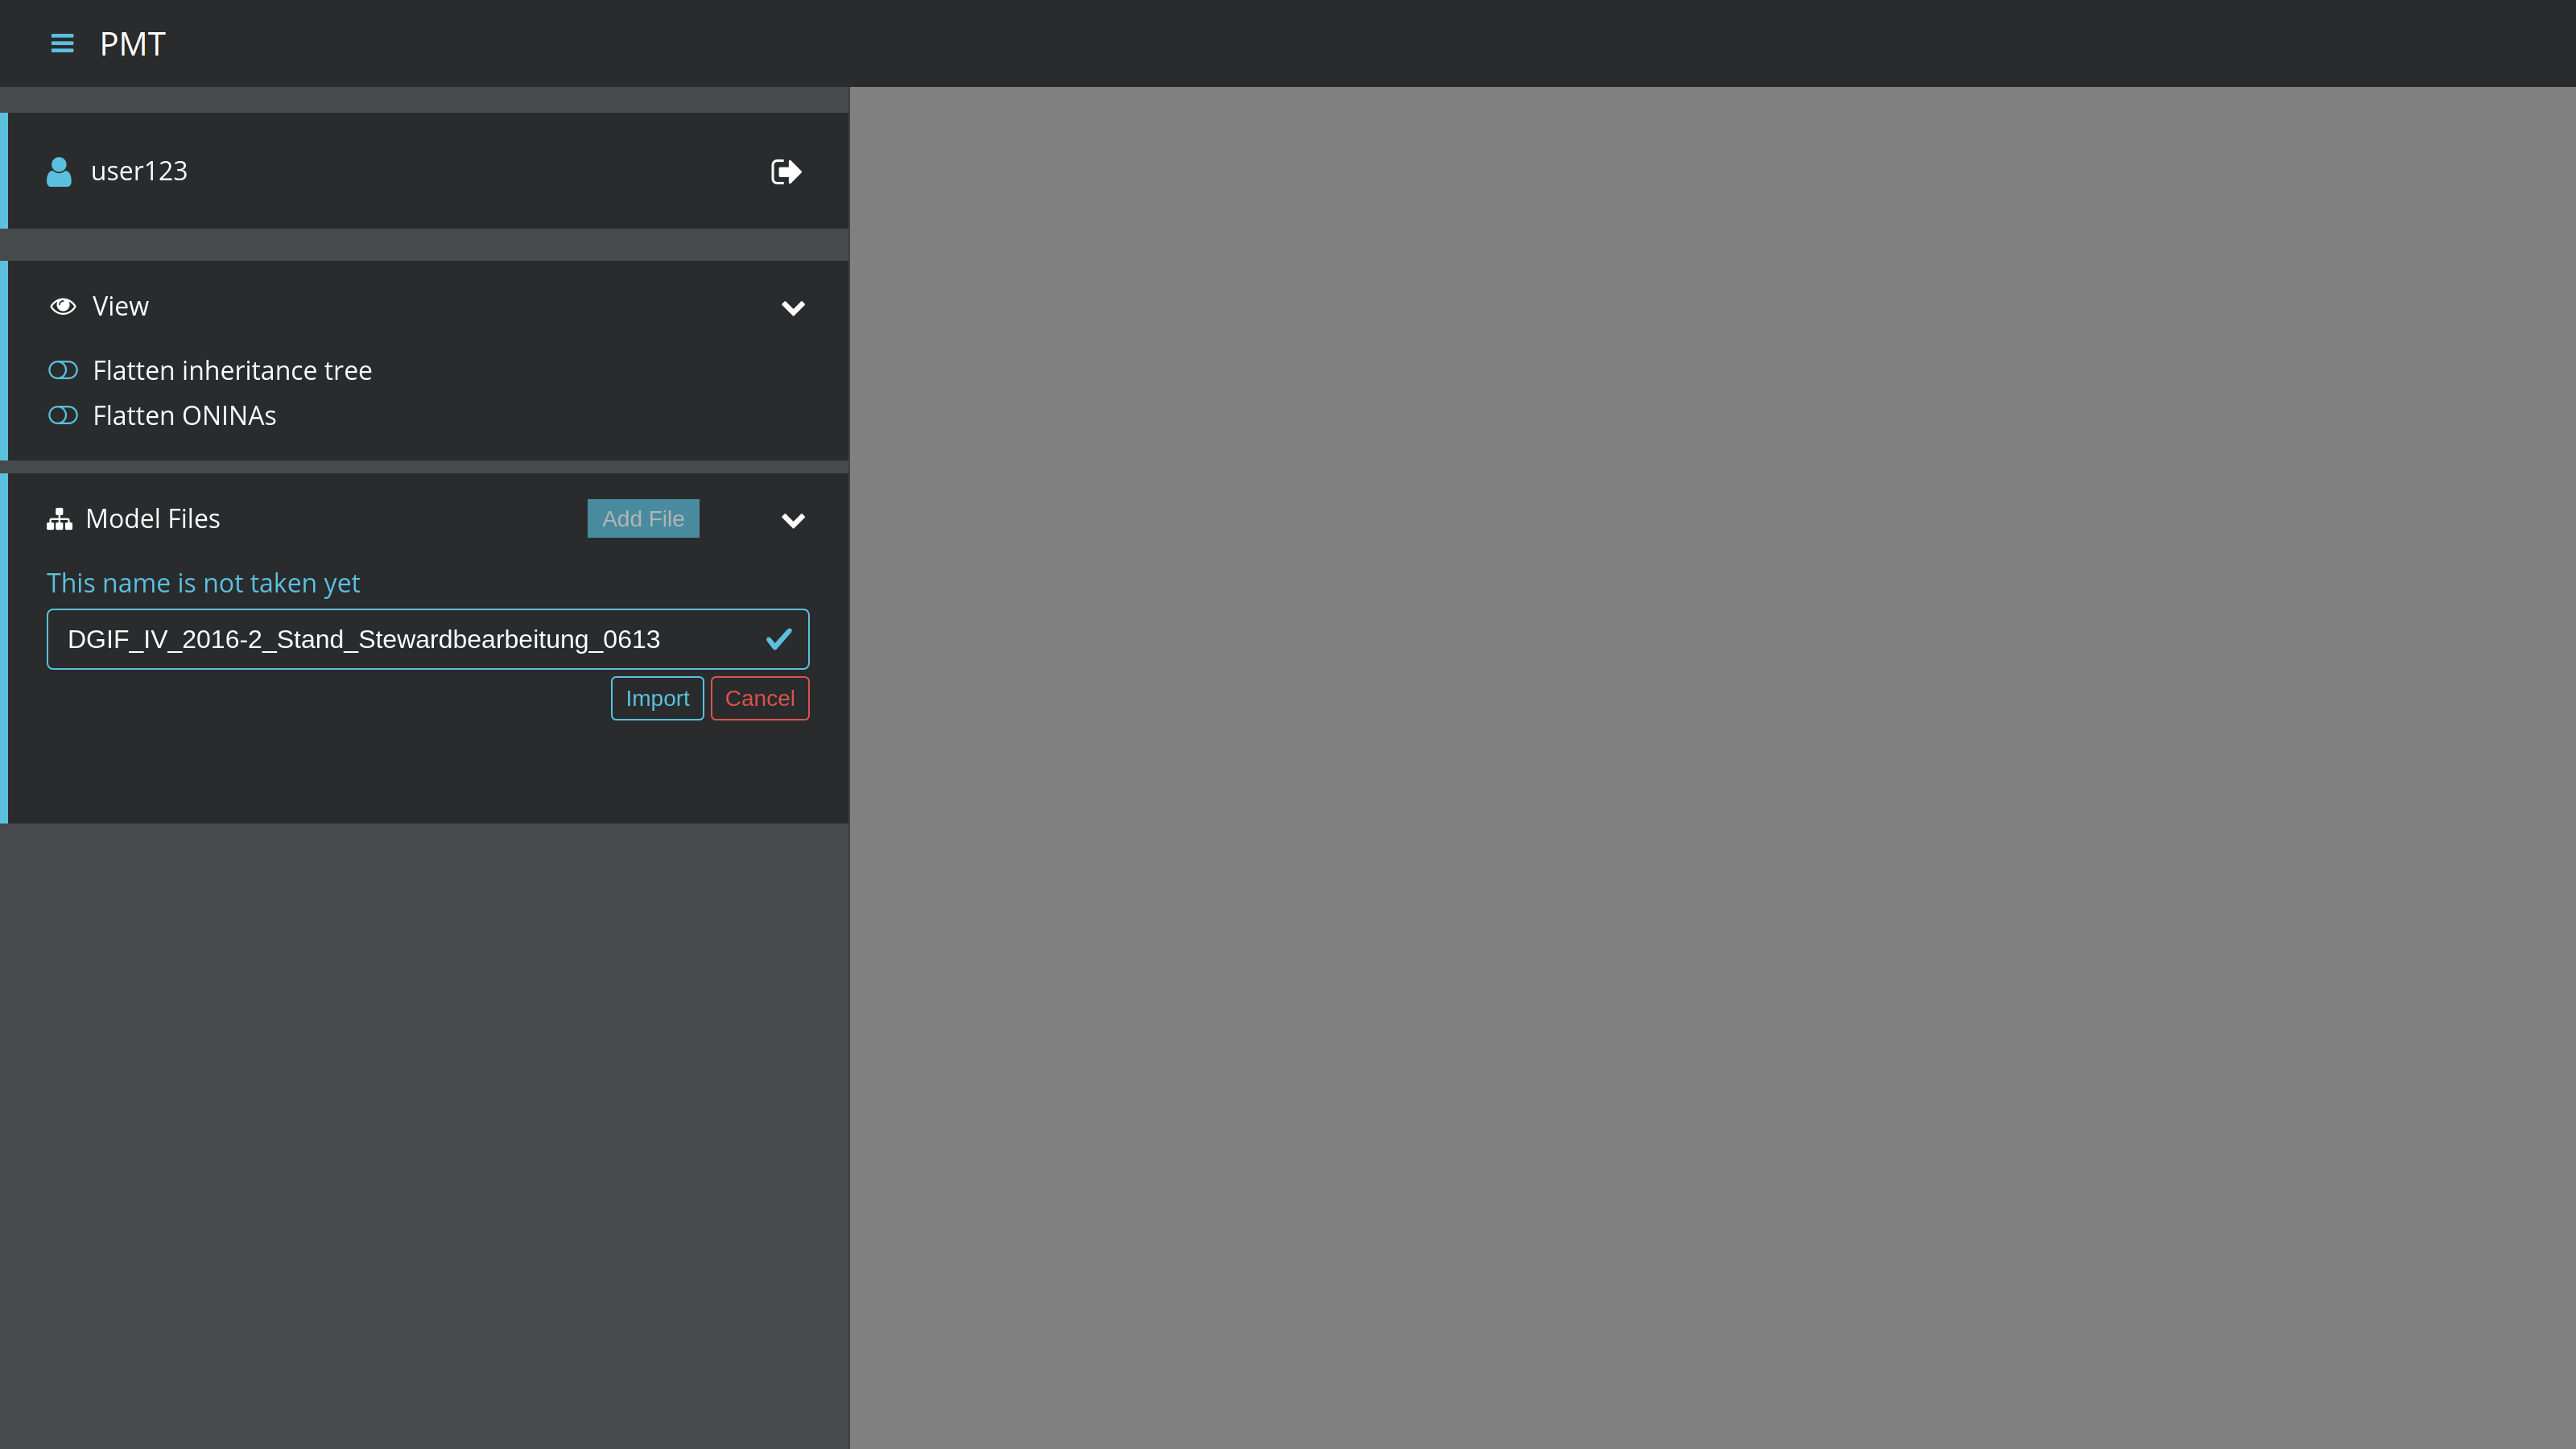
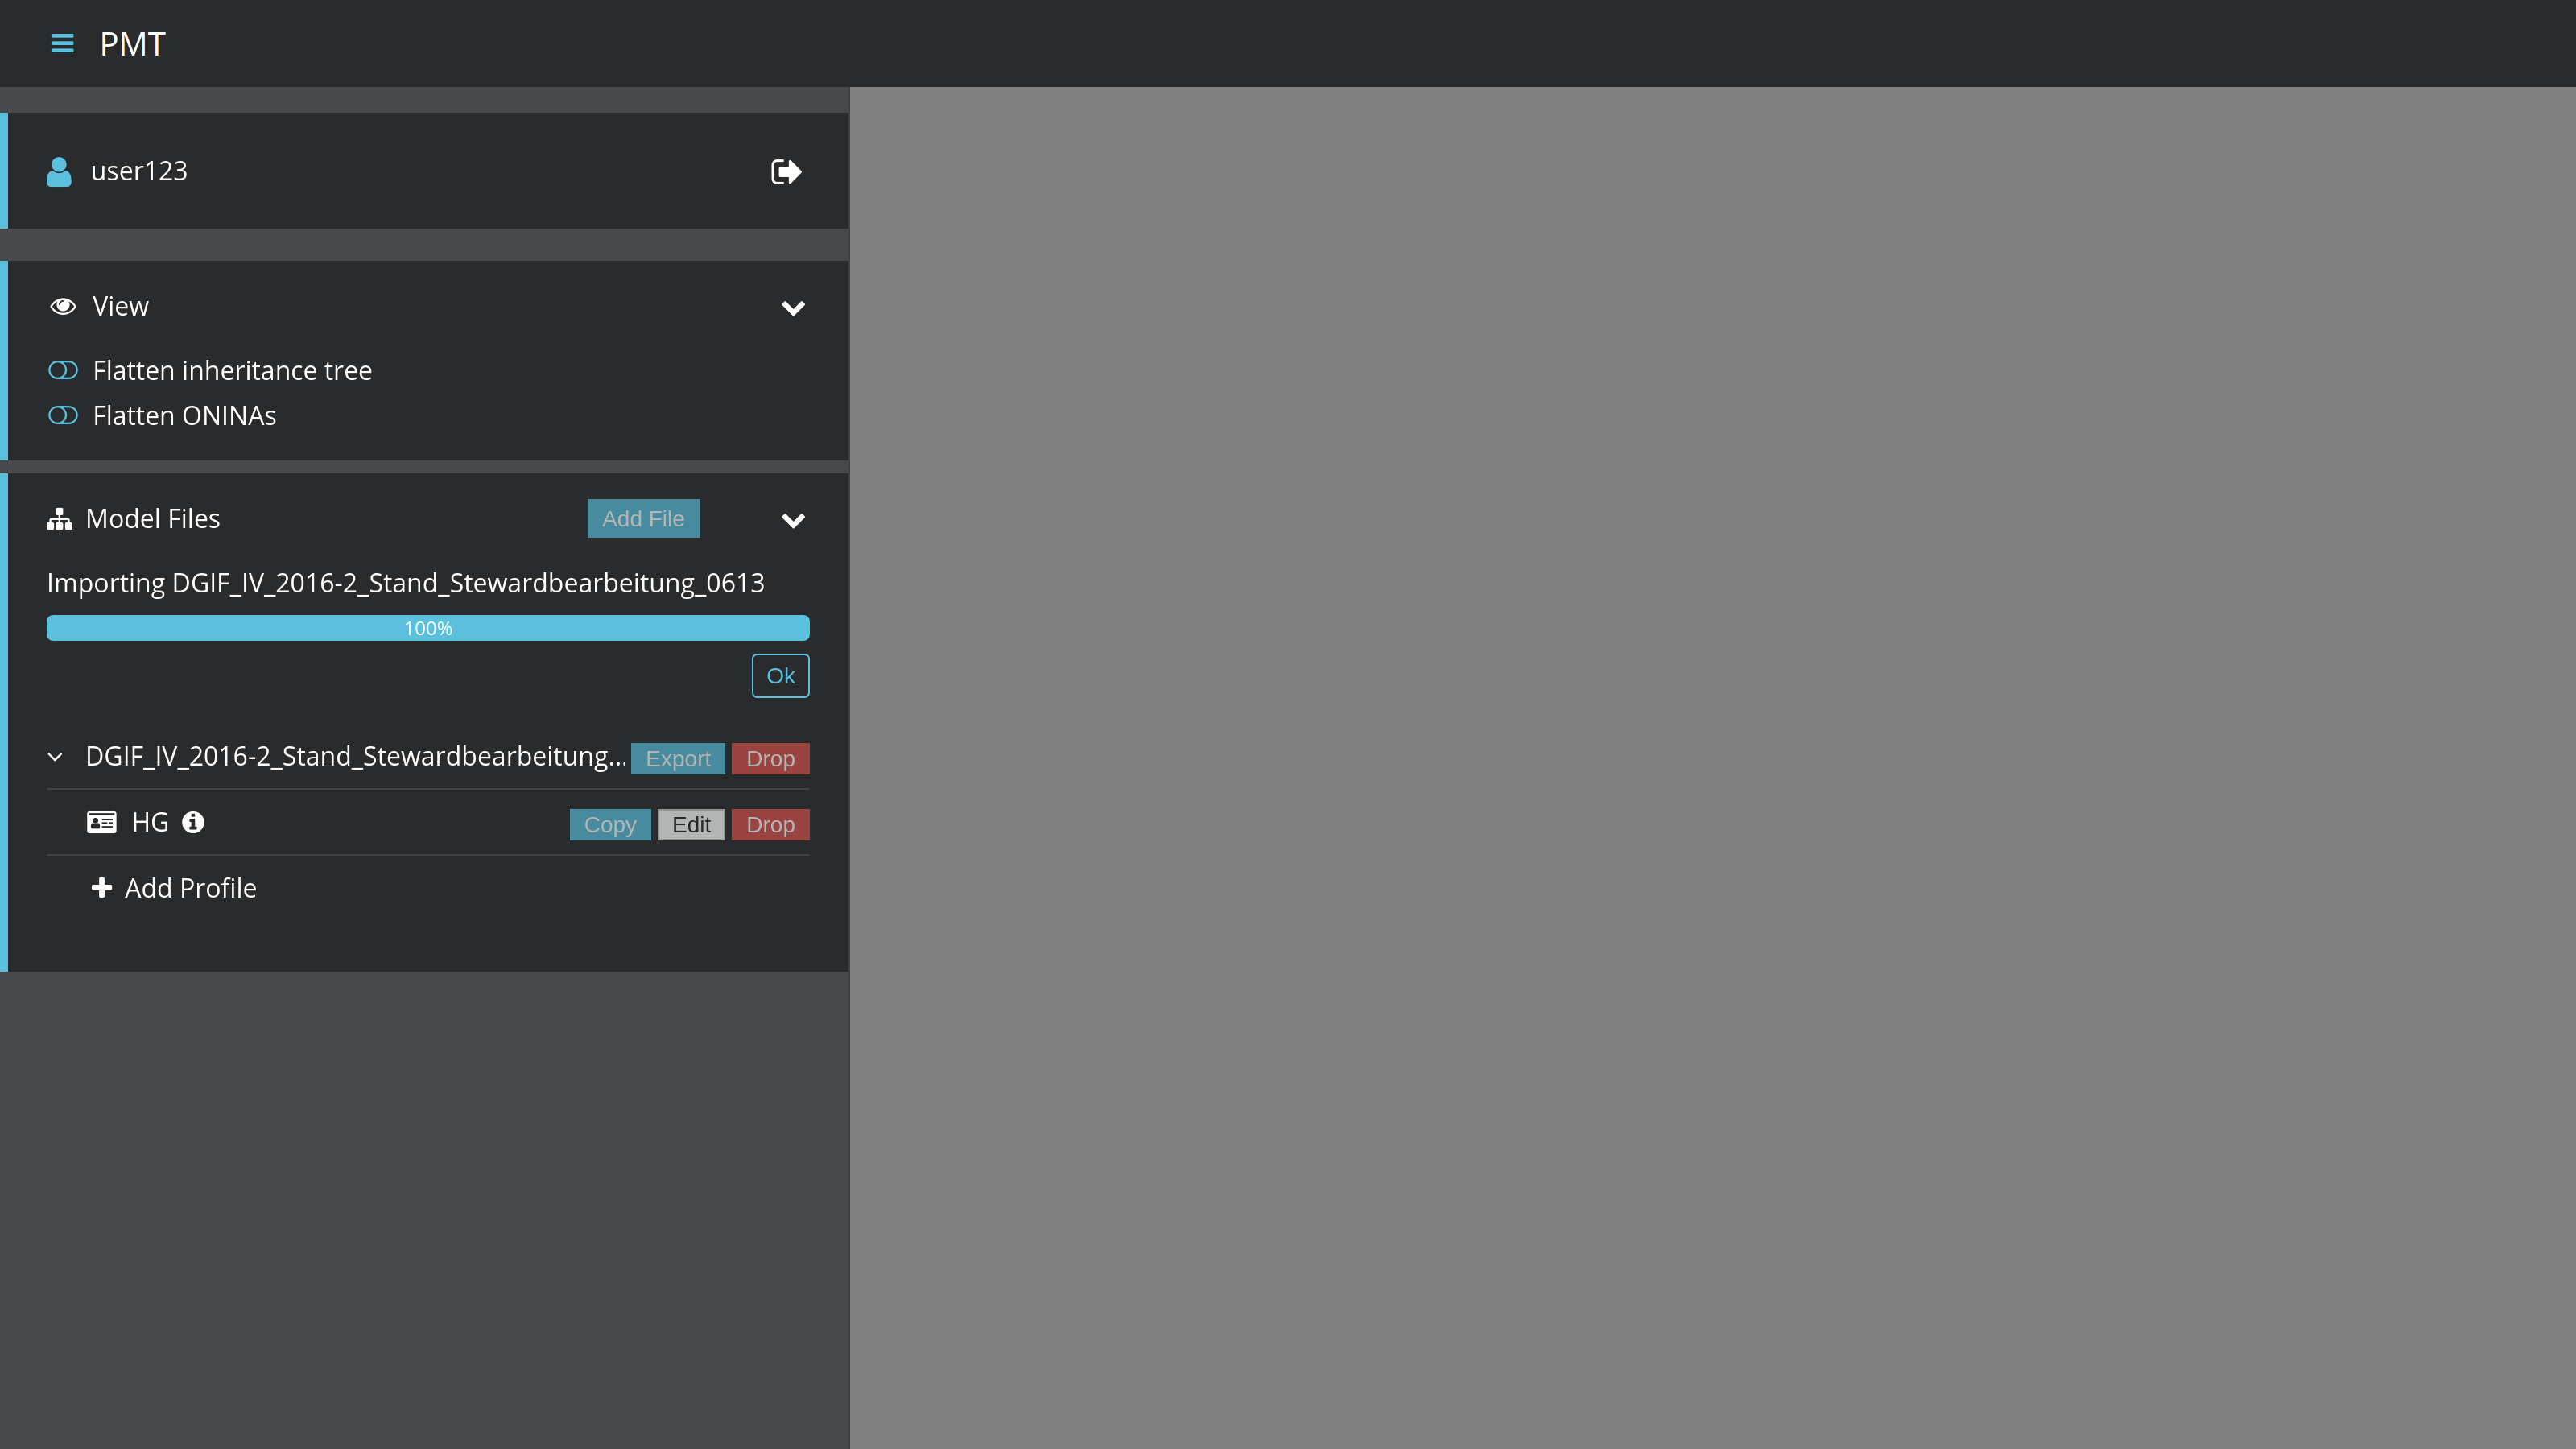
To import a model file, open the menu, click on Add file, and then choose a model file (created by ShapeChange using the ModelExport target).
| The import supports both an uncompressed XML file and a Zip archive. |
After a file has been selected, a text field with the file name will appear. You can change the name that will be used inside the PMT. If a model file with the same name already exists in the PMT, you need to change the name in the text field. When a suitable name has been chosen, click on Import.
A progress bar will be displayed, showing you the percentage of completion.
| The import of a model file may take several minutes. |
When the import is finished, the model file will appear in the list and you can dismiss the import dialog by clicking Ok.
Exporting a model
To export a model file, open the menu and click on Export next to the list entry of the model file. The export will start immediately.
A progress bar will be displayed, showing you the percentage of completion.
| The exort of a model file may take several minutes. |
When the export is complete, a Download button will appear below the progress bar. Click it to save the file locally.

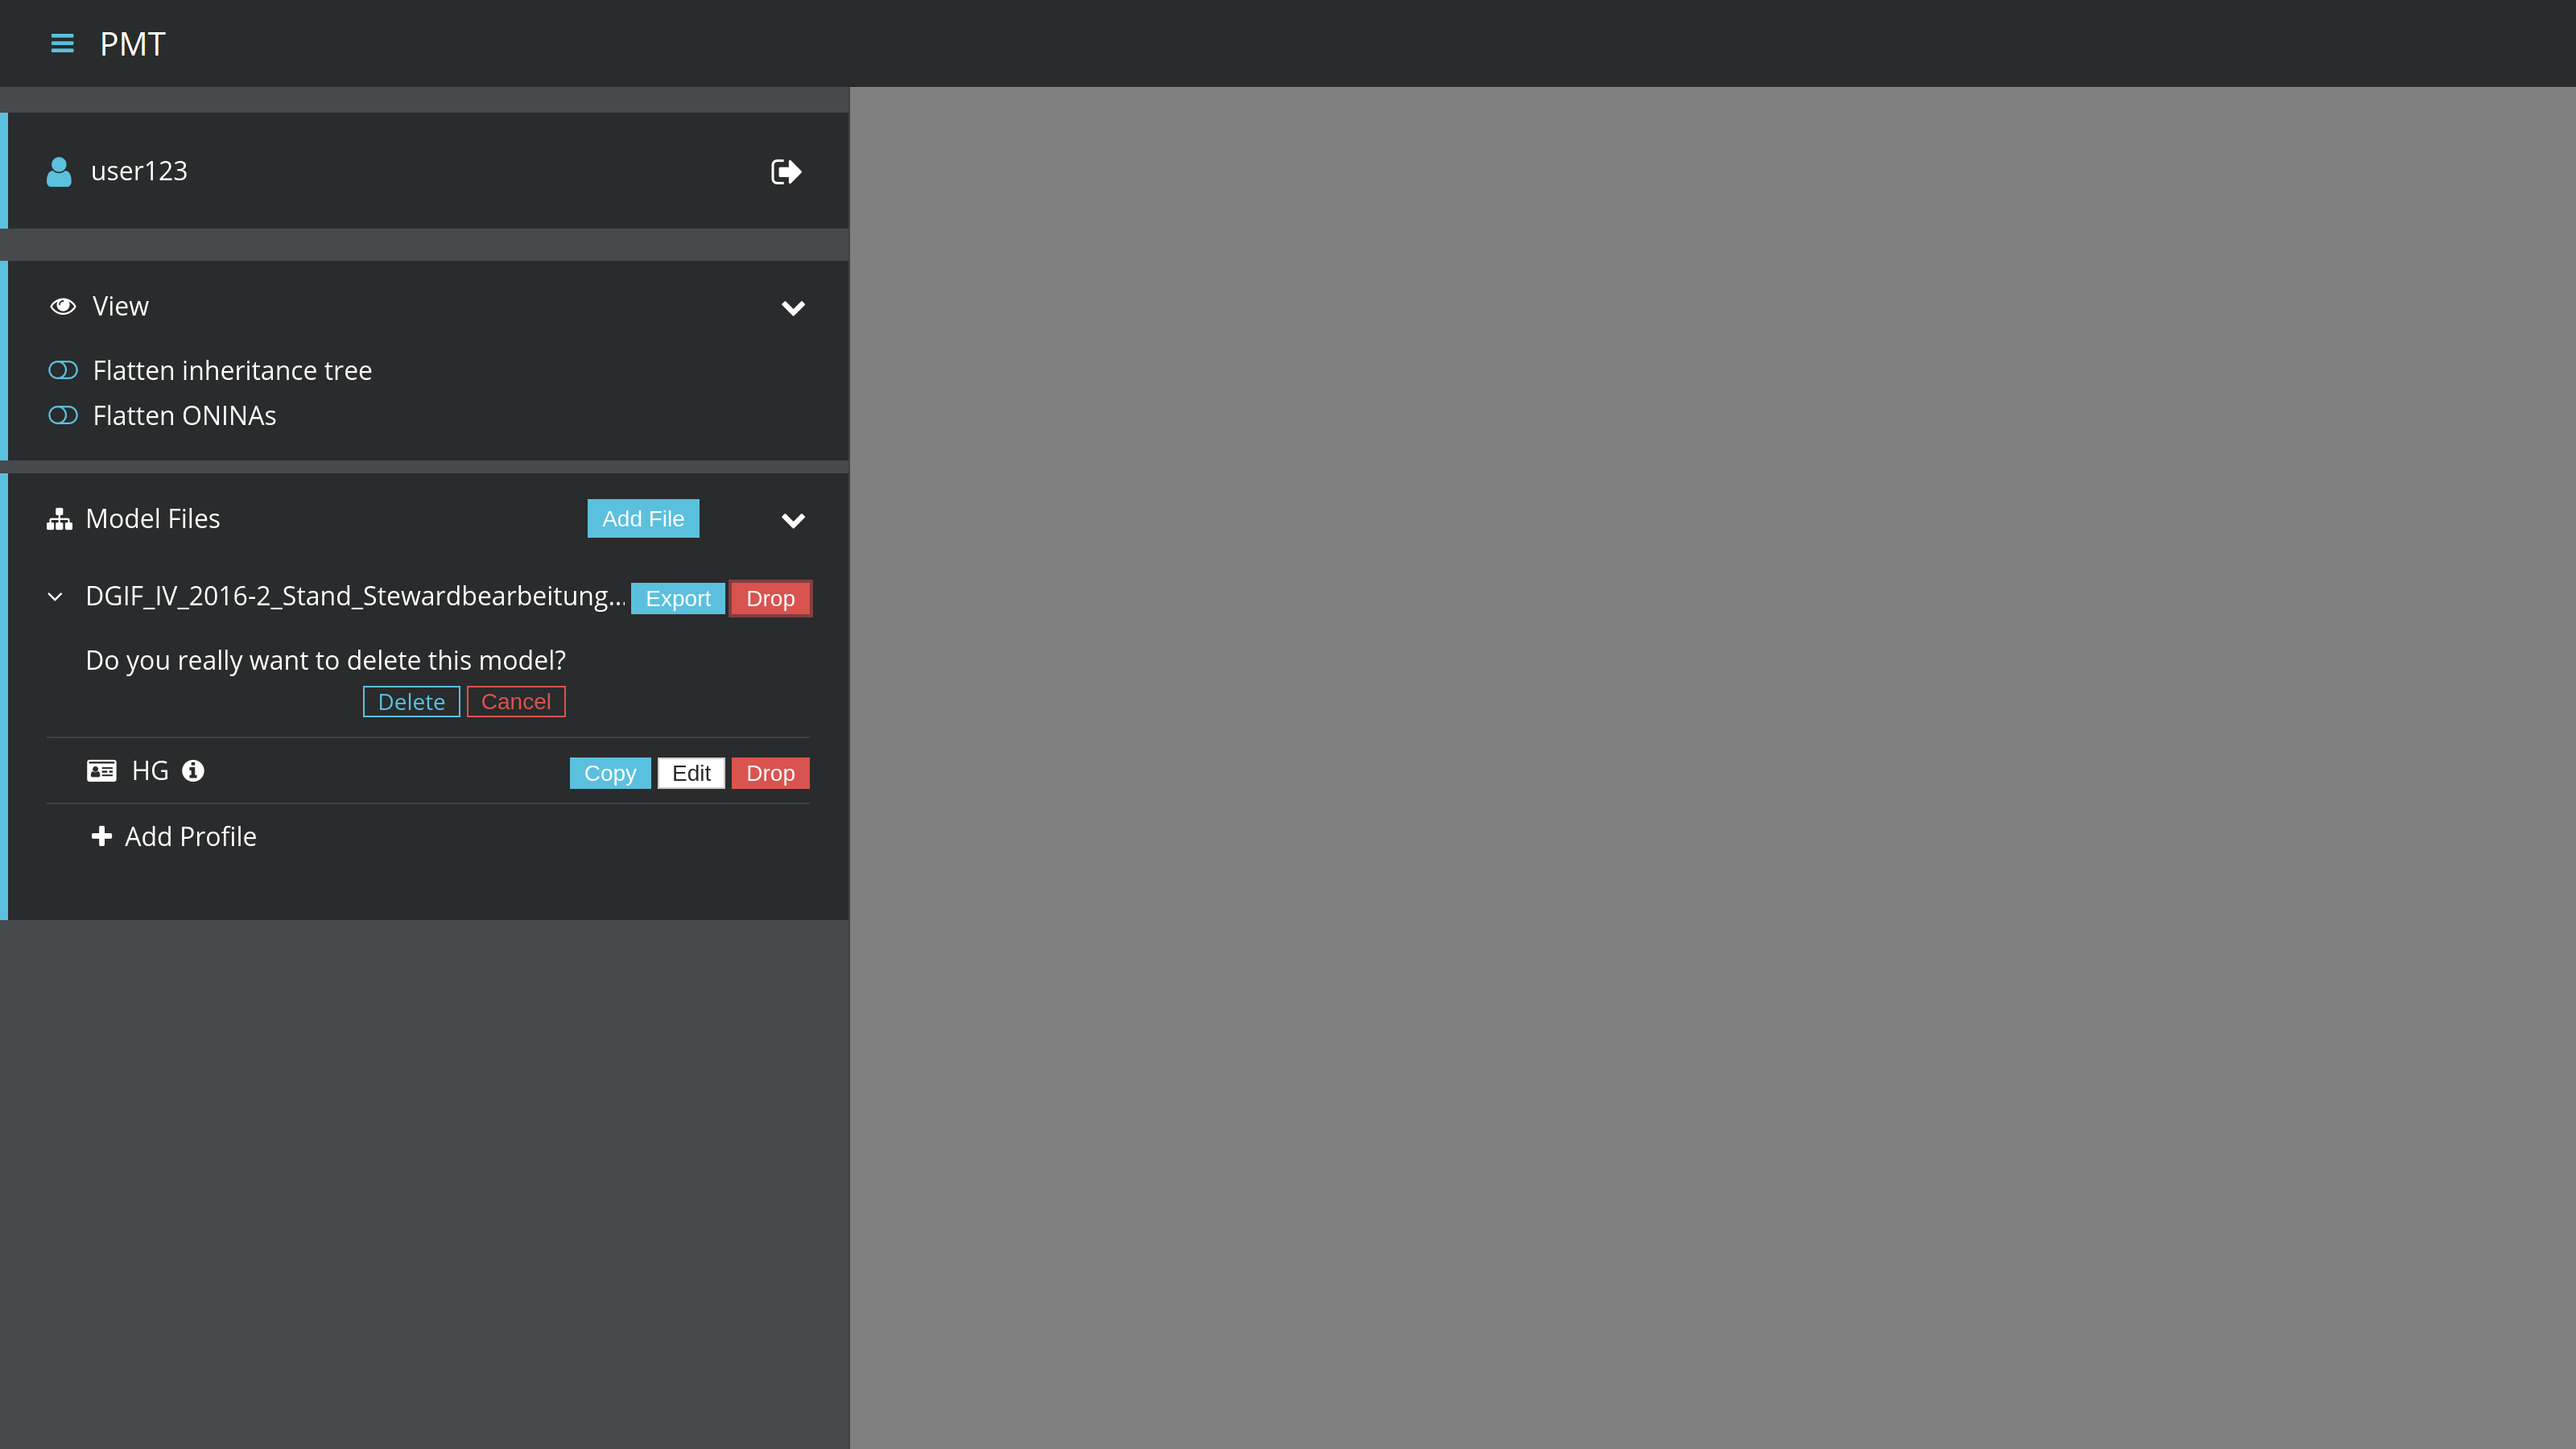
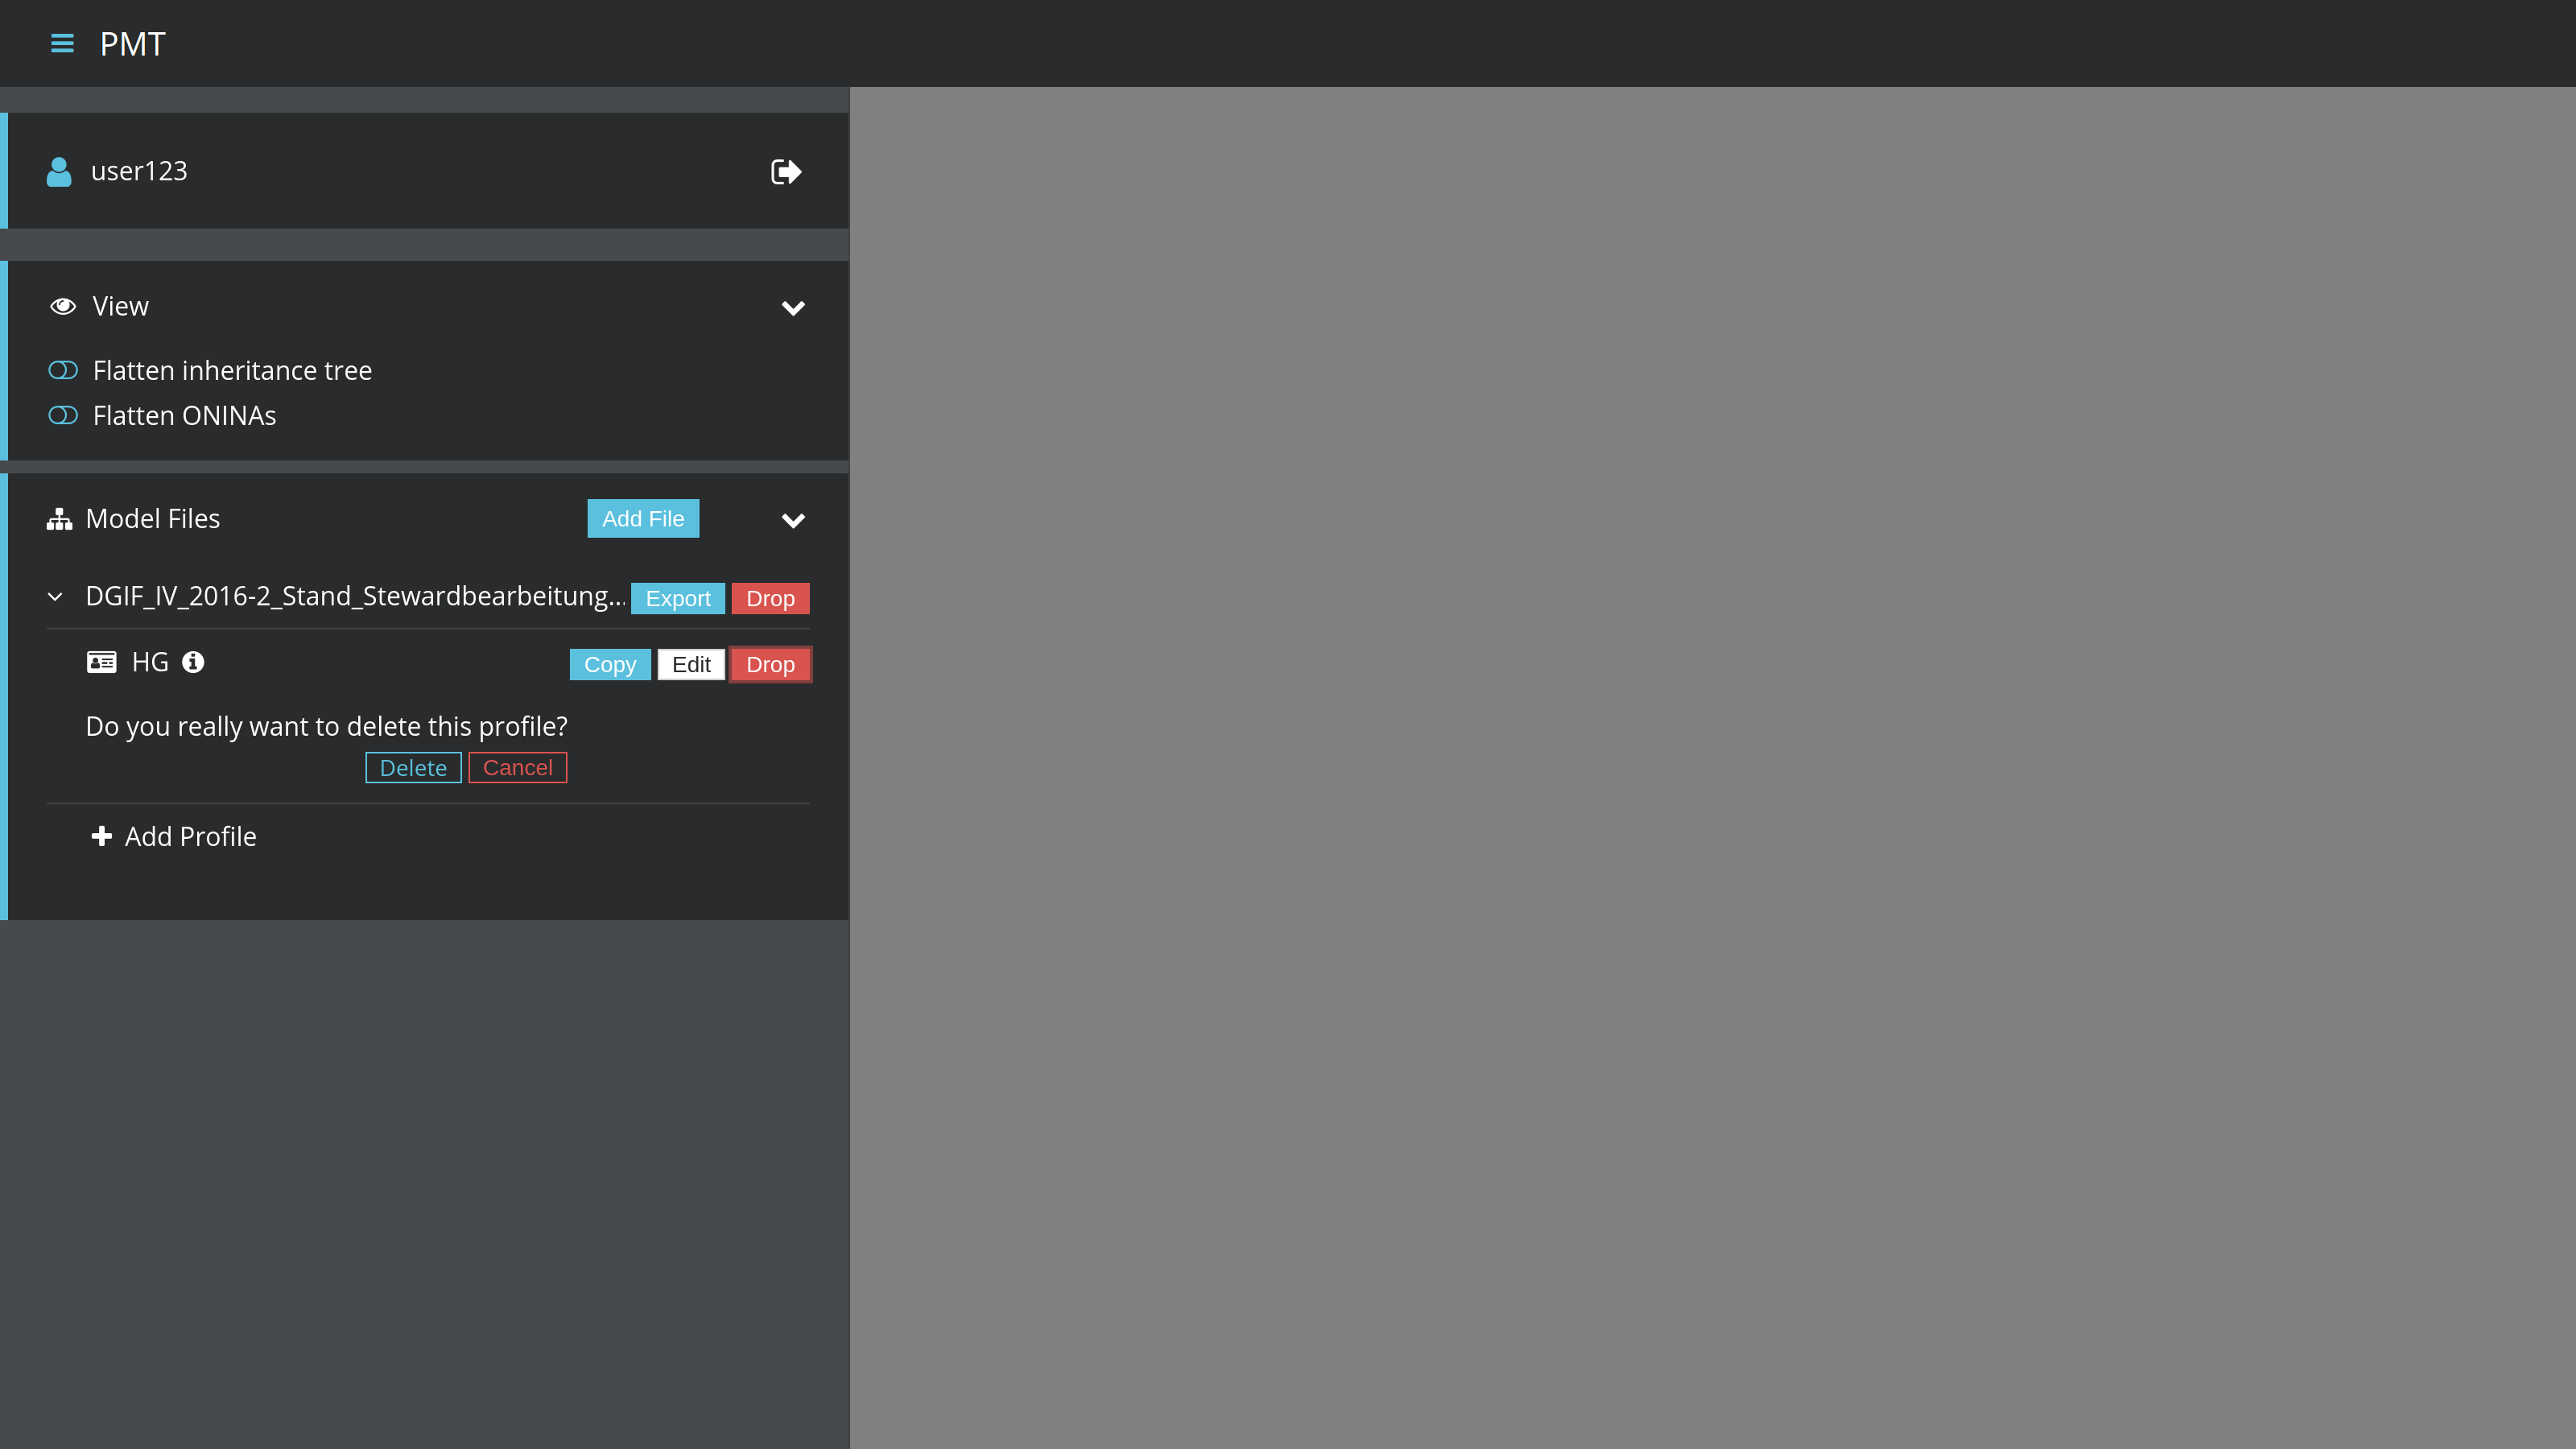
Deleting a model
To delete a model file, open the menu and click on Drop next to the list entry of the model file. A dialog will appear to request your confirmation of the deletion.
Selecting a profile
To open a profile from a specific model file in the model browser, open the menu and go to the model file. Click on the model file name if the profile list has not been opened yet. Then click on the profile you want to open. This will close the menu and show the model browser with the profile you selected. When opening the menu again, the selected model file and profile are highlighted.
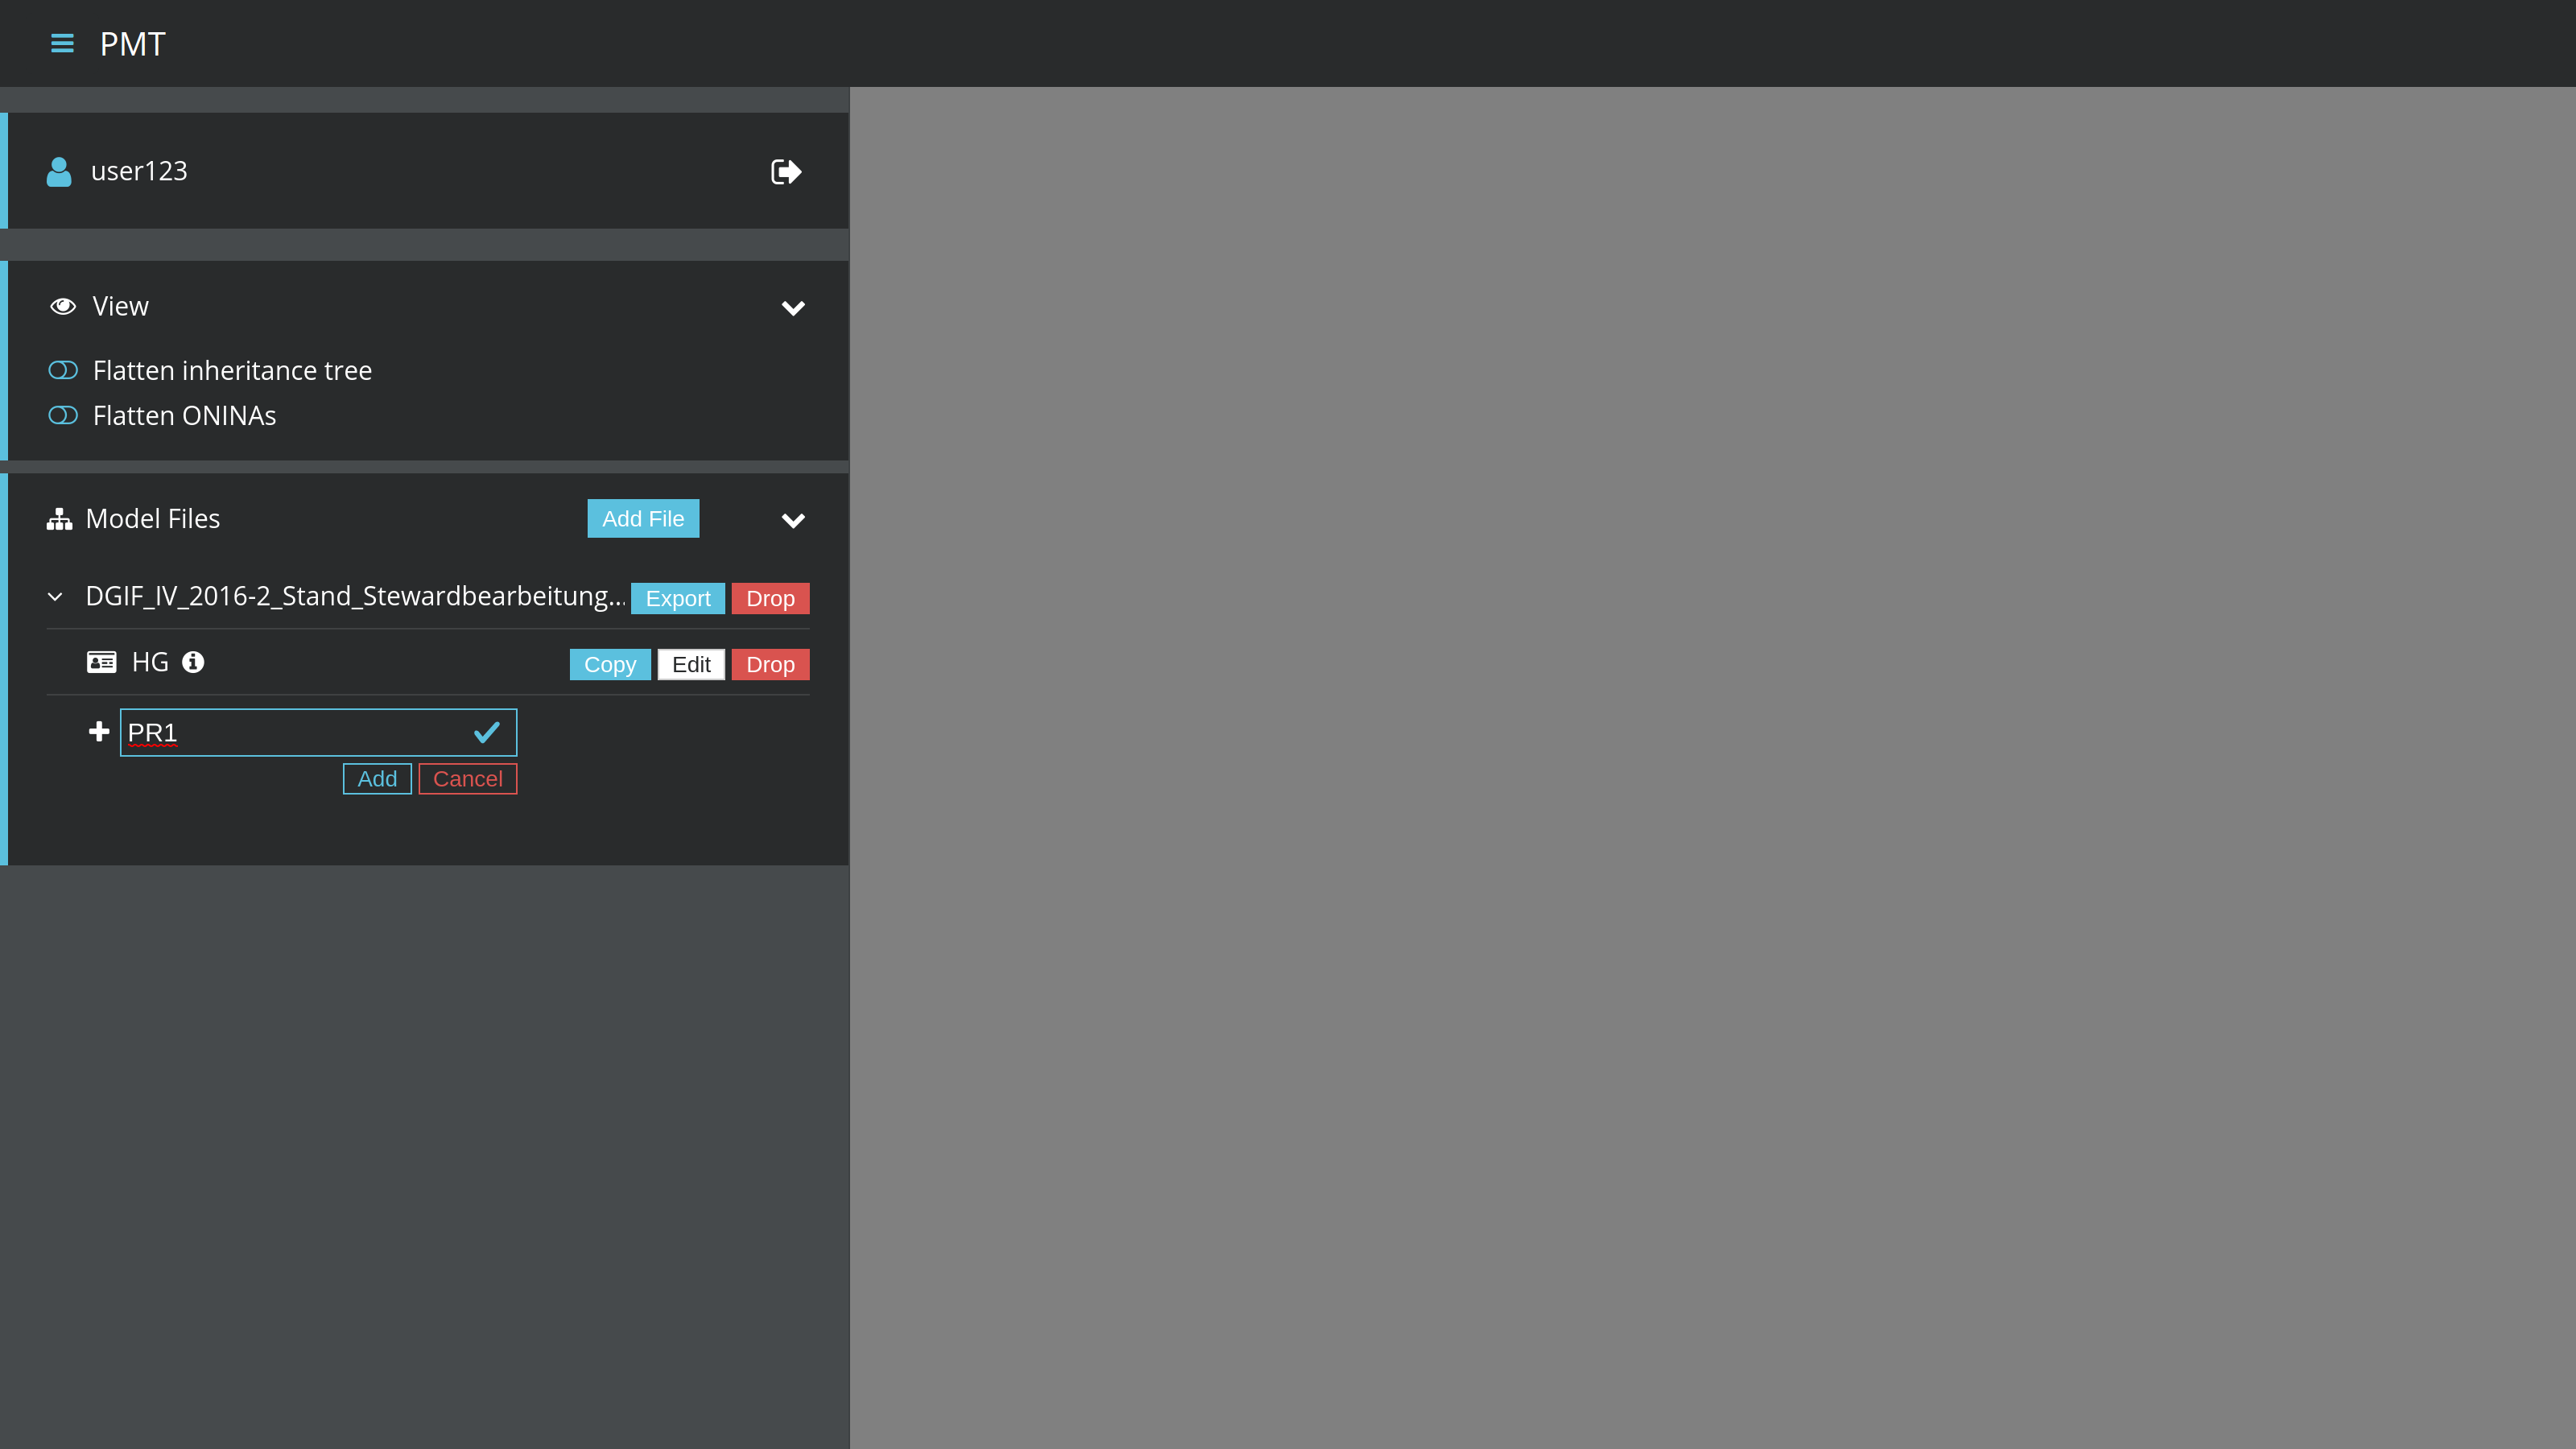
Adding a profile
To add a profile to a model file, open the menu and click on Add Profile at the bottom of the profile list. A text field will appear to enter the name of the new profile.
|
The name should only contain word characters and hyphens. The regular expression to check the profile name is Examples:
|
Adding the profile will only be possible if you enter a profile name that is unique for the model file.
Copying a profile
You can create a new profile by copying an existing one. To do so, open the menu, navigate to the profile you want to copy, and click on Copy. A text field will appear where you should enter the name of the new profile.
| The rules for naming a profile as described for Adding a profile apply here as well. |
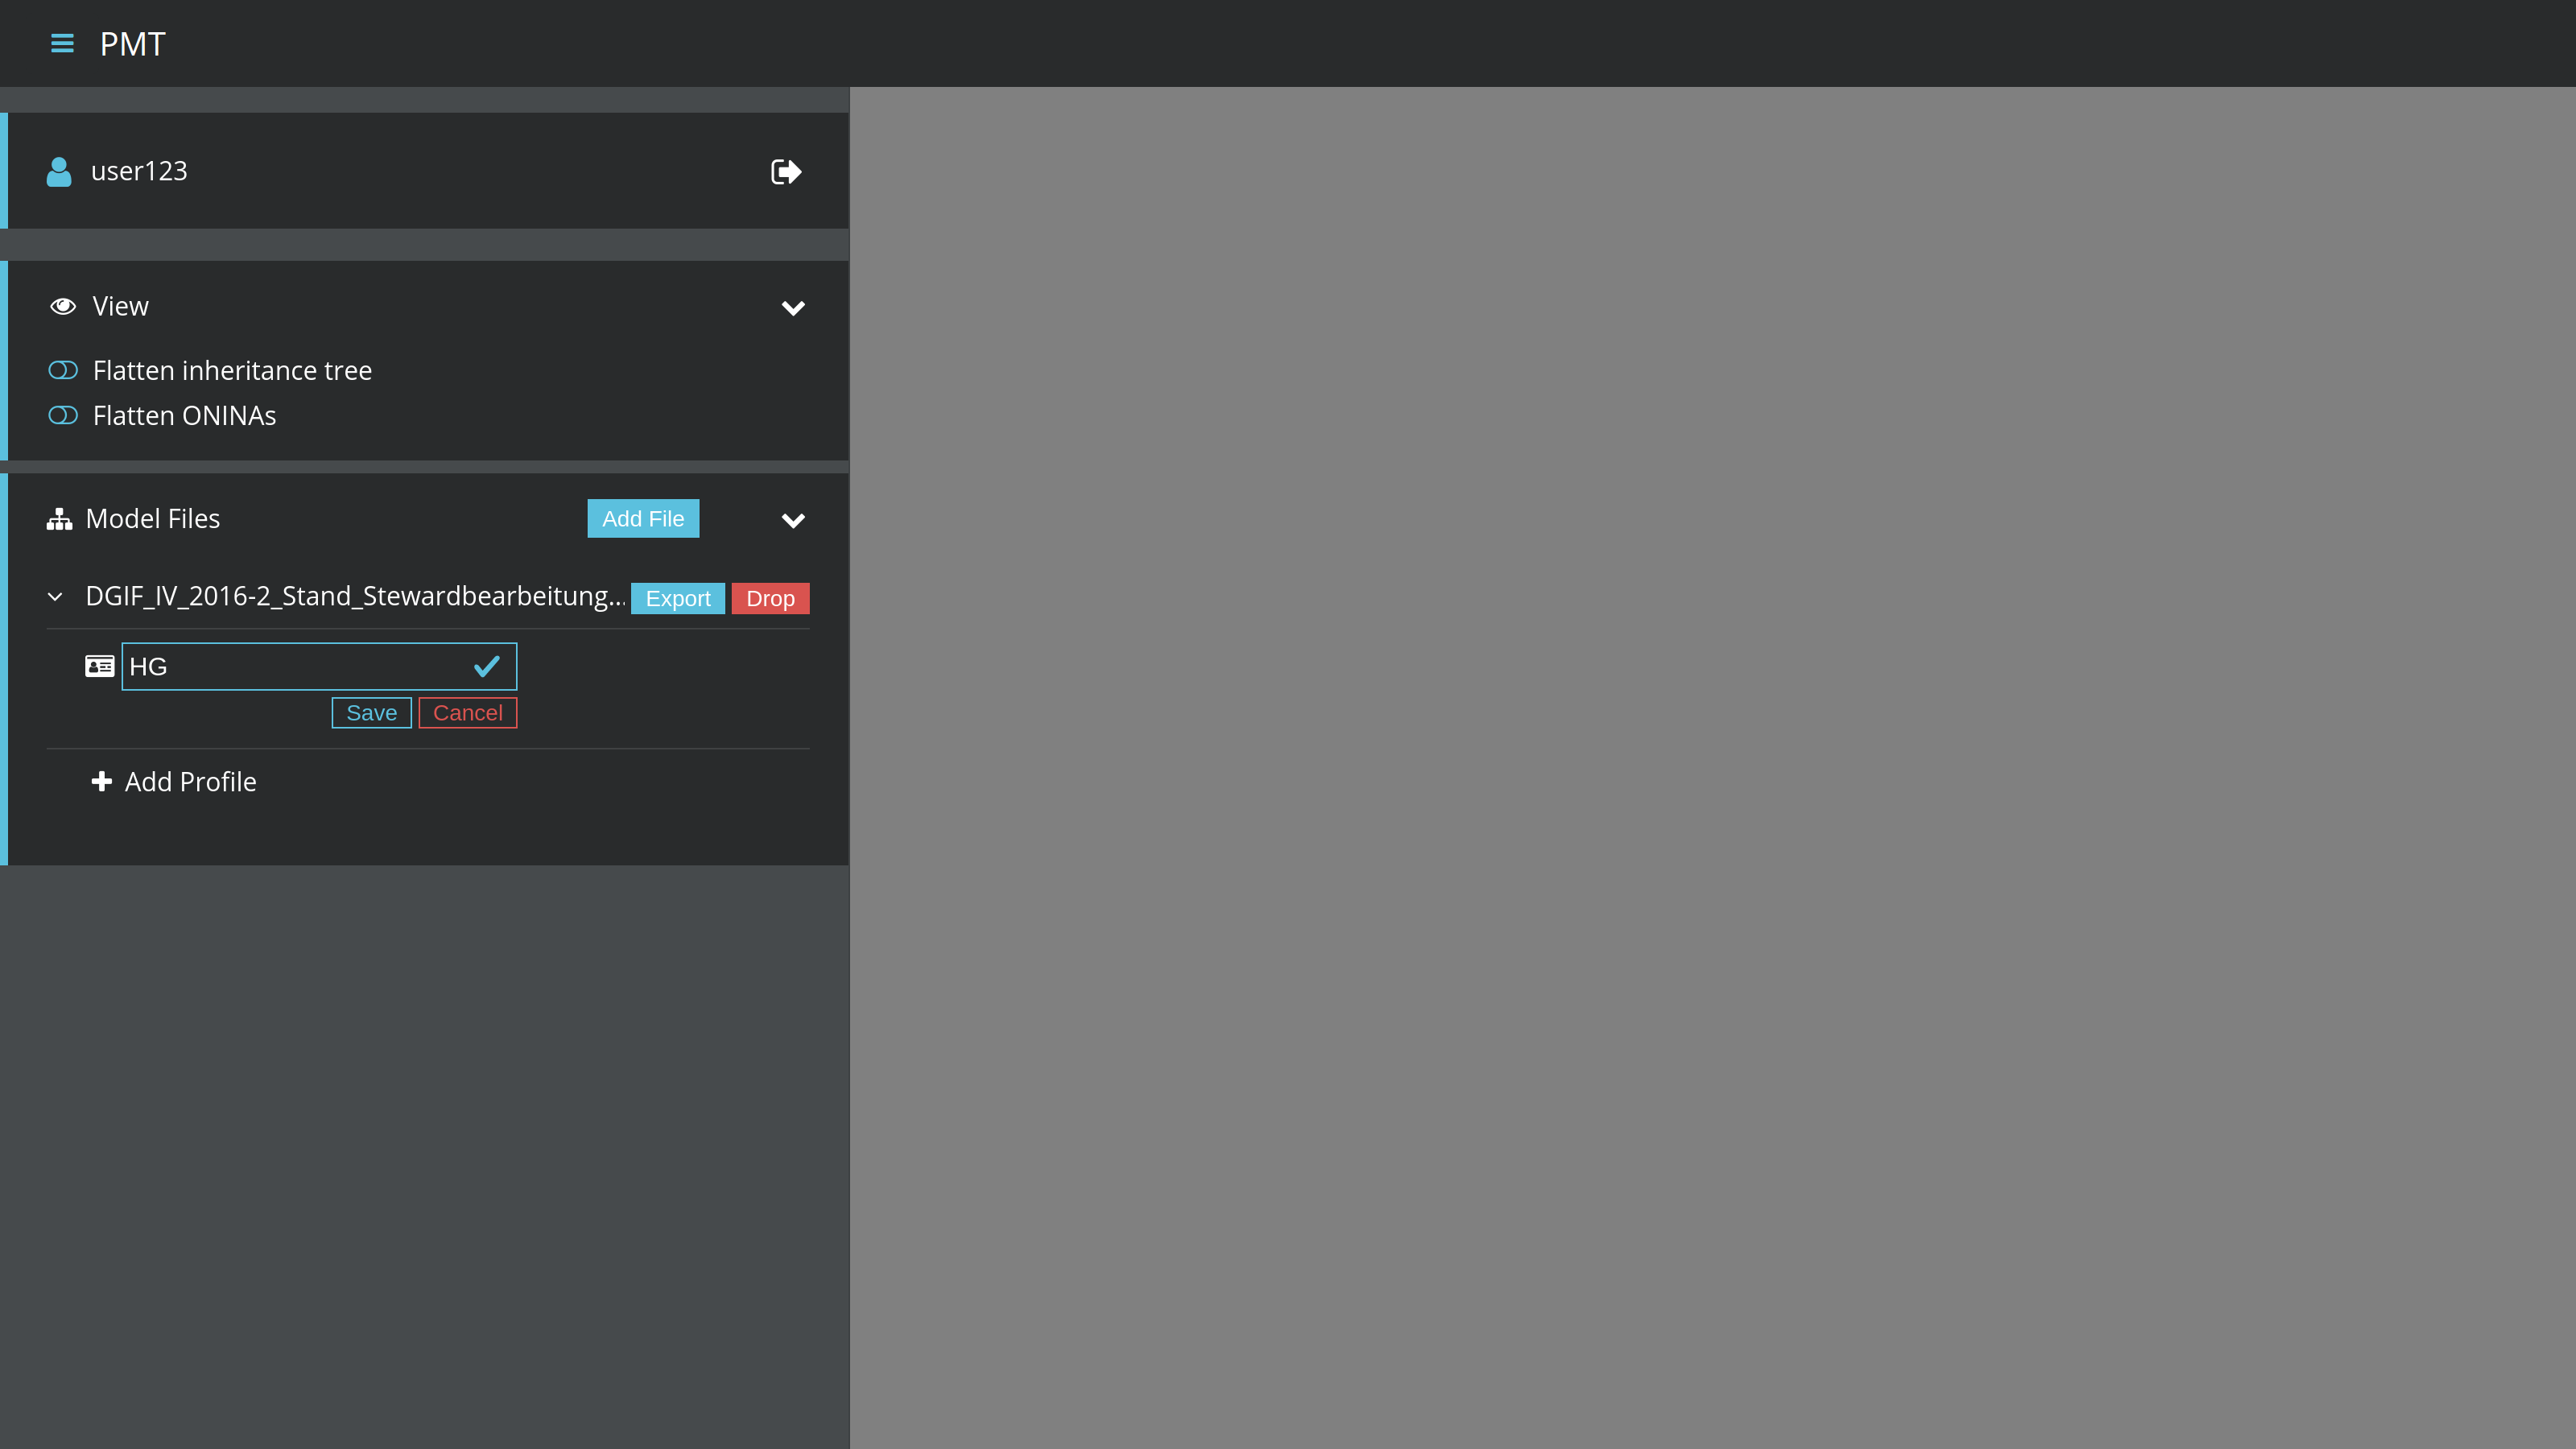
Renaming a profile
To rename a profile, open the menu, navigate to the profile, and click on Edit. A text field will appear where you should enter the new name of the profile.
| The rules for naming a profile as described for Adding a profile apply here as well. |
Deleting a profile
To delete a profile, open the menu, navigate to the profile, and click on Drop. A confirmation dialog will appear. A dialog will appear to request your confirmation of the deletion.
Browsing a model profile
When a model profile has been selected, the PMT displays GUI elements with which you can browse the model. A core element is the Model tree. You can use it to select model elements for making profile assignments. You can also select model elements based on a textual search.
Model tree
The model tree shows the packages, classes and properties of the selected model profile in a tree structure. Different layout options exist. Clicking on an item in the tree will show or hide its children and open the item in the Details pane.
Icons
-
 - Package
 -
Class
-
 - Feature type
 -
 - Type
 -
 - Data type
 -
 - Code list
 -
 - Enumeration
 -
 - Union
 -
 - No stereo type
-
-
Property
-
 - Attribute
 -
 - Association role
-
States
-
 - Included in profile
 -
 - Not included in profile
 -
 - Not editable
 -
 - Selected
Layout
Above the model tree are two toggles to adjust the layout of the model tree.
The first toggle lets you switch from the default tree view to a three pane view. In this view, packages, classes and properties are not contained in a single tree but are presented in three separate panes.
| This is only a different presentation, the behavior of browsing and selecting model elements remains the same. |
The second toggle lets you switch to a smaller font size for the model tree. That allows seeing more model elements on screen without scrolling.
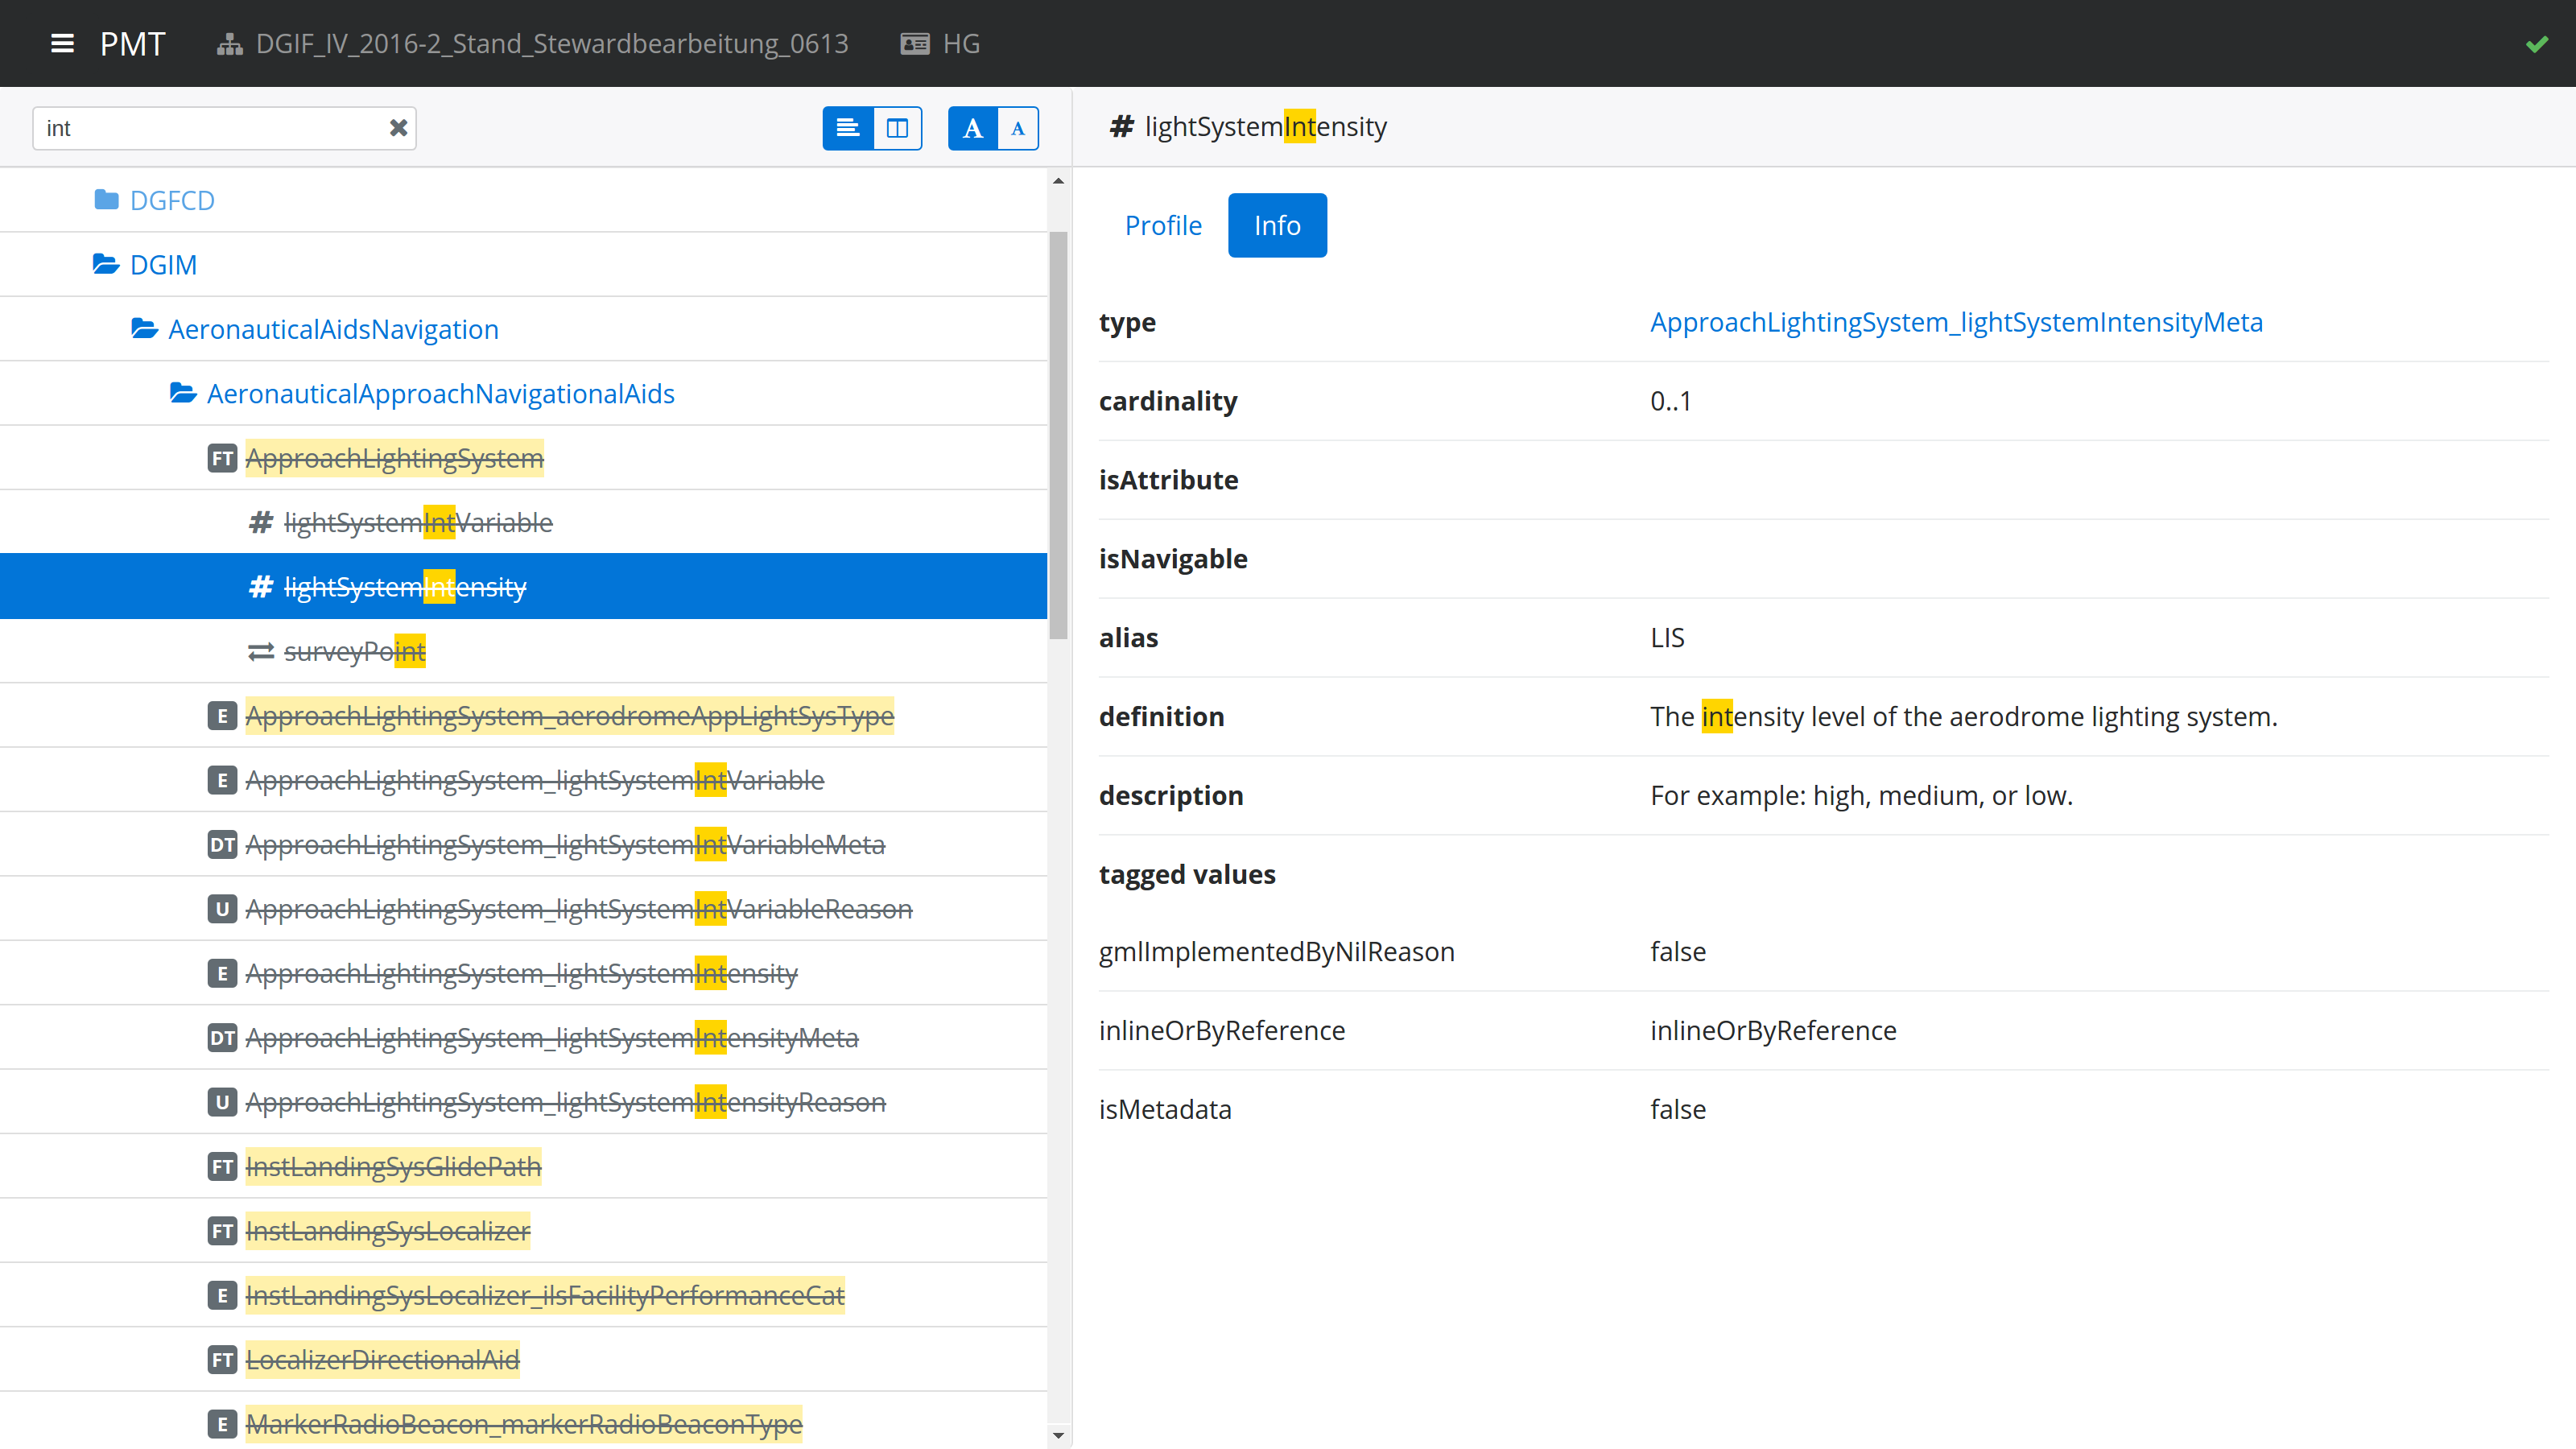
Search
Above the model tree you will find the search box. It allows you to filter the model elements displayed in the model tree by matching the search value against model element names, aliases, descriptions, and definitions.
The search will start automatically once you entered at least three characters and then paused typing for a second. To reset the search value, you can click on the icon at the right of the search box. The search is case insensitive and uses partial matching.
If you type int, that will match Integer as well as Point.
Items that are neither matched by the search value nor satisfy any of the following conditions are hidden:
-
If a package matches, its contained classes match as well.
-
If a class is matched, its contained properties match as well.
-
The parent elements on the path to the top of the tree of a matching element match as well.
If the name of an item is matched, the matching part will be highlighted in yellow in the model tree. If the alias, description or definition of an item is matched, the item will be highlighted in a light yellow in the model tree. In the info pane, the matching part of the alias, description or definition will be highlighted in yellow.
Details pane
The Details pane is situated at the right side of the Model tree. It shows the details for the model element that is selected in the model tree. The name of the element is shown at the top of the Details pane, including its type.
Profile pane
The Profile pane allows you to edit the profile information for the selected model element. Different actions are available for different element types.
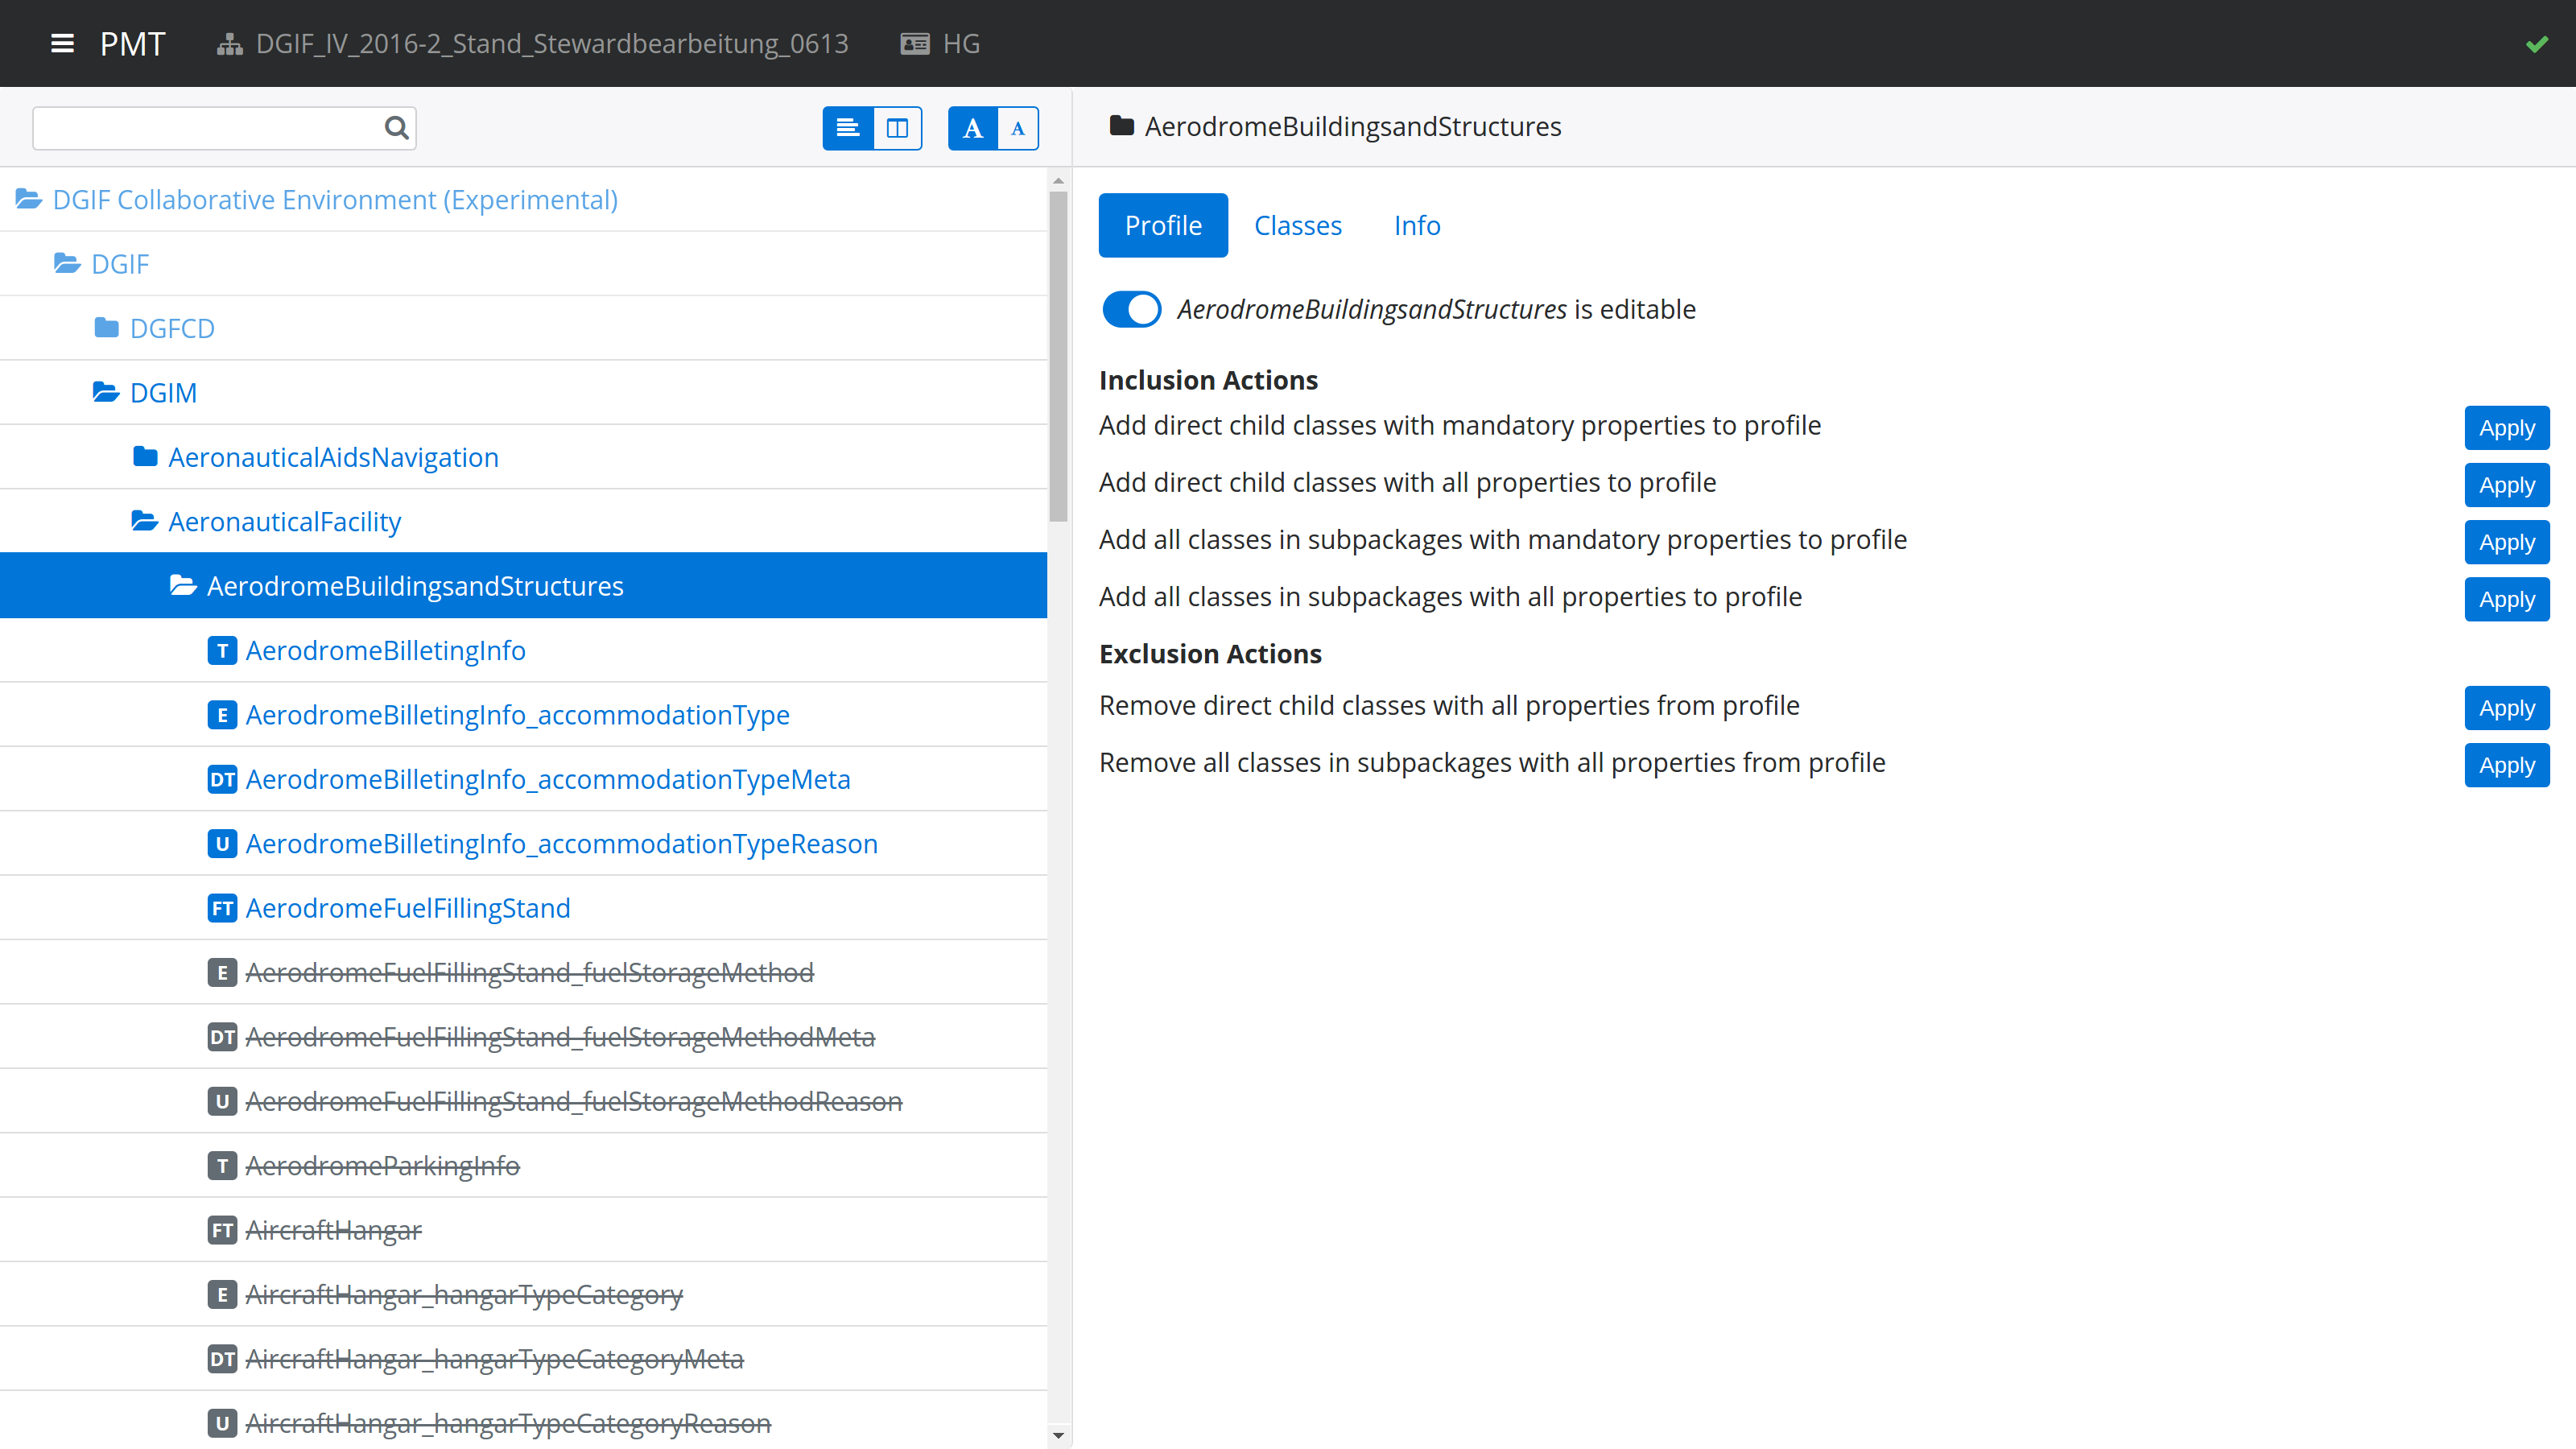
Packages
For packages, at the top you find a toggle to specify if the package is editable. If you switch the toggle, that will also switch it recursively for all sub-packages. If a package is not editable, then the profile information for classes and properties contained in the package cannot be edited.
You can also perform batch editing actions. These allow you to add to or remove from the profile either only the direct child classes of the package or all classes in all sub-packages.
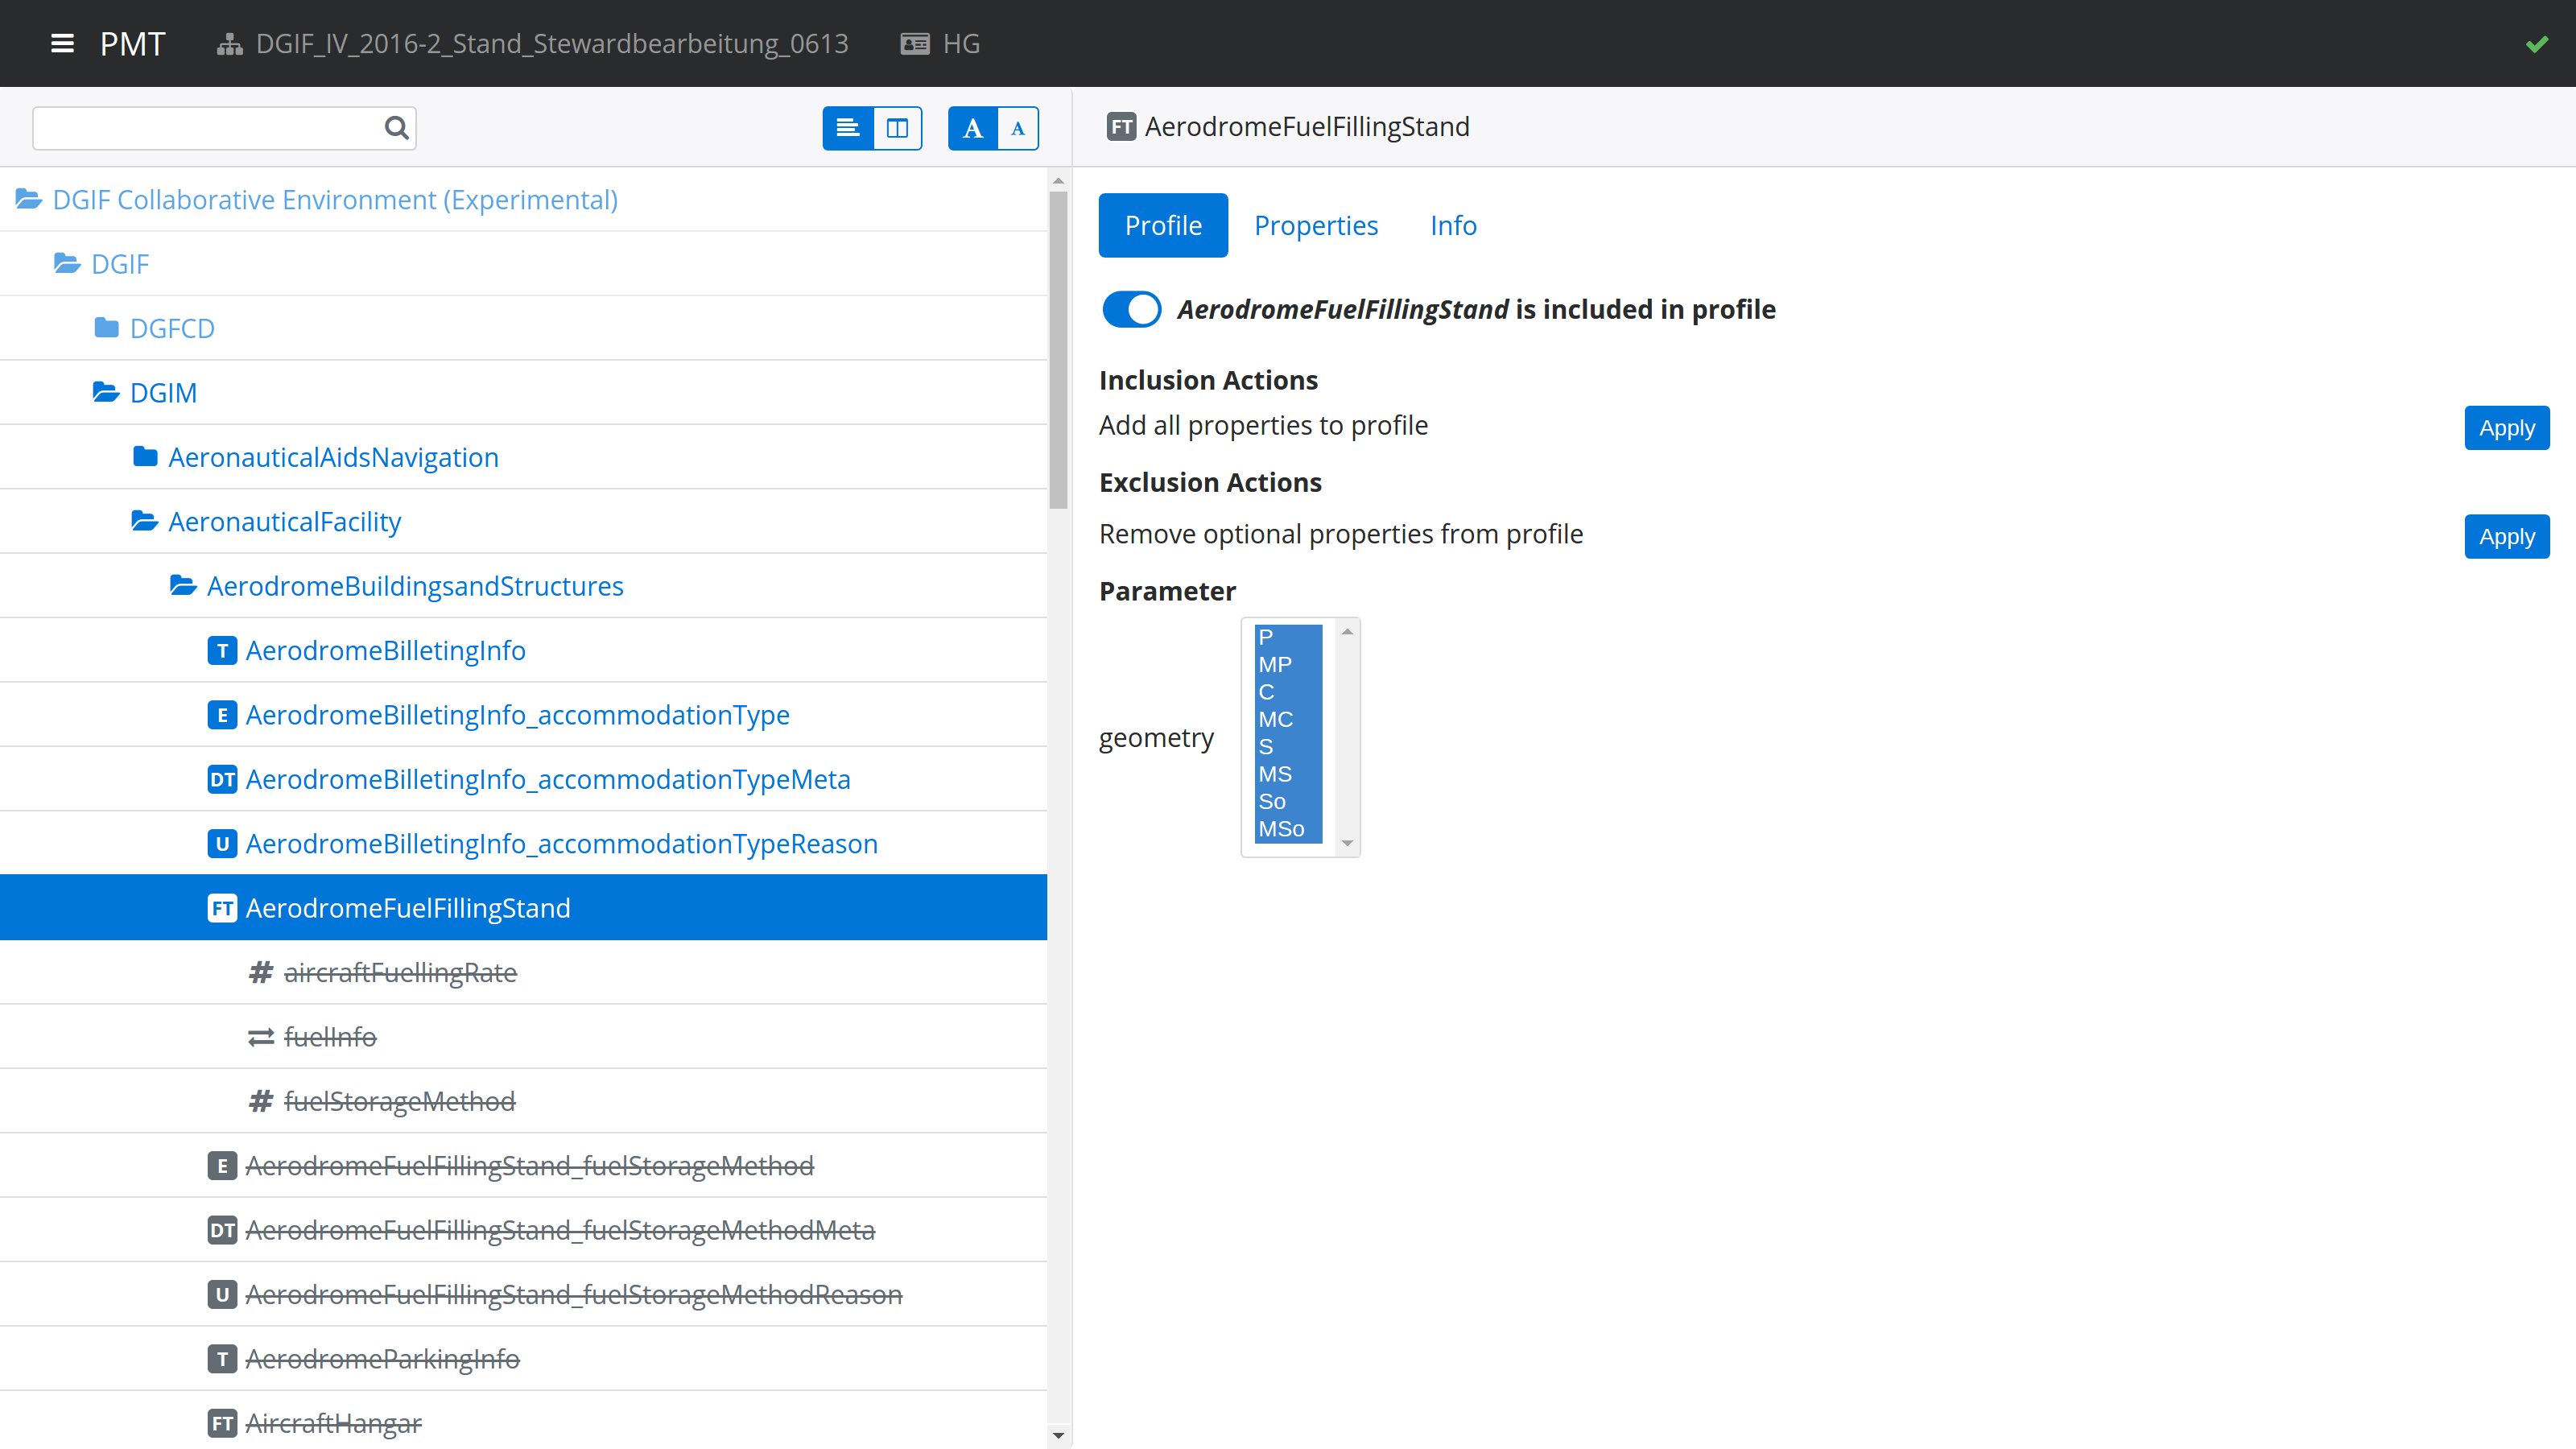
Classes
For classes, at the top you find a toggle to specify if the class is included in the profile. If you add the class to the profile, that will automatically add its superclasses and its mandatory properties. If you remove the class from the profile, that will automatically remove its subclasses and all of its properties. If the class to remove is a Meta or Reason class, then the value types of its properties will also be removed – unless these types are used by other properties or belong to a non-editable package.
You can also perform batch editing actions. These allow you to add the optional properties of the class to the profile, or remove them.
For classes with stereotype featuretype, you can also specify the profile parameter geometry. It allows you to limit the geometry types that are allowed for the featuretype.
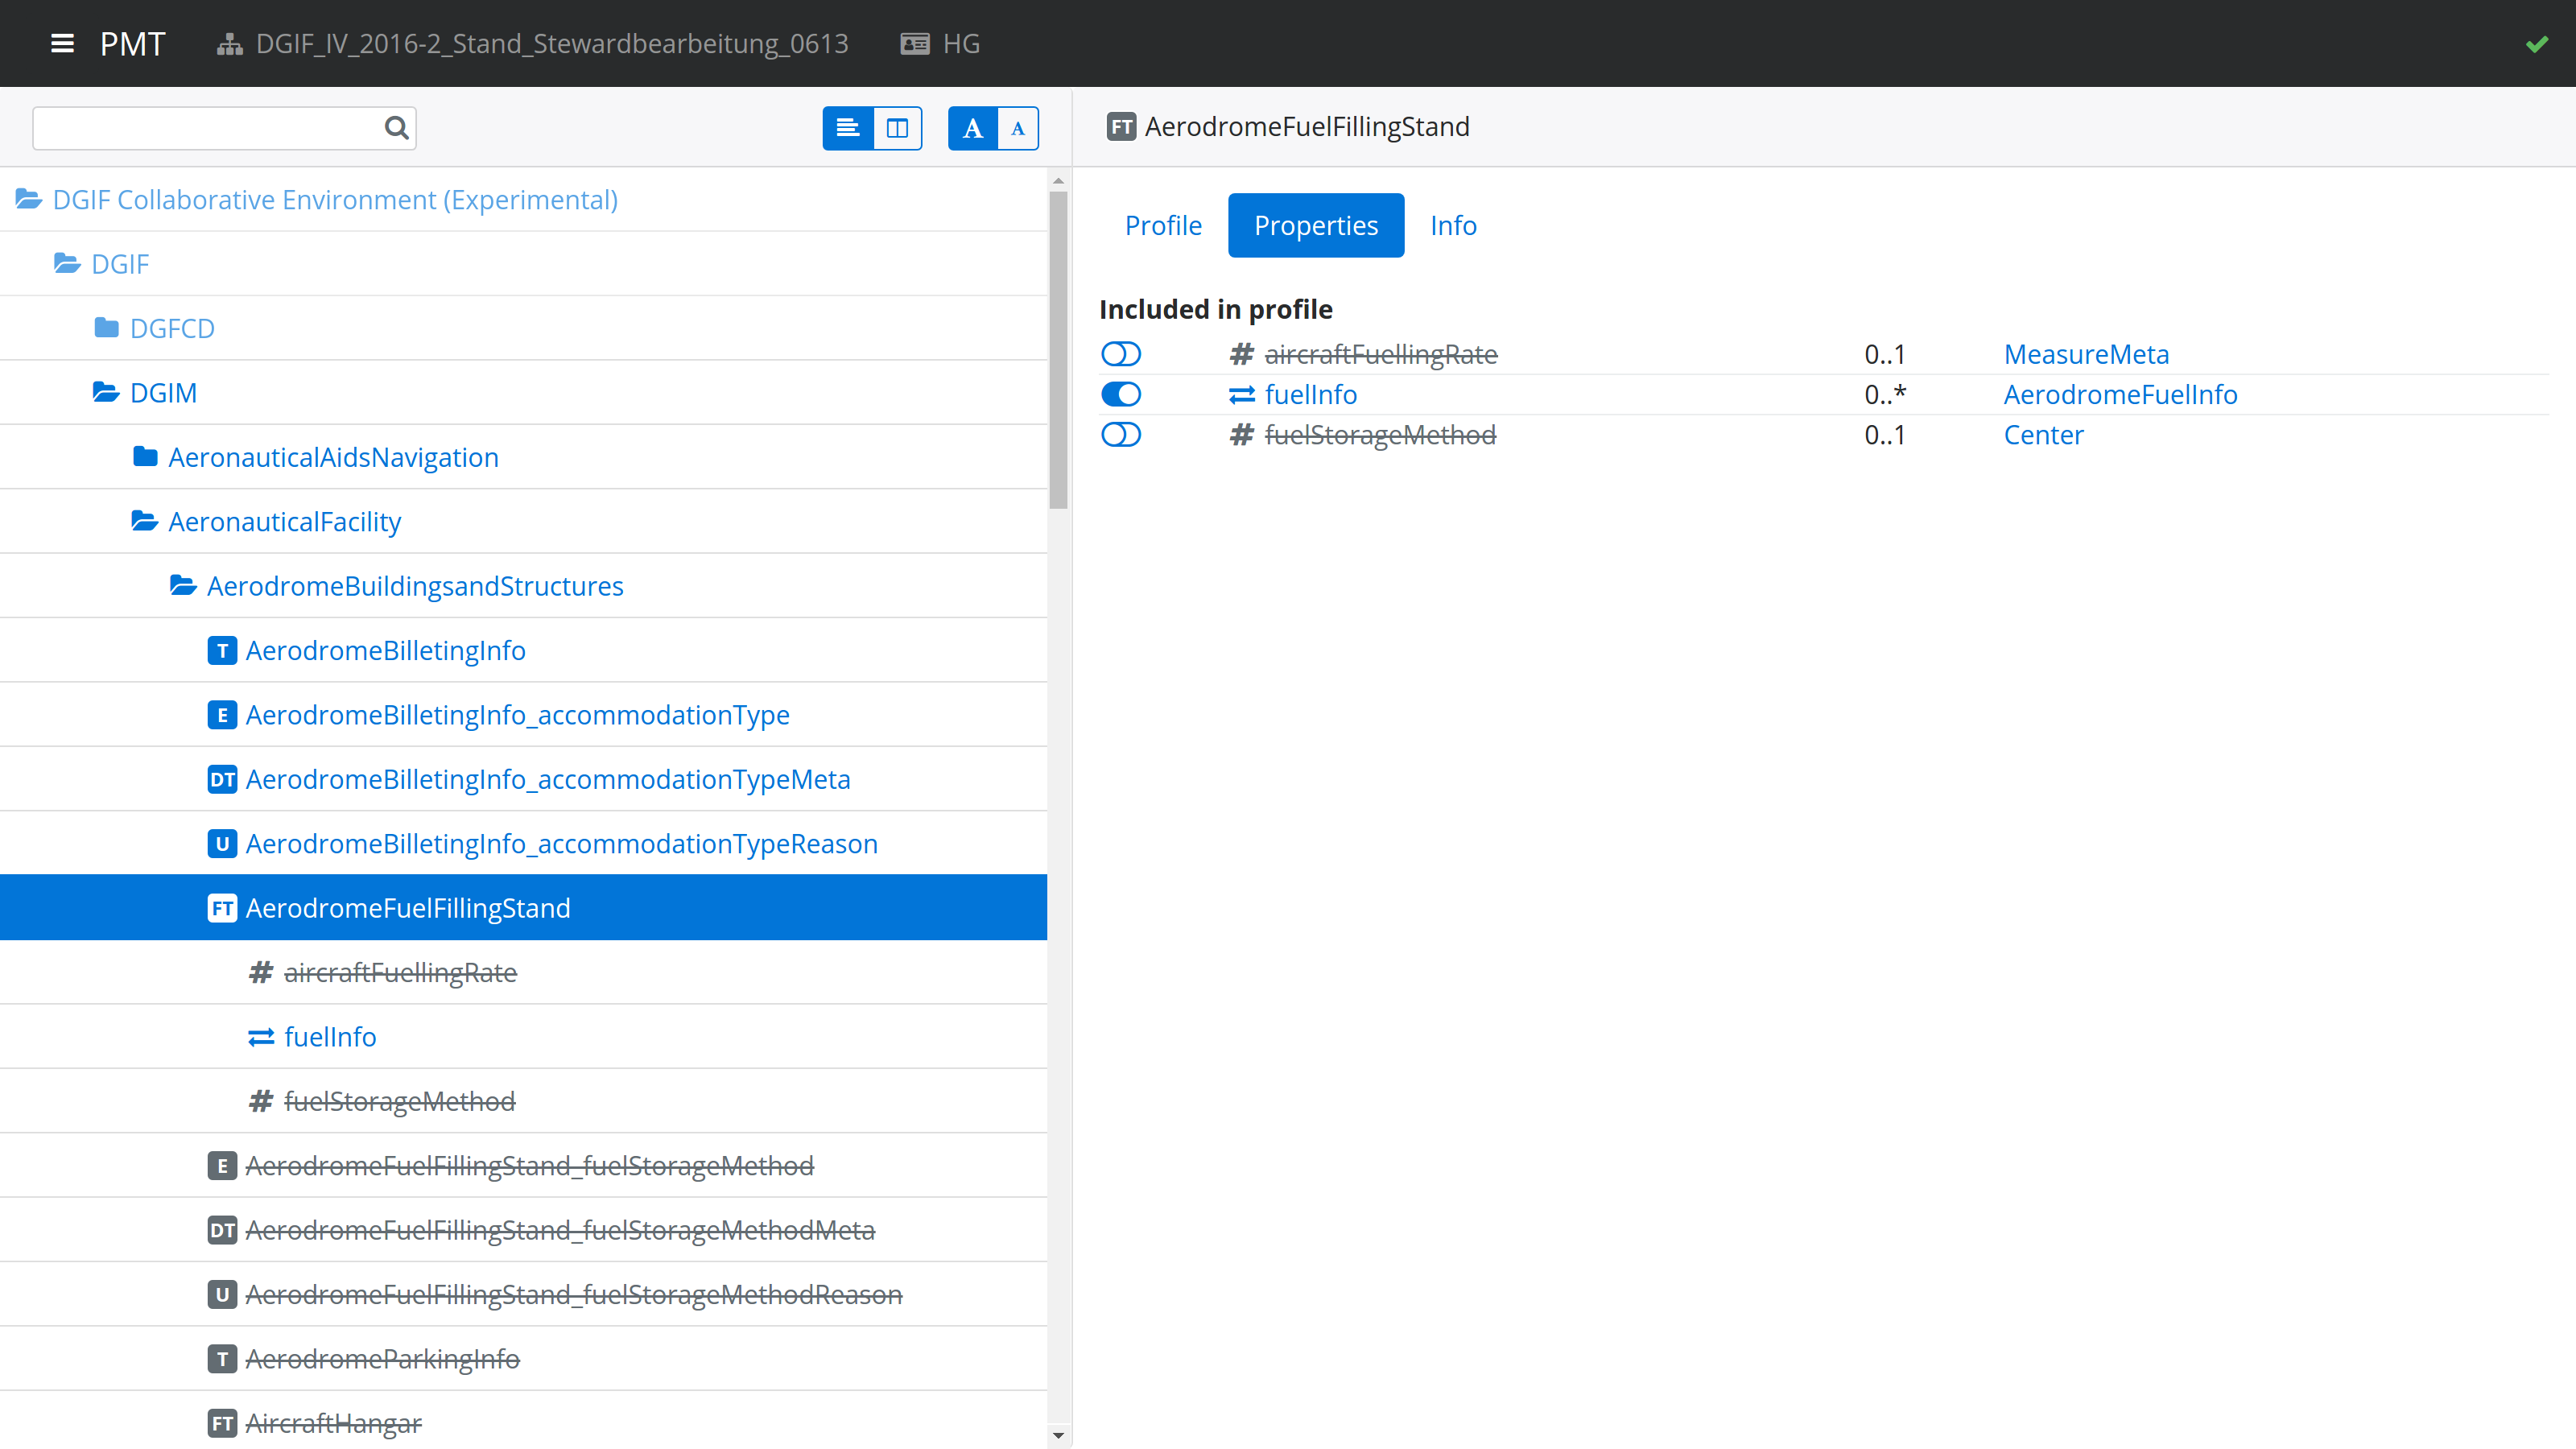
Properties
For properties, at the top you find a toggle to specify if the property is included in the profile. The toggle is only enabled if the class that owns the property is already included in the profile and if the property is optional. This does not apply for mandatory properties that either do not belong to the profile - which can happen in case that a model with inconsistent profiles has been imported - or that belong to an enumeration or code list.
If you add the property to the profile, that will automatically add its type class. On the other hand, if you remove a property from the profile, its type class will not automatically be removed from the profile (since other properties that belong to the profile may have the same type). An exception is made for properties whose type class is a Meta or Reason class, or which belong to such a class: in such a case, the type class is also removed if it belongs to an editable package and is not used as type of other properties.
You can also set the profile parameter cardinality. This allows you to limit the cardinality of a property in the profile.
For association roles, you will also be able to set the profile parameter isNavigable. This allows you to render a bidirectional association unidirectional.

Classes/Properties pane
This pane shows the list of classes contained in the selected package, or the list of properties contained in the selected class. On the left of each list entry is a toggle to specify if the item is included in the profile. The toggle behaves in the same way as the ones in the Profile pane. If you click on the model element name, that element will be selected in the model tree and shown in the Details pane.
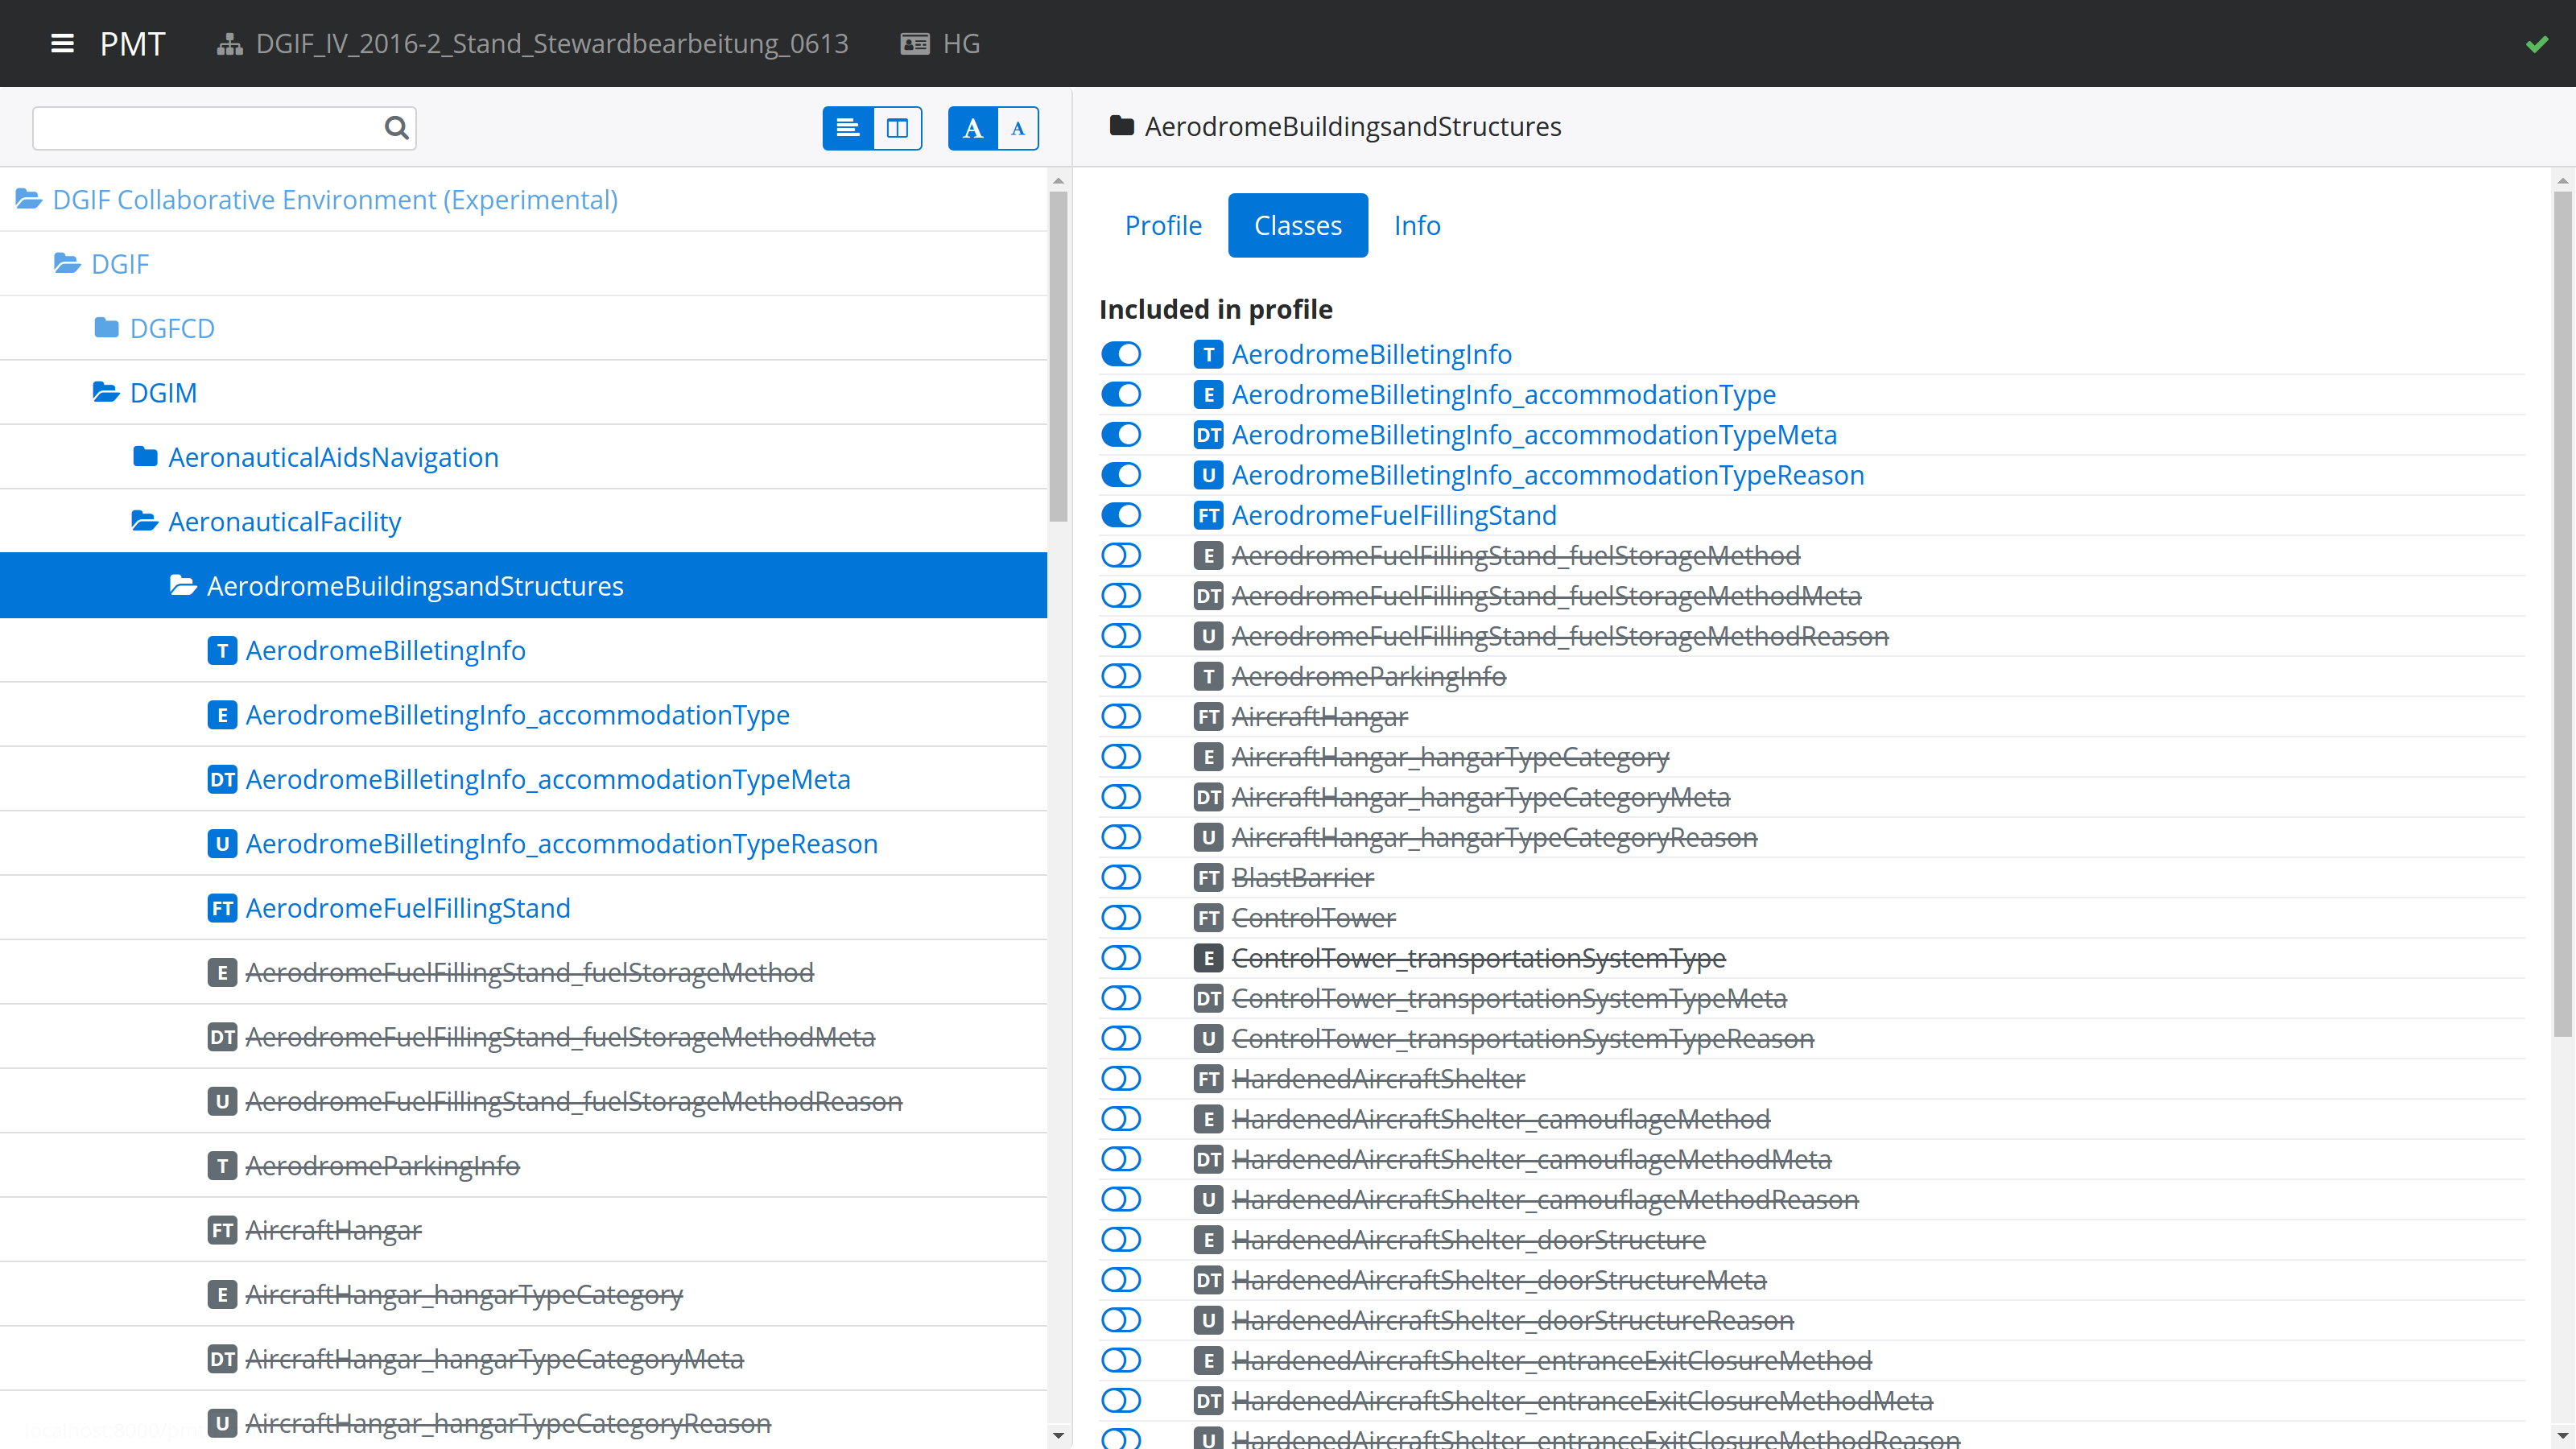
If the list shows properties of a class, the cardinality and type of each property will be shown on the right. Clicking on the type name will select the type in the model tree and display it in the details pane.
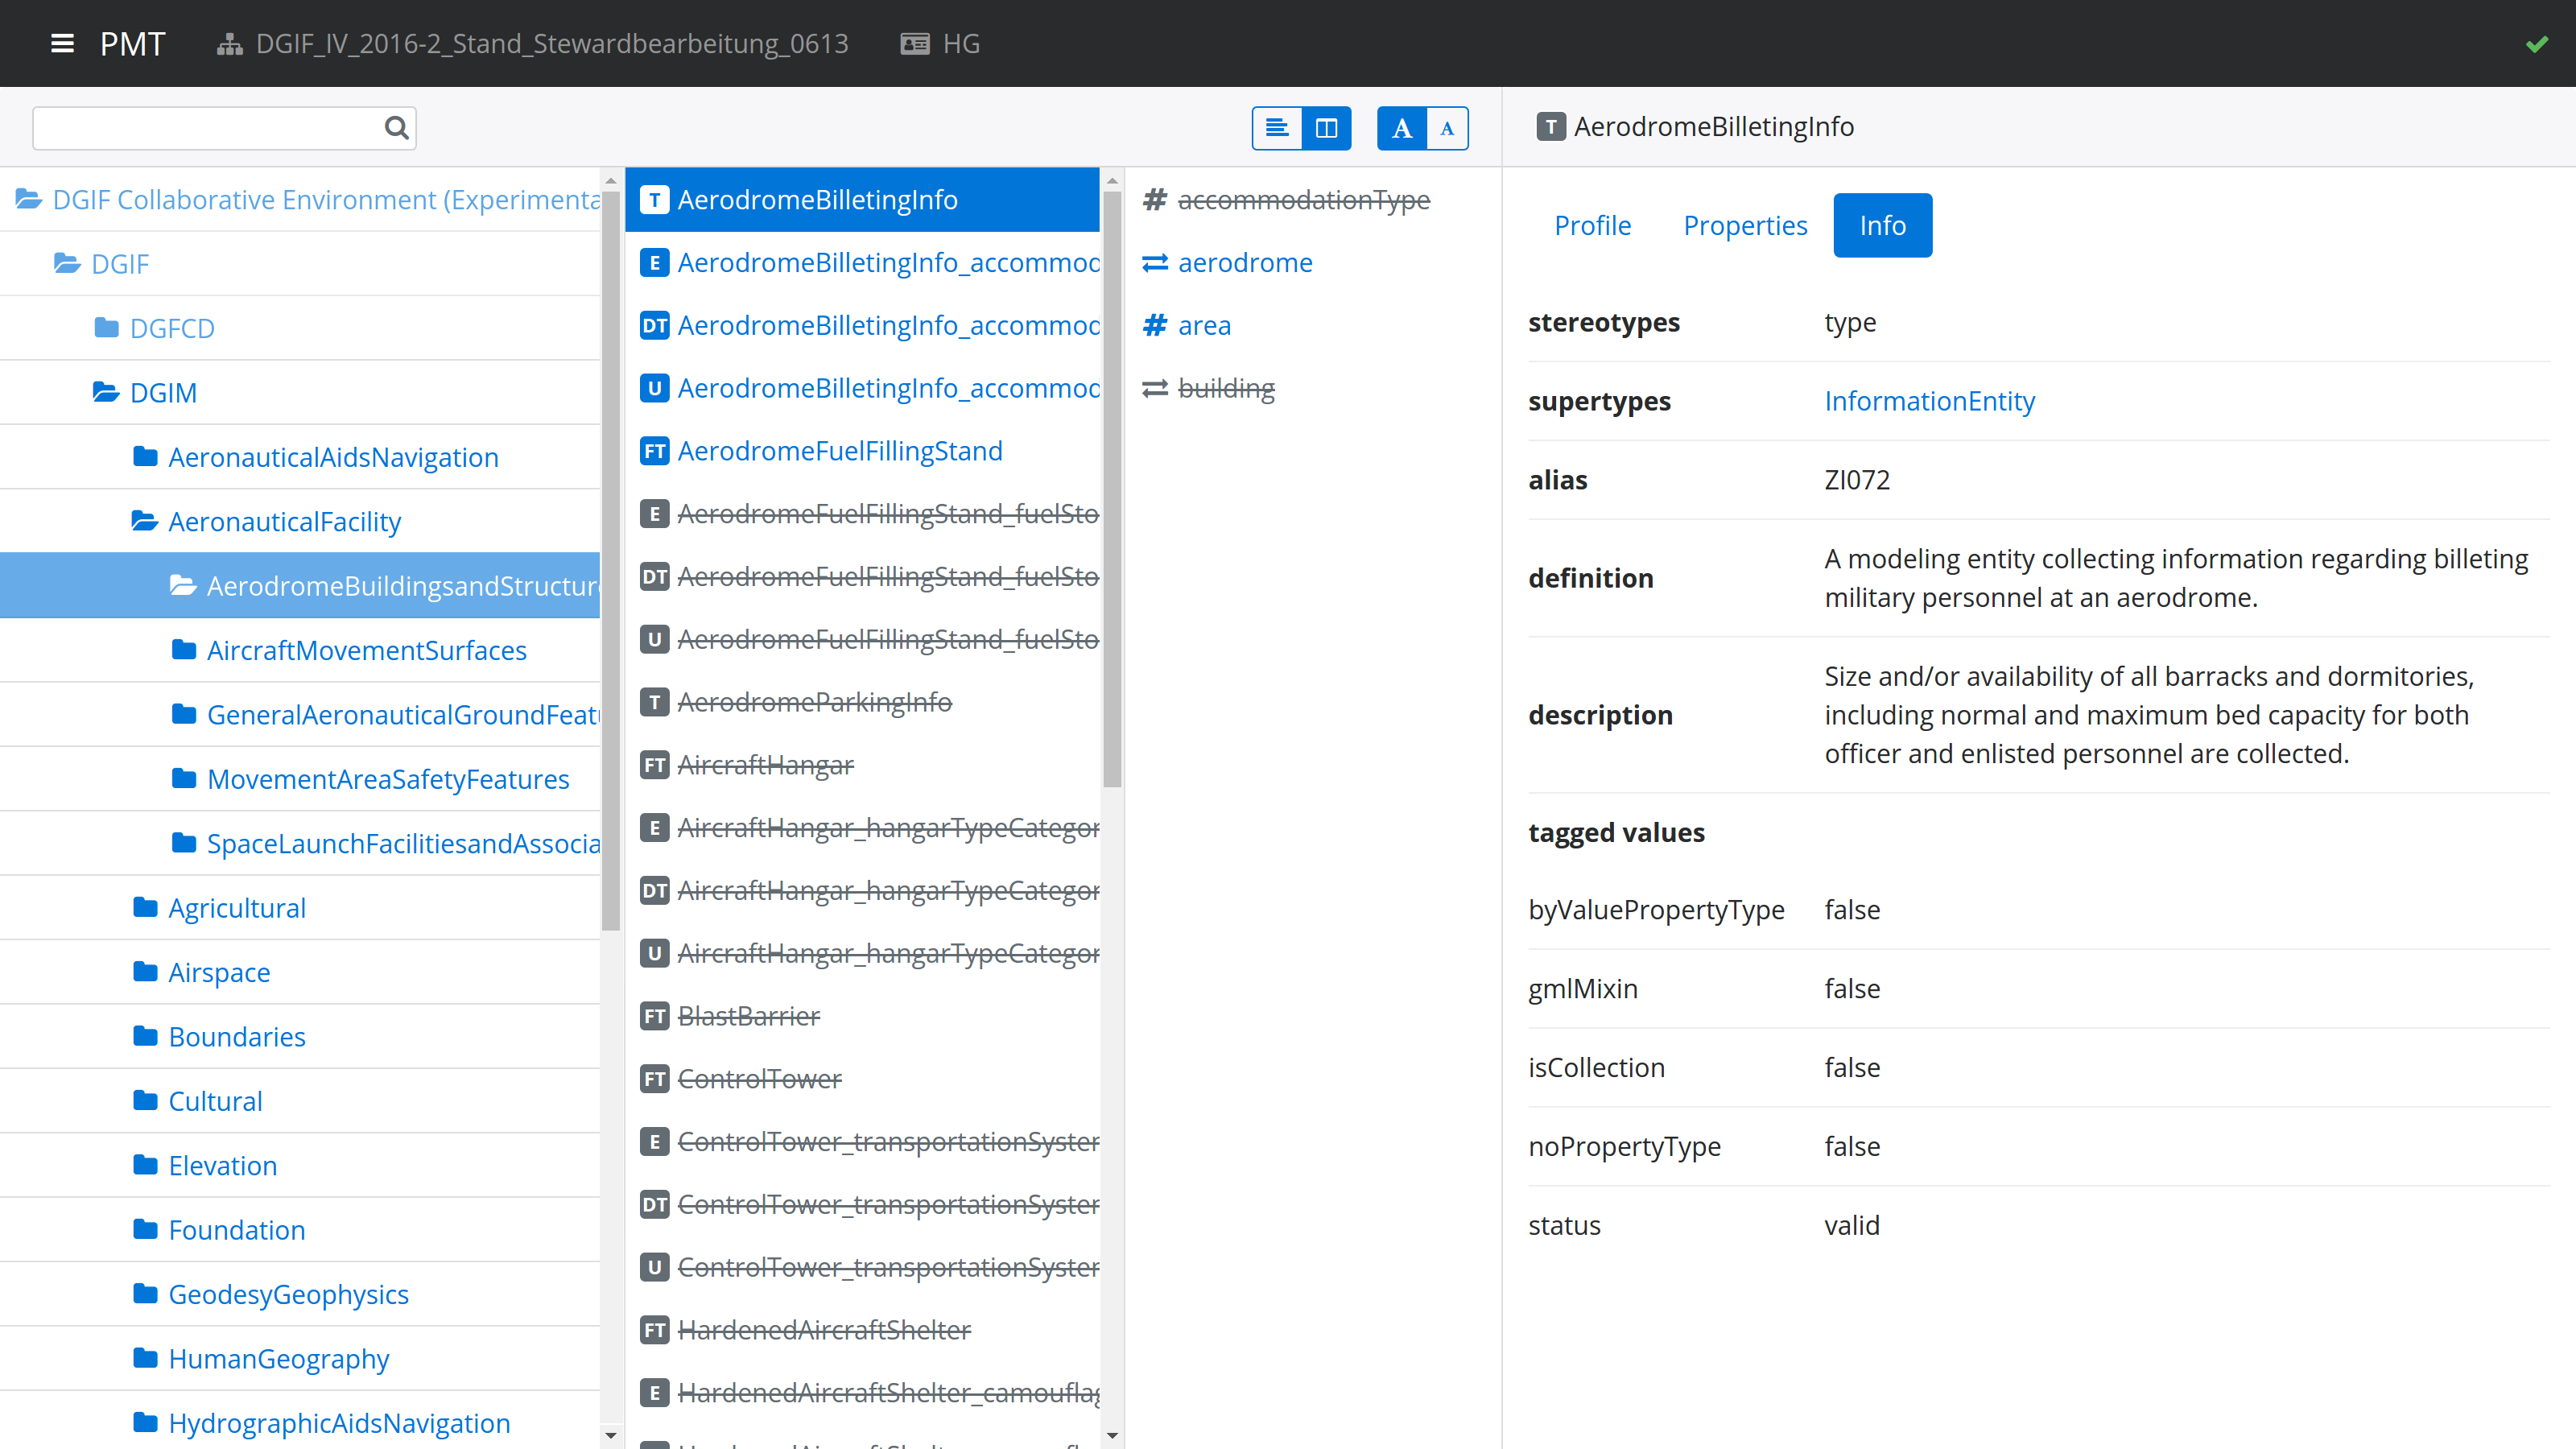
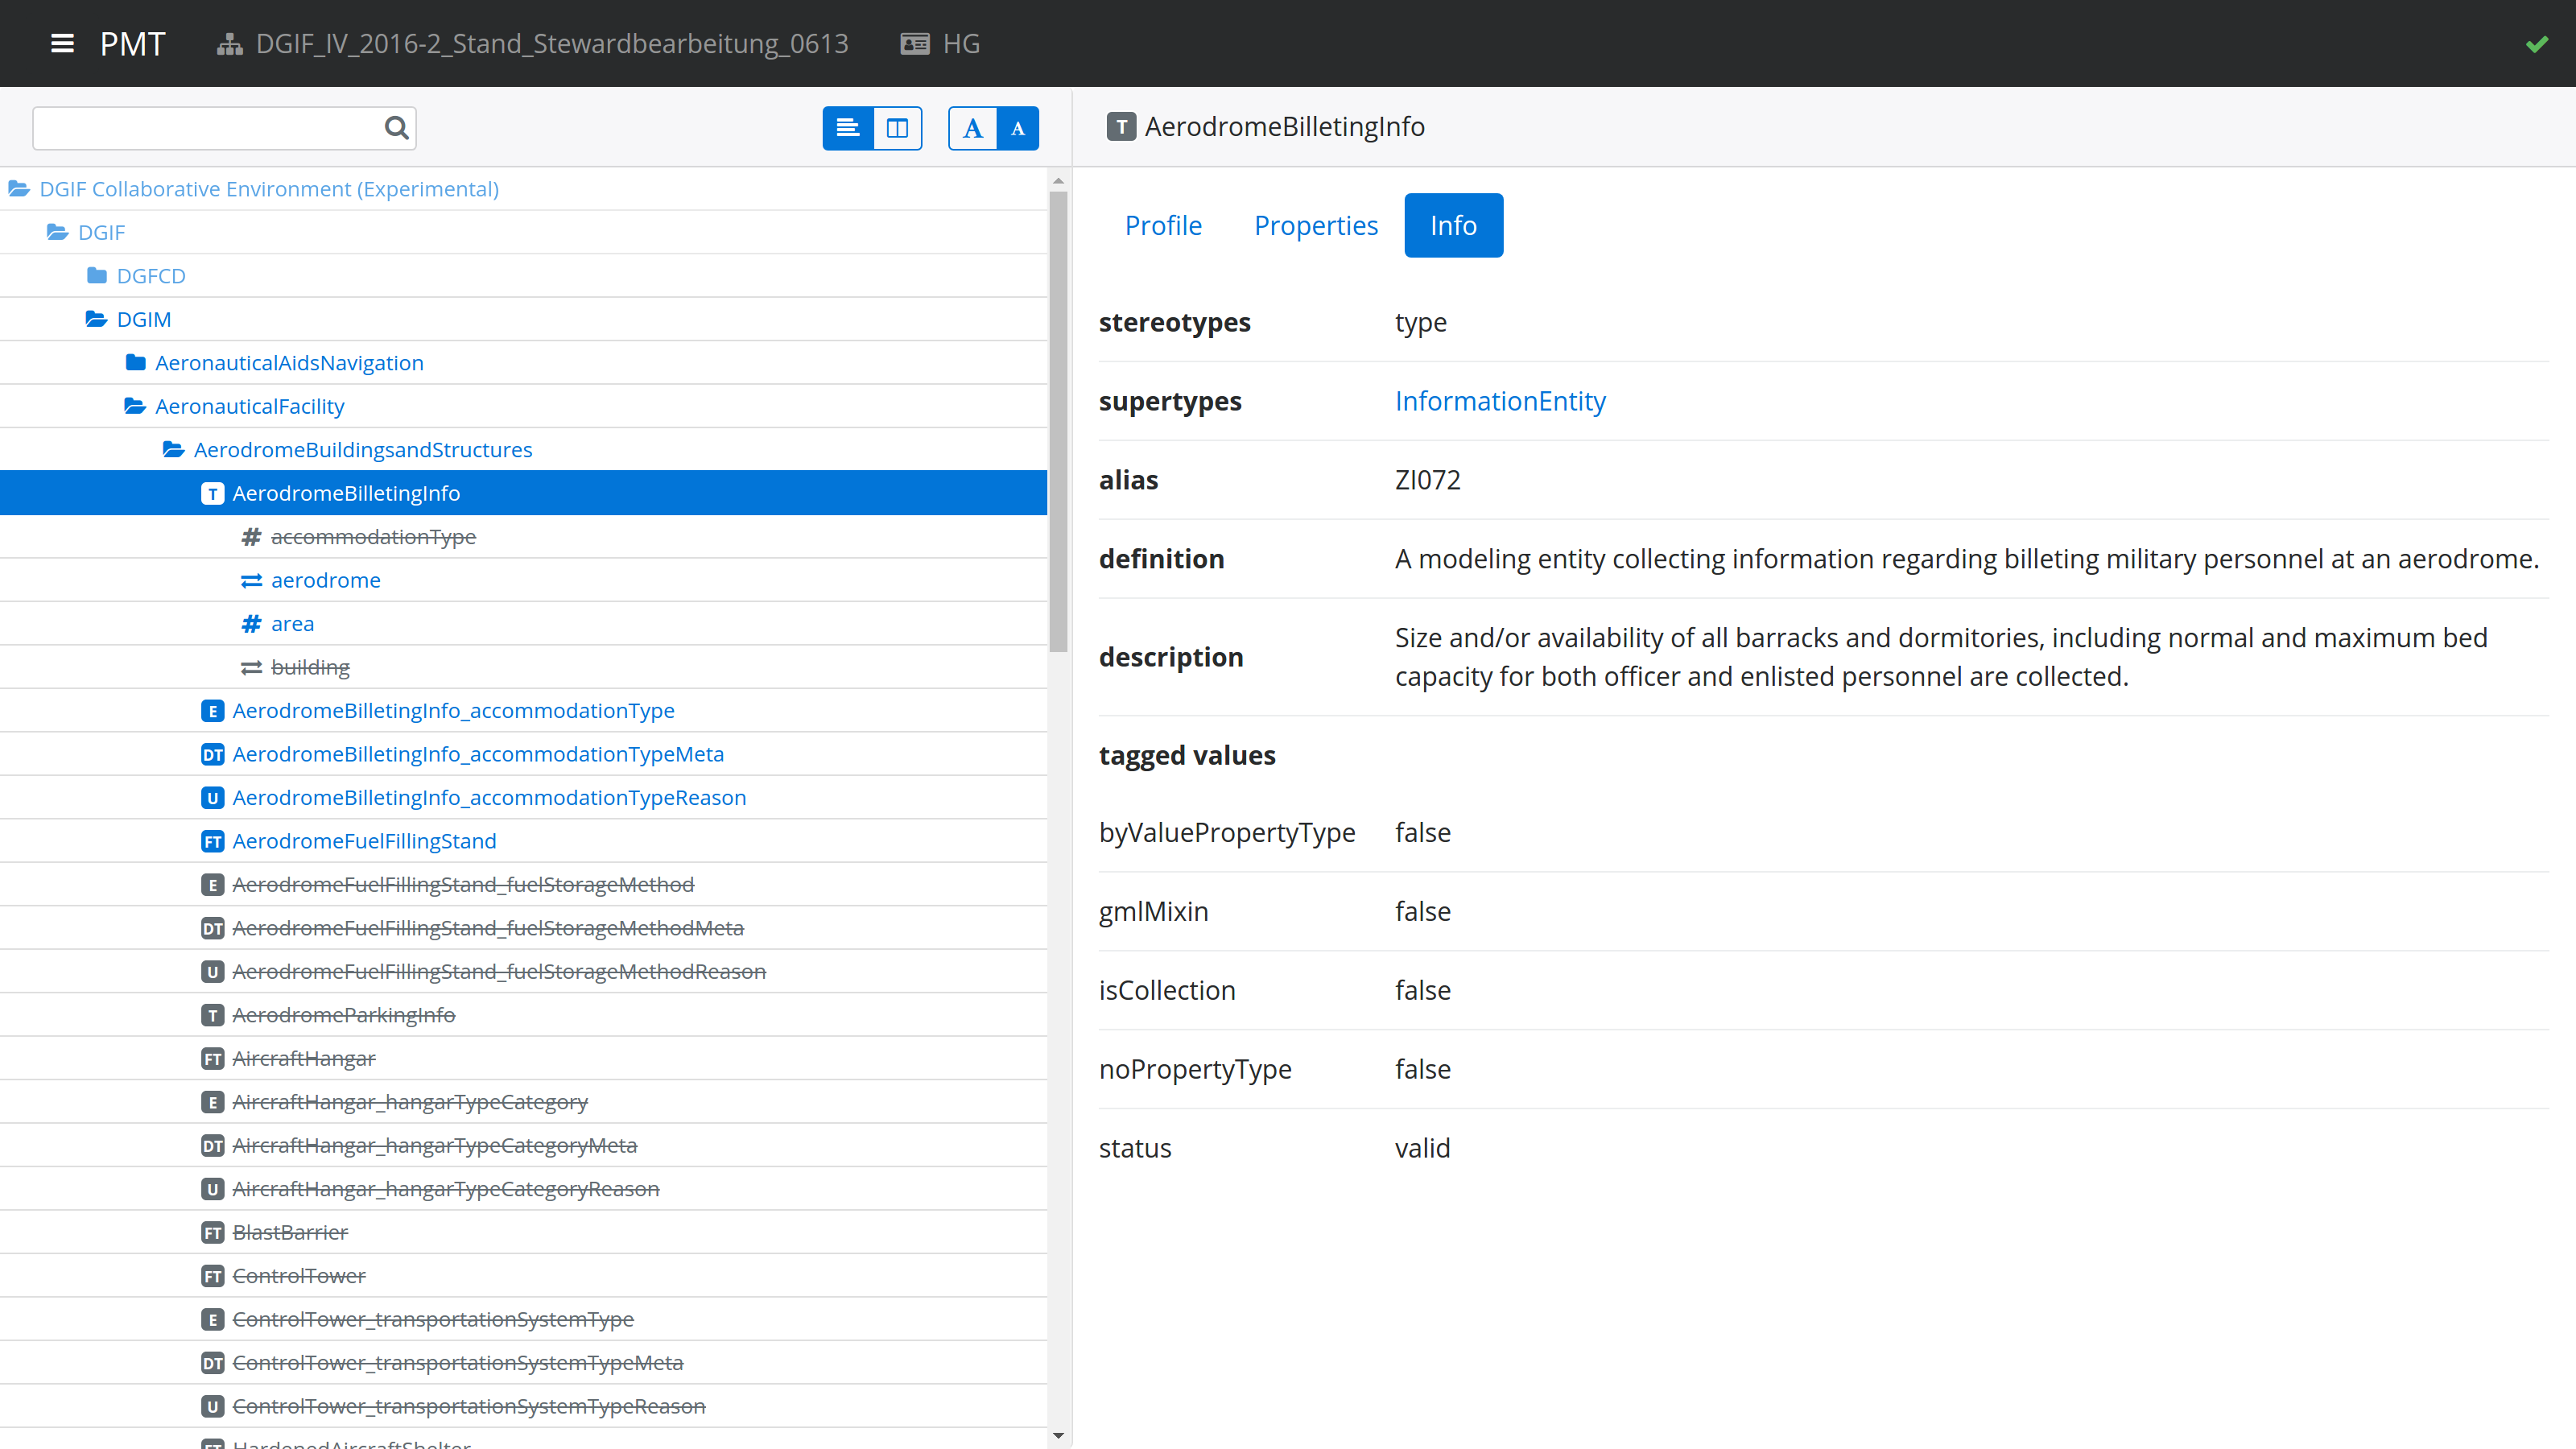
Info pane
This pane shows various information from the model for the selected model element, like description, definition, alias, stereotypes, and tagged values. For classes, it will also show links to superclasses and subclasses. For properties, it shows links to the type. For association roles, it will show links to the association.
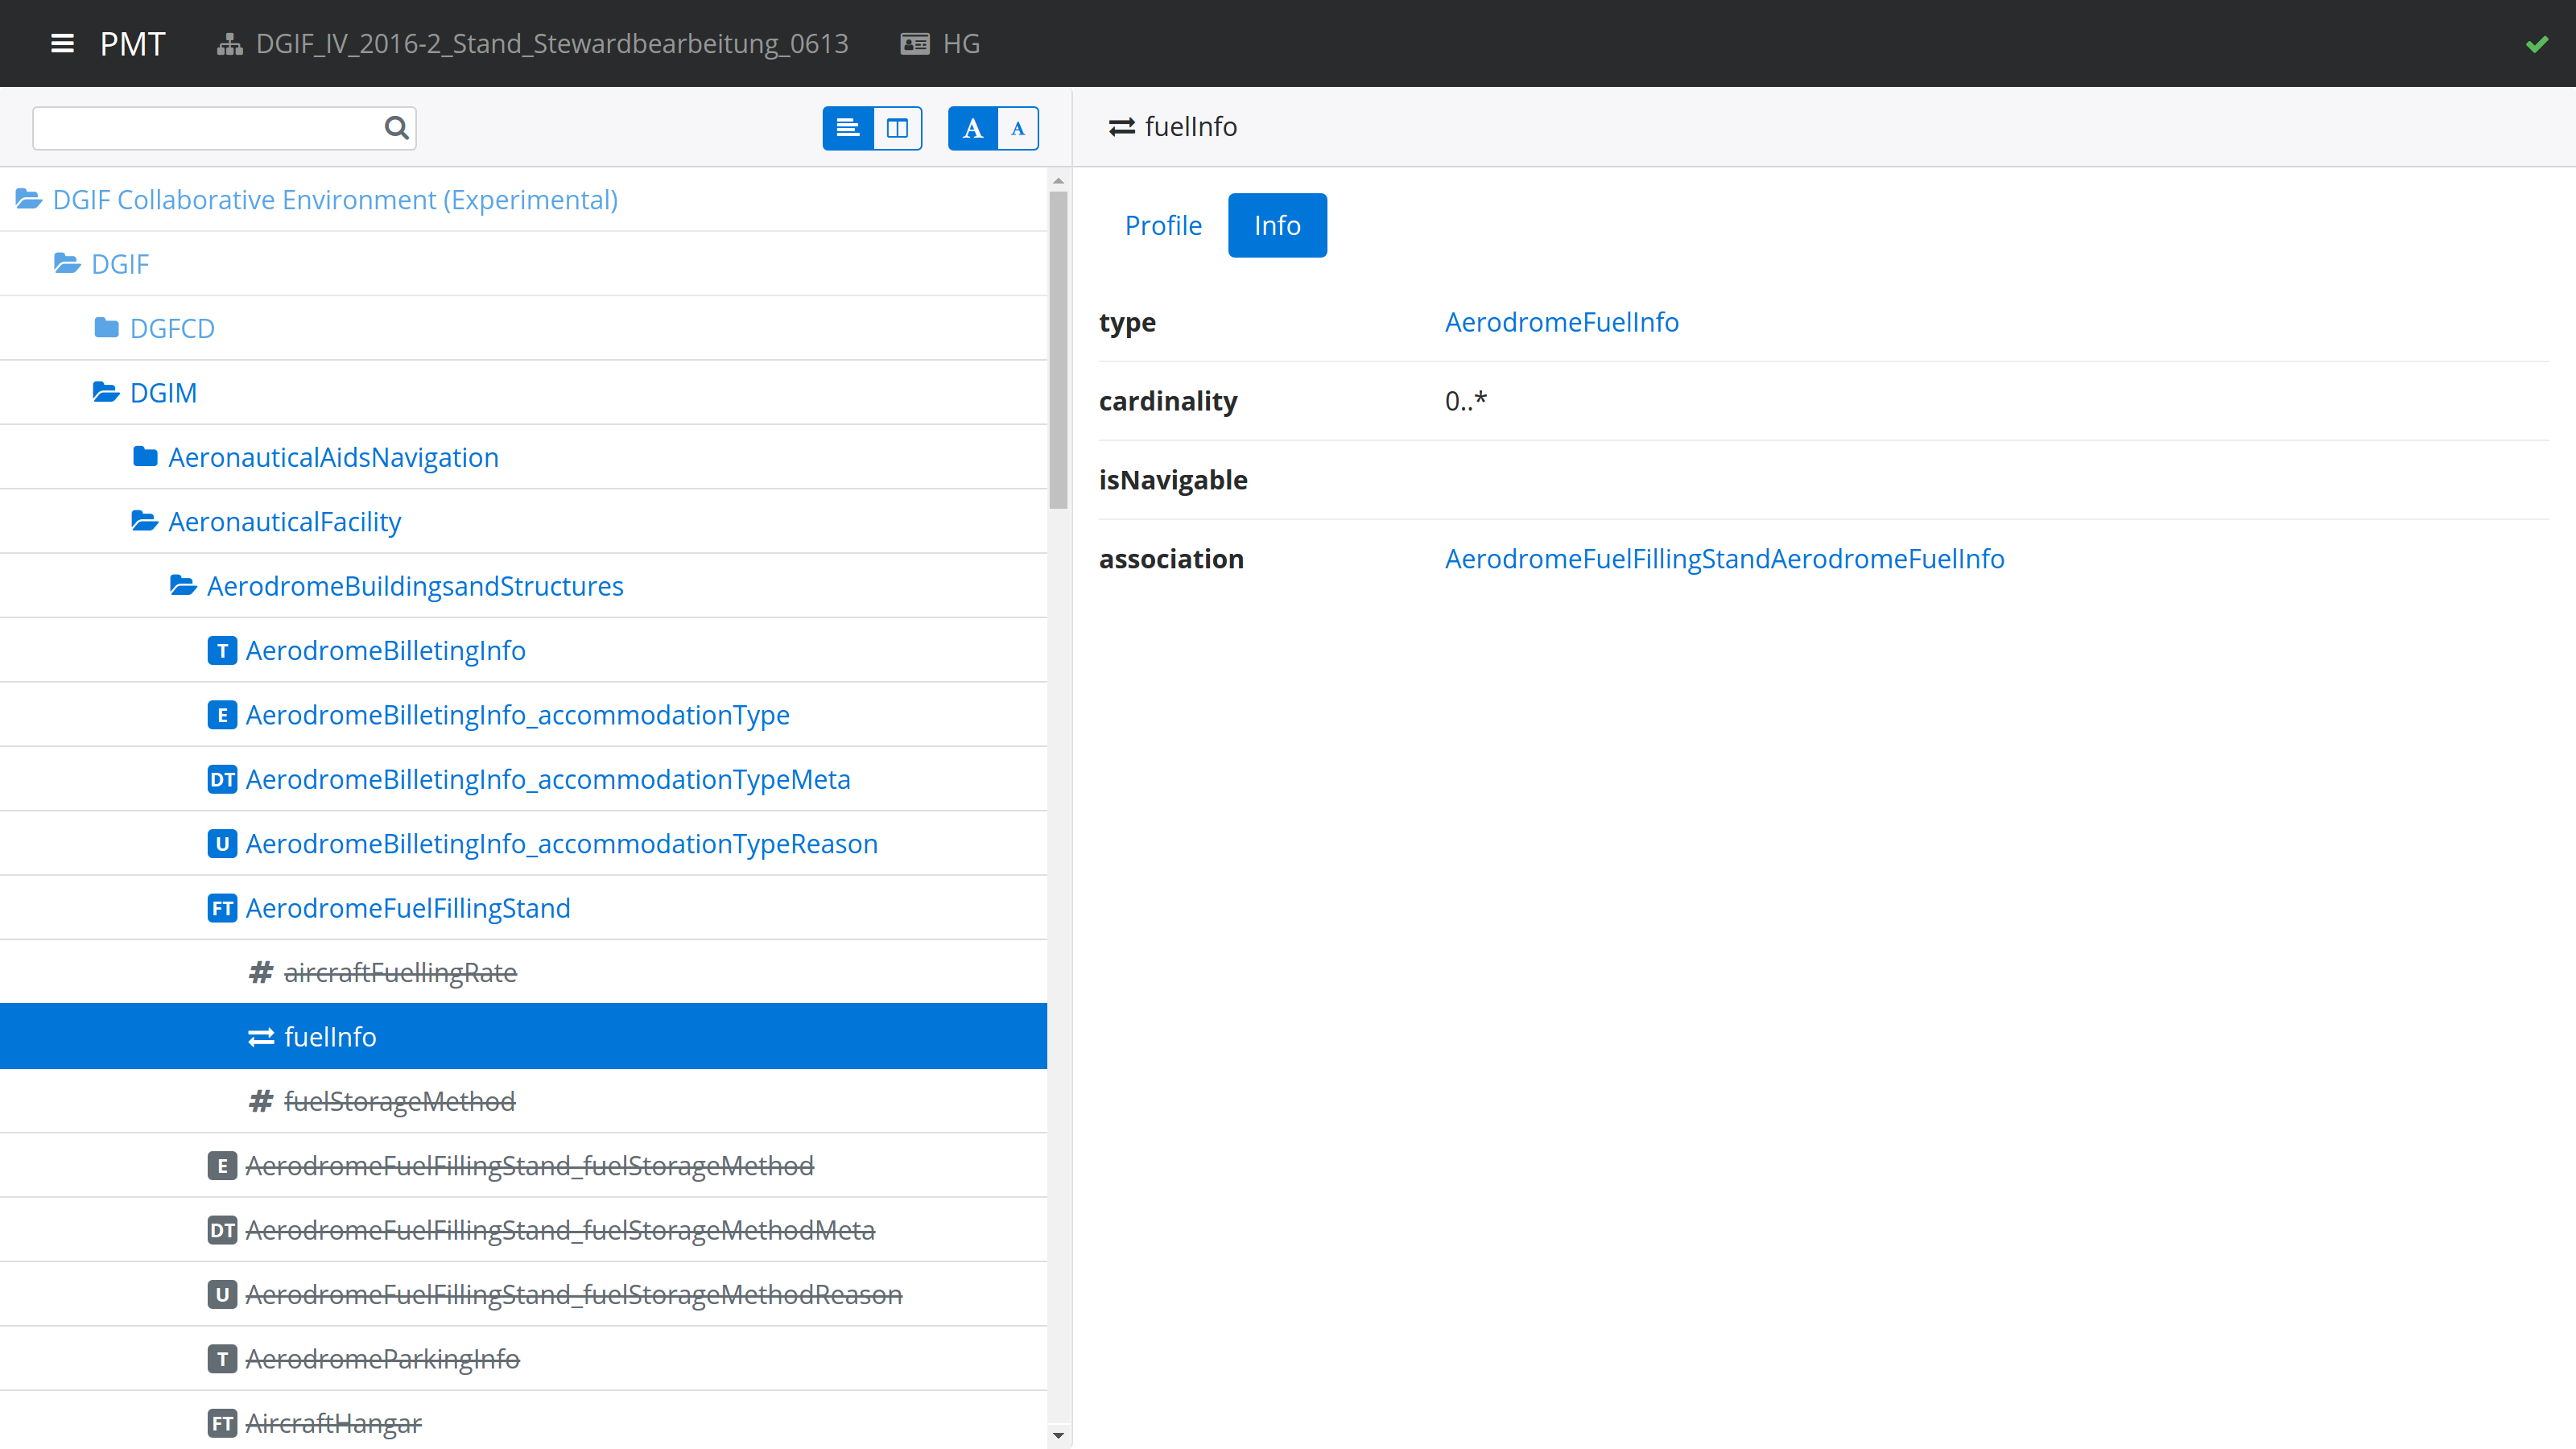
If you click on a link to an association, the info pane will show the information for the association. However, the association is not shown in the model tree. The information for the association includes links to its two association roles.
Navigation
When you select model elements in the Model tree or follow links in the Details pane, the URL in the browser address bar changes accordingly. That means you can use the browsers back and forward buttons to navigate through the history of selected items. It also means you can copy the URL and open it in a different browser to open the PMT with the same model element selected.
Consistency checks
The PMT continuously checks the consistency of the profile that is being edited. When you import a model file, the consistency for every profile in the model file will be checked during the import. When you change the profile information for a class or property or the editability of a package, the consistency of the selected profile will be checked.
If the selected profile has consistency errors, a red circle with the numbers of errors will be displayed at the top right of the PMT window. When you click on the circle, the list of errors will pop up. When you click on an error, the model browser will jump to the erroneous model element.
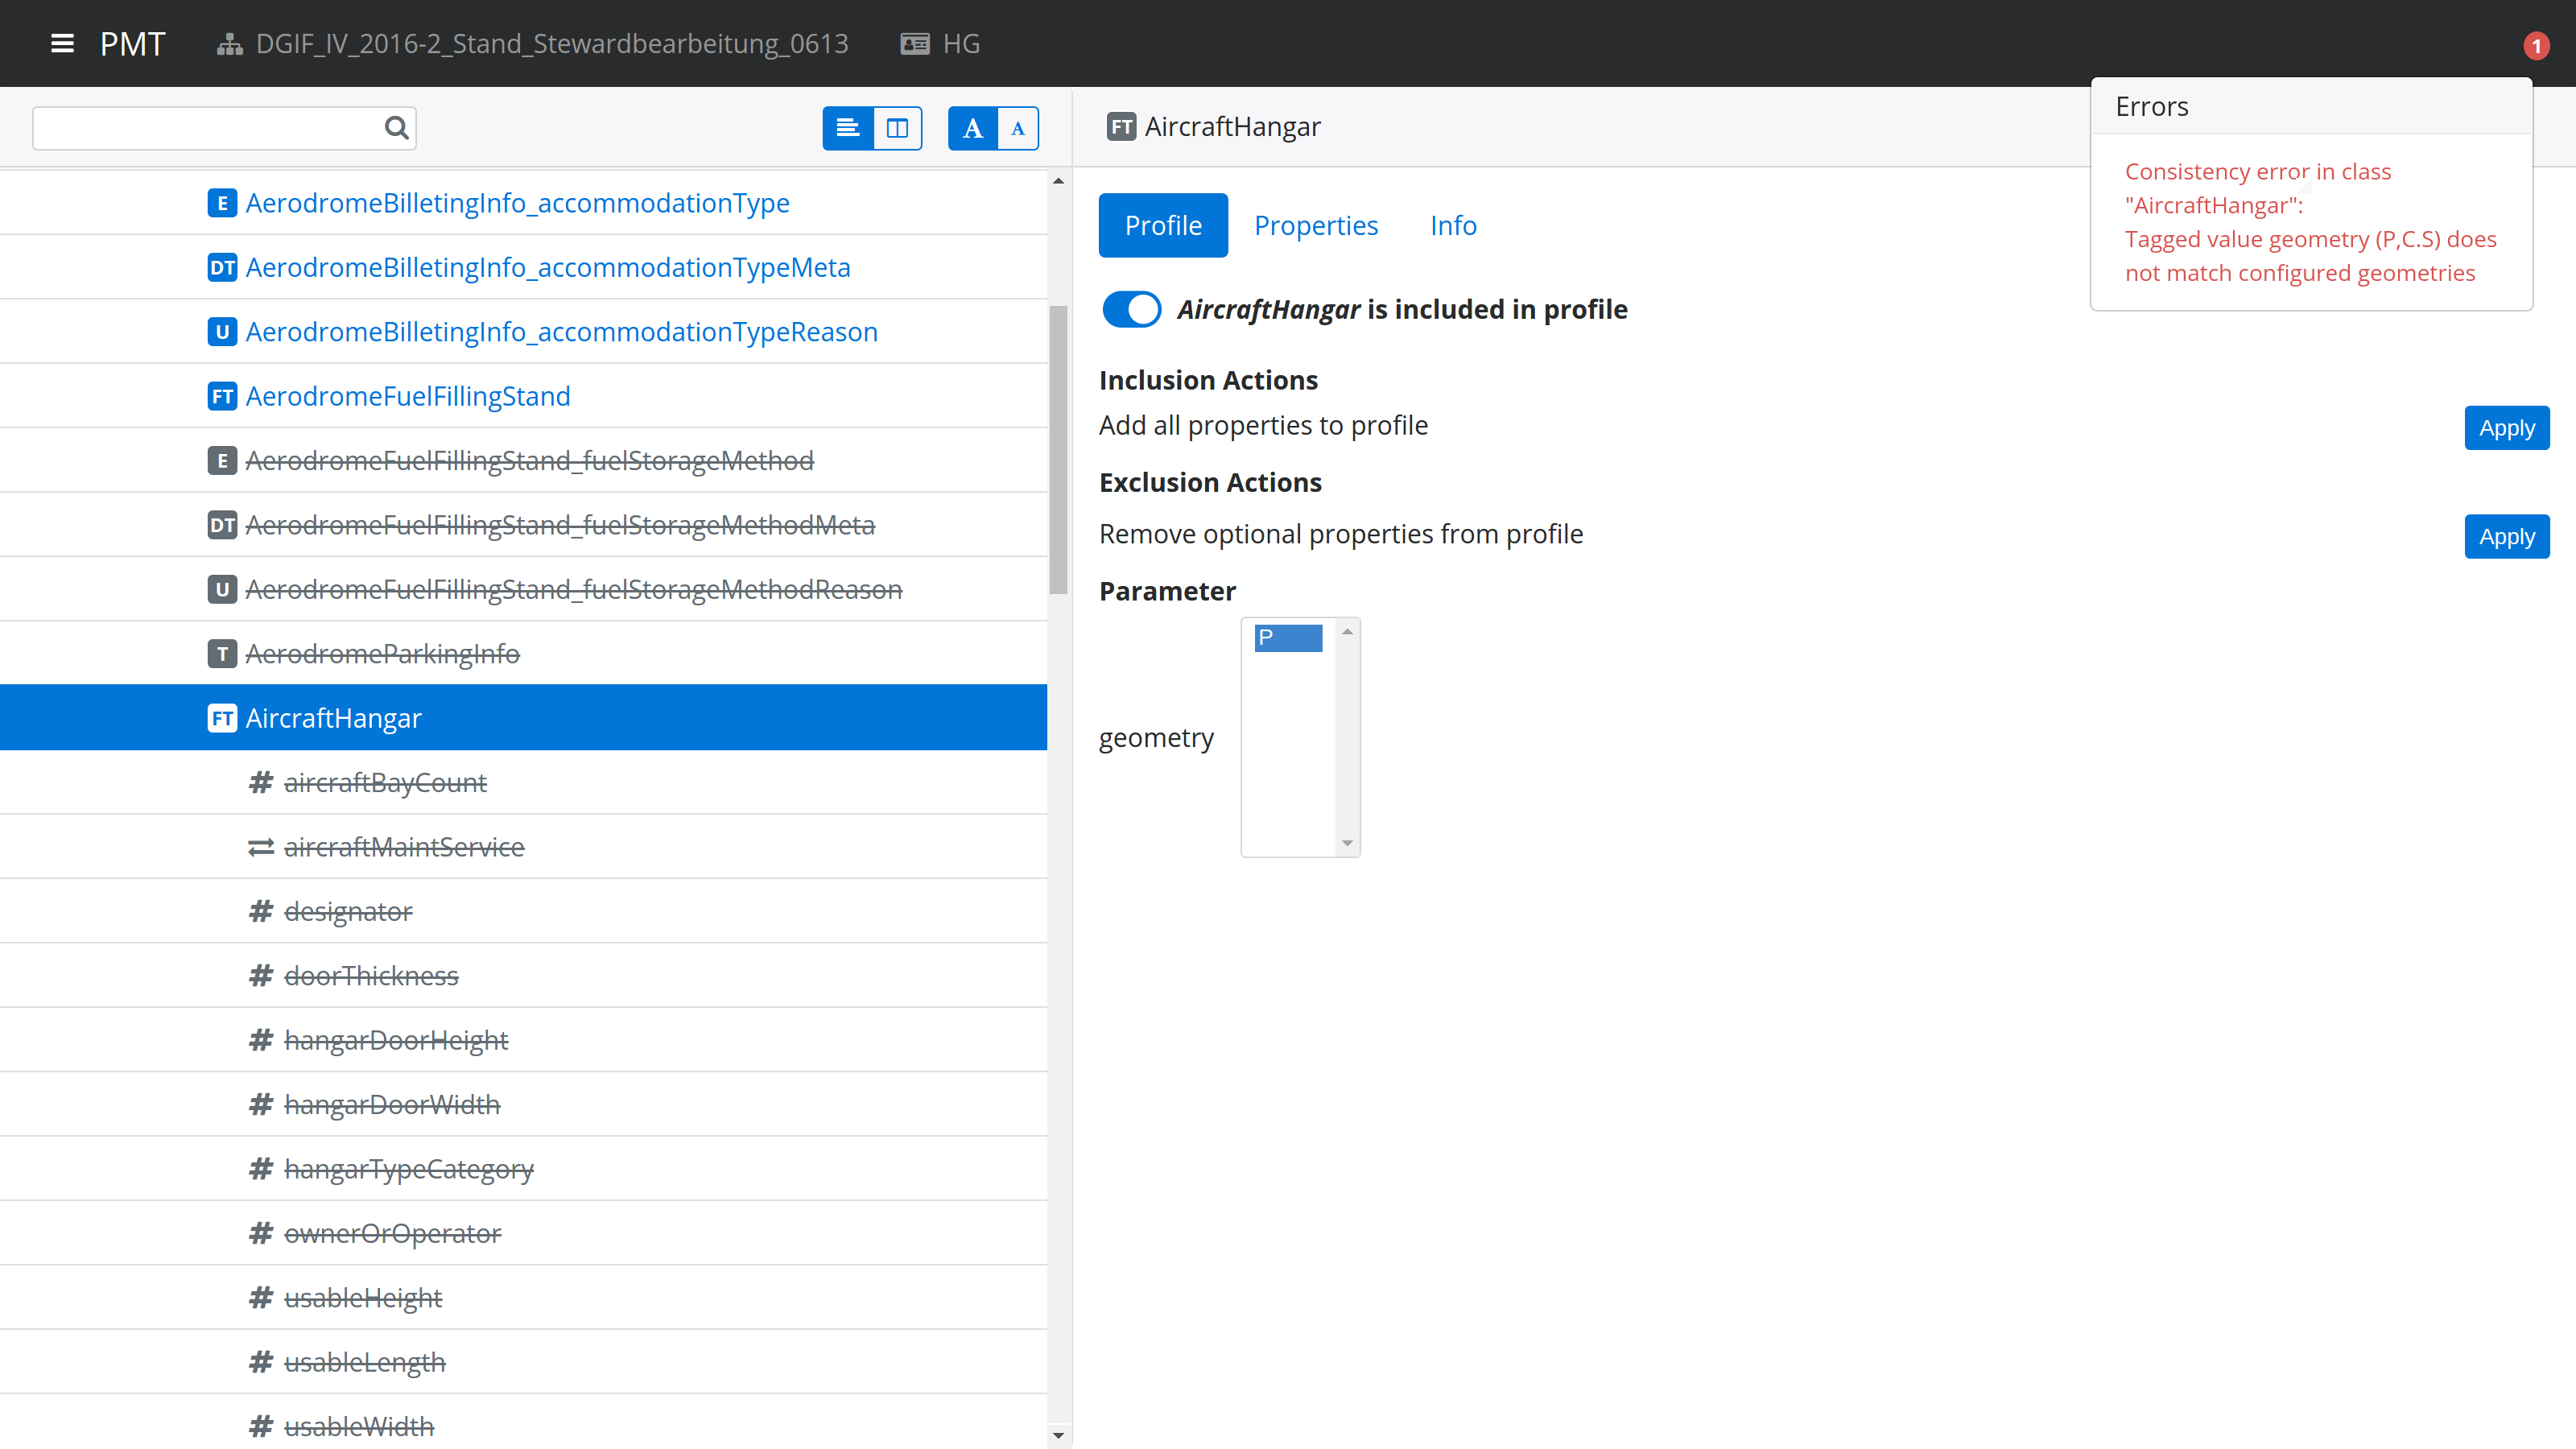
If the selected profile has no errors, you will see a green check mark instead of the red circle. During write transactions, you will see a spinner icon in the same place.
The following checks are available:
-
If a class is included in the profile, its superclasses have to be included as well, except when they are contained in a non-editable package.
-
If a class is included in the profile, its mandatory properties have to be included as well, unless the class is an enumeration or code list.
-
If a property is included in the profile, its containing class has to be included as well.
-
If a property is included in the profile, its type class has to be included as well, except when it is contained in a non-editable package.
-
If a class with stereotype featuretype has tagged value geometry with a list of geometry type identifiers, that list has to be a subset of the PMTs list (which is a global configuration option, see the PMT administrator manual for further details). The list of geometry types defined via the profile parameter geometry has to be a subset of the intersection of the geometry types defined by the tagged value geometry and the PMTs list.
-
The profile parameter isNavigable may only be specified for association roles. It may not render an association unnavigable.
-
The profile parameter cardinality may only restrict the cardinality of a property. It may not extend the cardinality range.
Administrator Manual
Installation
The initial version of the PMT has been developed for installation on Windows Server 2008/2012 R2. The installation of the PMT in that environment is documented in the following sections.
| Support for other server environments can be added in the future. Contributions and support are welcome! |
MongoDB
| The following instructions assume that MongoDB is installed on the same server as the PMT. You can also install MongoDB on a separate Linux server and adjust the MongoDB Connection URI in the configuration. |
-
Download the latest stable release of MongoDB Community Server for Windows Server 2008 R2 64-bit and later with SSL from: https://www.mongodb.com/download-center?jmp=nav#community
-
The PMT requires at least version 3.4.x of MongoDB.
-
-
Follow these instructions to install MongoDB for Windows: https://docs.mongodb.com/manual/tutorial/install-mongodb-on-windows/#install-mongodb-community-edition
-
After the installation, follow these instructions to create a Windows Service for MongoDB: https://docs.mongodb.com/manual/tutorial/install-mongodb-on-windows/#configure-a-windows-service-for-mongodb-community-edition
-
Optionally, to enable authentication, follow these instructions: https://docs.mongodb.com/manual/tutorial/enable-authentication/ If you do that, make sure to create a database and an according user with write access for the PMT. After installing the latter, you have to change the MongoDB Connection URI accordingly, see https://github.com/ShapeChange/ProfileManagementTool/wiki/Configuration
Node.js
-
Download the latest LTS version of the 64-bit Windows Installer for Node.js from: https://nodejs.org/en/download/
-
The PMT requires version 10.x of Node.js.
-
-
Execute the installer with the default settings and follow the instructions.
-
To verify the installation, open a command prompt and run "node -v". That should print the installed Node.js version.
PMT
Two options are available for installing the PMT:
-
If you are installing the PMT for the first time, perform the full installation.
-
If a prior version of the PMT has already been installed and you want to install a newer version, perform an upgrade.
Full Installation
-
Download the latest release (pmt-win-1.0.3.zip and pmt-{release}.tgz) from here: https://github.com/ShapeChange/ProfileManagementTool/releases/latest
-
Unzip pmt-win-1.0.3.zip to a directory of your choice, e.g. C:\Program Files\pmt. This file contains a wrapper for the application to run it as a windows service.
-
Copy pmt-{release}.tgz to the installation directory.
-
Open a command prompt with administrative rights and go to the installation directory, e.g. C:\Program Files\pmt.
-
Run the command
npm install pmt-{release}.tgzto install the application itself. It will automatically be registered as a windows service. -
Open http://localhost in a web browser if the browser is running on the same machine, otherwise use the respective hostname.
Upgrade
-
Download the latest release (pmt-{release}.tgz) from https://github.com/ShapeChange/ProfileManagementTool/releases/latest and copy it to the installation directory of the PMT.
-
Run the command
npm install pmt-{release}.tgzto upgrade the application. The windows service will automatically be stopped before upgrading and started again when the upgrade is complete.
Configuration
To change the PMT configuration, edit the file config.js in the installation folder of the PMT. You need to restart the PMT windows service to apply the new settings.
The default configuration looks like this:
{
    "server": {
        "port": 80
    },
    "db": {
        "url": "mongodb://localhost/pmt01"
    },
    "app": {
        "geometry": ["P", "C", "S", "So", "MP", "MC", "MS", "MSo"],
        "search": {
            "descriptors": ["alias", "description", "definition"],
            "taggedValues": ["name"]
        },
        "propertyInfos": {
            "defaultValues": {
                "cardinality": "1..1",
                "isNavigable": true,
                "isDerived": false,
                "isReadOnly": false,
                "isAttribute": true,
                "isOrdered": false,
                "isUnique": true,
                "isComposition": false,
                "isAggregation": false,
                "isOwned": false
            },
            "hidden": [{
                "keys": [
                    "cardinality",
                    "isNavigable",
                    "isDerived",
                    "isReadOnly",
                    "isAttribute",
                    "isOrdered",
                    "isUnique",
                    "isComposition",
                    "isAggregation",
                    "isOwned"
                ],
                "condition": "cls.stereotypes.includes('enumeration') || cls.stereotypes.includes('codelist')"
            }]
        },
        "classInfos": {
            "defaultValues": {
                "isAbstract": false,
                "isLeaf": false
            }
        }
    }
}
Web Server Port
By default, the PMT server listens on port 80. You can use a different port by setting the server.port in the configuration file.
MongoDB URI
If the MongoDB instance that the PMT should use is running on a different machine, on a non-default port, or uses authentication, you can change the setting of db.url in the configuration file.
| The value needs to be a valid MongoDB Connection String URI, see https://docs.mongodb.com/manual/reference/connection-string/. |
Application Settings
Geometry
To change the allowed geometries for featuretypes, update the setting of app.geometry in the configuration file.
Search
You can change which descriptors or tagged values are taken into consideration by the search function. To do so adjust app.search.descriptors or app.search.taggedValues in the configuration file.
Hide property infos
You can hide certain property infos depending on the class stereotype. To do so adjust app.propertyInfos.hidden in the configuration file.
Default property infos
If you want to display additional default property infos in the Display default values view, you can add them to app.propertyInfos.defaultValues in the configuration file.
Default class infos
If you want to display additional default class infos in the Display default values view, you can add them to app.classInfos.defaultValues in the configuration file.
Internationalization
The PMT is prepared for user interface internationalization, so it is possible to add new languages. For this purpose, i18next is used.
However, you cannot just add new languages to your installation, because the JavaScript files in the PMT release are optimized and compressed for performance reasons.
The easiest way to add a new language to the PMT is a pull request to the Github repository at https://github.com/ShapeChange/ProfileManagementTool.
You would have to copy the file at https://github.com/ShapeChange/ProfileManagementTool/tree/master/pmt-app/locales/en/app.json to a new folder according to its locale. For example, a German translation would be found at https://github.com/ShapeChange/ProfileManagementTool/tree/master/pmt-app/locales/de/app.json.
After the pull request has been accepted, a new version of the PMT would be released that includes the new language.